
Build a garden конструктор
Обновлено: 08.05.2024
It is the future and we have made significant progress in building brain interfaces. We use it to augment our vision and sometimes, change our perception of the world.
An enterprising gardener decides to build the ultimate garden experience. A blank piece of land. A blank canvas waiting to be filled with the garden designer's vision. Elements of the garden can be controlled by the garden's designer. It is dynamic, and personalized to the user. How can the designer use machine learning to build such a garden?
Let’s train a model that will pick a garden configuration to show to the user. This model optimizes for a goal. A general approach is:
1. Pick a goal. Let’s pick ‘High probability of a return visit’ aka retention.
2. Form a hypothesis for the factors that affect the goal. These become features in the ML model. Examples: configuration of the garden, total number of people in the garden when you visit, are you alone, your age, weather, are you visiting with children, etc. For the purposes of this article, let’s imagine that we have data for anything that we dream up, like the current mood of a person.
3. Since there are a large number of configurations, it may not be possible to predict the goal from a single configuration with high accuracy. Find an intermediate representation of the configuration for user happiness. Since we have access to the user’s mood, we measure happiness as the user walks around the garden. We build a ‘happiness journey’ and quantify it in some way. We then use this happiness journey as a feature in the model to predict the goal
4. When a user enters the garden, you know the happiness journey that the user needs to be given to optimize for the goal.
5. Use an approach like approximate dynamic programming to decide what garden configuration to use to achieve the happiness journey
A garden can be fully described using a configuration like this.

A perky MBA student shows up.
“Have you thought about adding a tea shop?
You’ll make more money”
“Great idea. Let me start experimenting with that”
We now have a new goal — maximise tea shop revenue. We repeat the process and now have 2 models — one optimizing for retention and one maximizing tea shop revenue.
Running these models together might result in conflicting configurations. For example — if it is a hot day, the tea shop revenue model might result in a configuration that places vanilla plants all over and gets you hungry for some sponge cake. The retention model might leave an open space in the garden to soak up the sun (quite a common thing in London), while being surrounded by mango trees. How does one prioritize? Here are three possible approaches.
Stack ranking goals in priority order
A basic ordering for goals can be used. In case of a conflict, choose retention over monetization. But real life is more complex. In free to play games, retention and monetization usually have an inverse relationship. If you do things in your game that introduce more monetization triggers and currency pinches, you might increase monetization but you will reduce retention. A raging debate I often had with fellow PMs was — “Is ARPDAU (Average Revenue per Daily Active User) increasing because people are leaving the game or is it because more people are spending in the game. Which one is it and which one is better?”
Metric of Everything
One approach to balancing conflicting goals is to find an umbrella metric that encapsulates every other metric you care about. This could be revenue or Lifetime Value (LTV). The LTV equation for a set of users is (% users still in the game) x (money spent in the game per user), integrated over time i.e. retention x monetization. This sounds like a great idea in theory — let’s just do everything in the game to maximise LTV and we’re done!
If we train a model with LTV as the goal, we depend on the model to learn the relationship between retention and monetization. This is a dangerous situation because it is difficult to make product experience changes and test their effectiveness on finer grained metrics. Example: engagement with the eucalyptus trees in the garden.
The model will reinforce tradeoffs between retention and monetization that have worked well in the past, but such tradeoffs may not be in line with the product’s strategic priorities. “We need to hit our revenue target this month, do what it takes” or “Let’s focus on getting our early user funnel right”.
Model weights
This is a nuanced version of the stack ranking approach. Say we have a retention model (Model A) and a monetization model (Model B), and these models are predicting a probability between 0 and 1. If we rank retention over monetization, we give Model A a weighting of 1 and Model B a weighting of 0. This product decision can be encapsulated as 1 x Model A + 0 x Model B.
Model weights can be generalized as:

Coming up with the right weights is a subjective product decision. “For users coming to the garden for the first time, let’s not try to get them into the tea shop during their first visit” or “Increase the monetization model weight by 5% each time the user visits so we create an increasing likelihood of monetization with each visit”.
The best part is that nobody knows what will work. What is the definition of ‘work’ anyway — how do you define success in a machine learning environment with competing goals? It is impossible to know beforehand because the experience of the user is one step removed from the product decision. We come up with weights for the models, and the combinations result in a specific type of user behavior. This user behavior acts as training data for the model. This forms a very tight learning loop.

The beauty of such a learning loop is that it is now possible to experiment by serving personalized user experiences.
Experimentation in machine learning models is often associated with trying out different algorithms, tuning parameters, changing training features etc to optimize for a goal. When using machine learning to change core product experience, the learning loop allows for product managers and data scientists to experiment on user experience itself. This is especially beneficial because products change all the time — new features are built, new content is shipped, different types of users show up to use your product.
“Products change, models need to keep up”
A culture of continuous experimentation is critical to using ML for product experiences. Product decisions can be experimented on by trying out different model weights. New models are built with different feature combinations, new goals are added and changes in other areas of the product will change model behavior. Experimentation is key to ML product management.
Next: Exploring the difficulty space
(Link next Friday)
5.0 Оценок: 5 (Ваша: )
Мы собрали 10 популярных программ, чтобы вы могли самостоятельно разработать дизайн своего участка или сада. В список вошли бесплатные программы для ландшафтного дизайна для новичков, софт для профессионалов и приложения, которыми можно пользоваться с мобильного телефона. Программы для проектирования домов работают по тому же принципу, но в них обычно меньше объектов растений — они направлены на интерьеры внутренних комнат.

Ландшафтный дизайн может быть настоящим искусством
Бесплатные программы и сервисы для ландшафтного дизайна для начинающих
Новичкам в дизайне тоже хочется красивый сад, но страшно запутаться в мудреных интерфейсах профессионального софта. Вот программы для проектирования участка для начинающих. Простые в управлении и в то же время функциональные:
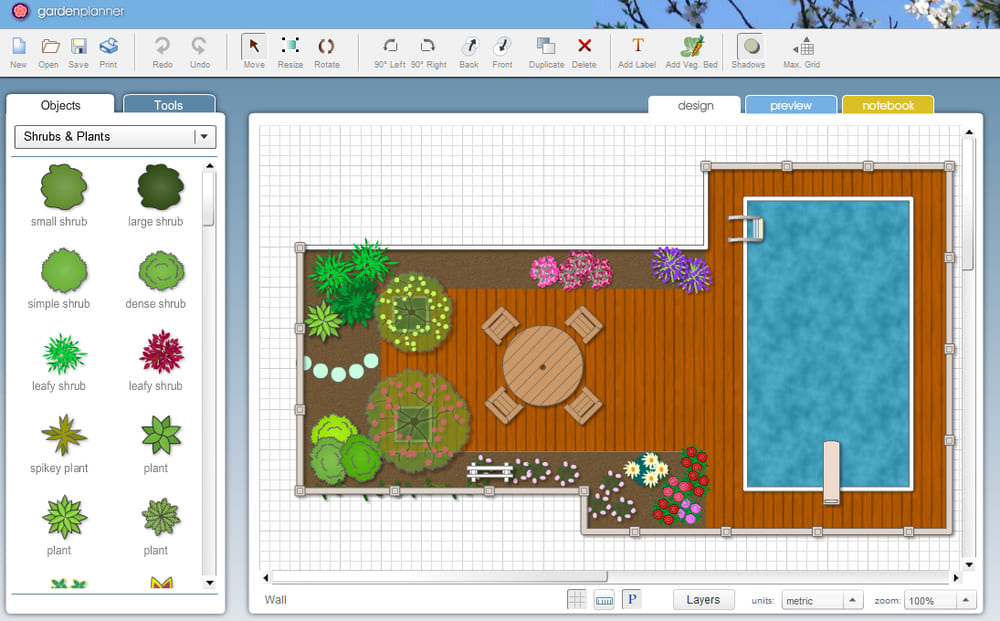
Garden Planner 3
Работает по принципу «Drag and drop», т.е. через перетаскивание объектов мышкой. Интерфейс несложный и подойдет для новичков. Программа поможет нарисовать, где будут находиться основные постройки, а где стоит посадить жасмин, расположить бассейн или поставить скамейки. В базе более 1200 объектов цветов, деревьев, живых изгородей, разных видов почвы. В каталоге есть даже животные, так что вы легко сможете представить, как ваш любимый песик будет гулять по вымощенной дорожке в саду.
Удобно, что растения в каталоге можно выбрать, исходя из климата, где вы живете. В настройках приложения есть возможность установить максимальную и минимальную температуру воздуха, настроить освещенность.
Недостатки программы. Работает только на английском языке и не умеет переводить чертеж в 3D-проекцию. Бесплатная версия есть, но выводит результат с водяными знаками, а через 15 дней и вовсе заканчивает работу. Лицензия дорогая — 33.99$единоразово.
На Windows ниже 10 версии не запустится.
Garden Planner 3
X-Designer
Проектировщик на русском языке. Прост в управлении и стоит недорого — 229 рублей за полную версию. С его помощью можно разместить на участке хозяйственные и жилые постройки, обустроить мангальную зону, продумать, куда посадить плодовые деревья или декоративные кусты. Есть функция моделирования ландшафта — прямо на чертеже можно отразить неровности почвы, «насыпать» холм.
Чтобы увидеть, как будет выглядеть проект в разгар весны или поздней осенью, поменяйте сезон через настройки. Там же в настройках можно выставить время суток и рассмотреть свой сад в утренние часы или на закате. Готовую планировку можно просмотреть в трехмерном виде и распечатать выбранные кадры этого плана.
Недостатки программы. Низкое качество графики, поскольку софт ориентирован на начинающего пользователя и не стремится к высокой детализации. Собственные модели и текстуры покрытий тоже создавать не получится.

Летний режим в планировщике участка X-designer
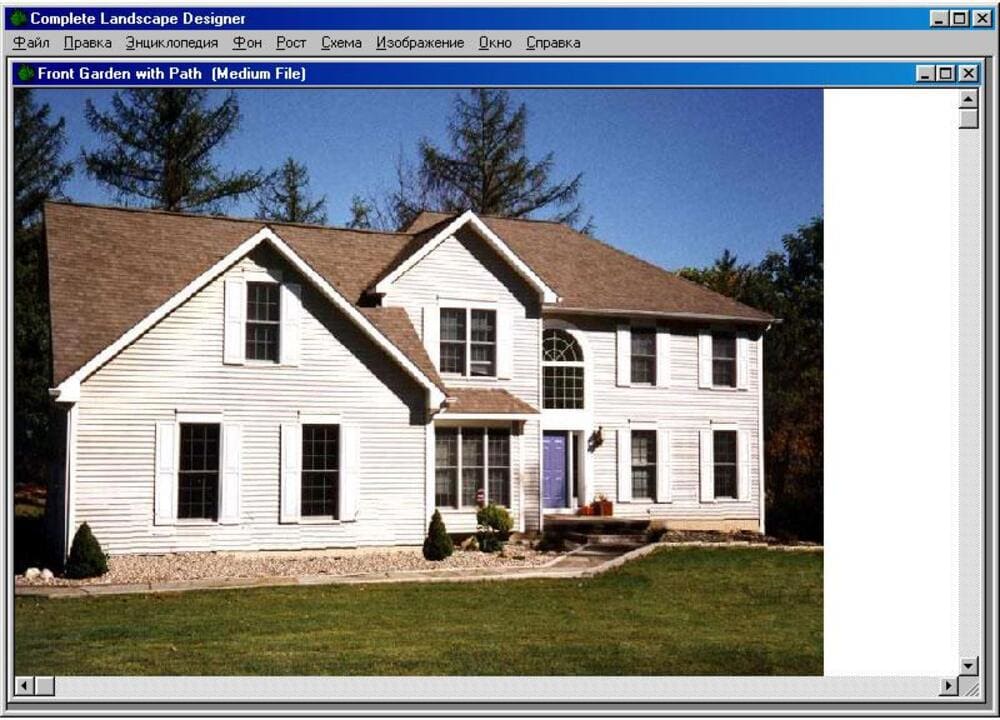
Complete Landscape Designer 3
Еще одна программа планировки участка, которая работает не только с пустым фоном и готовыми шаблонами садов, но и с фотографиями пользователя. Нужно только отсканировать реальный снимок и перенести его в базу редактора.
При этом корректировать план будет легко, т.к. поиск по параметрам хорошо продуман. Кликаете, например, «светолюбивые растения» или «почва нейтральной кислотности», и получаете результаты по запросу списком. Таким образом, программа заботится не только о внешнем виде вашего сада в проекте, но и поможет реально воплотить проект в условиях конкретной местности — горной, чернозема и т.д.
В базе хранится более 2000 растений и 350 архитектурных объектов — дорожки, водоемы, беседки и т.д. Готовый проект можно рассмотреть в виде 360-градусной панорамы. При покупке полной версии пользователь получает пакет Landscape Library Manager, чтобы добавлять в каталог собственные примеры растений и архитектурных моделей.
Недостатки программы. Есть только двумерный вариант просмотра в виде фото — сбоку или сзади проект не рассмотреть. А еще здесь нельзя настроить освещение.
Визуализация дизайна в Complete Landscape Designer 3
My Garden Online
Бесплатный онлайн-сервис для планировки сада и автоматической системы полива. Предлагает шаблоны участков, которые пользователь может редактировать под себя — изменять садовые покрытия, перемещать дождеватели, растения и постройки.
Для семей с детьми в каталоге есть надувные батуты, качели, песочницы, горка. Все объекты легко менять по размерам. Дополните проект фонтаном или прудом, мангалом, футбольными воротами или шатром для вечеринок — библиотека продумана удачно и учитывает самые разные интересы.
Недостатки программы. Полностью зависит от интернета. Нельзя менять текстуры в разделах «Мебель и досуг», «Пруды и бассейны». Нет трехмерной визуализации.
My Garden Online
Лучшие решения для профессионального проектирования ландшафта
Функциональные и мощные проектировщики для тех, кто любит детально проработать каждый квадратный метр территории частного дома.
Realtime Landscaping Architect
Лучший софт для создания ландшафтных дизайнов 3D профессионального уровня. Умеет не только «собирать» проекты с нуля, но и работает с фотографиями и чертежами уже готовых площадок. В нем можно проектировать уютные патио (внутренние дворики), просторные дворы, бассейны и террасы. В библиотеке программы содержится 17 000 объектов, из которых 7400 — это растения. Многолетние и однолетние цветы, кустарники, кактусы и тропические виды насаждений — все варианты разбиты по климатическим категориям.
Для тех, кто хочет упростить дальнейший уход за садом, есть шаблоны оросительных систем. Любителям бассейнов понравится, что водоем можно спроектировать со скалами, трамплинами или водной горкой. Неровности поверхности — низины, откосы, холмы — настраиваются вручную. Использованные материалы можно вывести в виде сметы.
Недостатки программы. Очень дорогая лицензия — 399$. Бесплатная версия есть, но в ней мало объектов и на каждый проект накладывается водяной знак. Русский язык не поддерживает ни платный, ни бесплатный вариант.
3D-визуализация в Realtime Landscaping Architect
Если на участке уже есть загородный дом, вы можете изменить дизайн и внутри него. Загрузите программу Дизайн Интерьера 3D, начертите схему площади и приступите к перепланировке внутреннего убранства. Примерьте новый цвет стен, добавьте в проект мебель и аксессуары из каталога, повесьте люстру и выберите красивые шторы. Все текстуры и цвета легко менять — можно брать варианты из встроенной библиотеки или добавлять свои с ПК.
Punch Home Design
Структура меню построена интуитивно понятно, поэтому отсутствие русского языка не мешает. Приложение помогает детально разработать проект двора со всеми садово-парковыми атрибутами. В проекте можно «вырыть» котлован под пруд или бассейн, «высадить» декоративные растения, проложить дорожки, расставить фонари и скамейки. Все объекты настраиваются по высоте и ширине, тротуары легко делаются изогнутыми.
Особый модуль анализирует эстетическую совместимость материалов и объектов. Используя его, вы избежите хаоса и безвкусицы на придомовом участке. Готовую планировку можно рассмотреть под разным освещением с помощью инструмента Lighting.
Недостатки программы. Не поддерживается русский язык и нет возможности добавлять собственные объекты и текстуры в каталог. Чтобы импортировать в проект бассейн, например, нужно загружать дополнительный модуль PoolDesigner, который действует только в версии Platinum. Пользоваться программой бесплатно можно 30 дней, но сначала придется заплатить 100$ за лицензию, а ближе к концу месяца вернуть ПО «по гарантии».
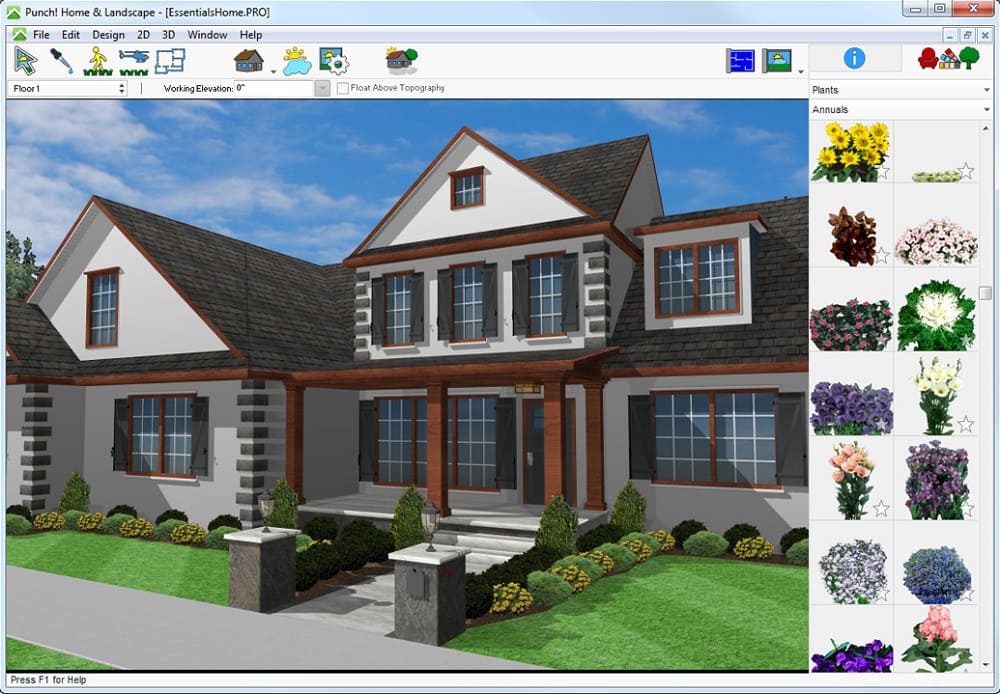
Каталог декоративных растений в Punch Home Design
Home Designer
Разработка от известного Chief Architect — производителя софта для интерьерных дизайнеров. ПО поддерживает работу с пользовательскими чертежами: загрузите фотографию участка и дополните проект объектами из встроенной библиотеки. А выбрать есть из чего: в каталоге более 5500 наименований, в том числе 3600 растений.
Особенность программы в том, что вы можете настраивать положение земельного участка, используя данные GPS. ПО проанализирует высоту местности и выставит освещение в соответствии с этой координатой. Если в настройках задать климат, система сможет дать рекомендации, какие из зеленых насаждений лучше приживутся на вашем участке. Готовый проект можно осмотреть в режиме 3D, а использованные материалы вывести в виде сметы.
Недостатки программы. Работает только на английском языке. Платный пакет минимум 99$. Не поддерживает Windows XP, 7, 8, 2000.
Трехмерный режим просмотра в Home Designer
Мобильные приложения для планировки участка
Программы для планирования участка, которыми можно пользоваться в любое время и в любом месте. Нужен только смартфон или планшет на Андроиде или iOS.
PRO Landscape Companion
Приложение можно скачать бесплатно. В каталоге более 18 000 объектов ландшафтного дизайна: скульптуры, растения для разных климатических зон, садовые постройки и водоемы. Проекты разрабатываются на основе снимка, сделанного на телефон и планшет. Лишние объекты легко удалить с фото и заменить их теми, что понравятся в каталоге.
Недостатки программы. Слабая тех. поддержка. Меню не русифицировано.
Выбор кустарников в приложении
Home Outside
Приложение для iPhone и iPad для проектирования ландшафтного дизайна с нуля. Техподдержка любезно помогает пользователям советами по дизайну сада, а встроенный каталог предоставляет разные модели растений, садовой мебели и дорожек. Результат можно сохранить в виде фото и разместить в соц. сетях.
Недостатки программы. Только на английском языке. Платная (279 рублей).
Как выглядят планы в Home Outside
Home Design 3D Outdoor/Garden
Хорошее мобильное приложение, которым пользуются уже 80 миллионов человек по всему миру. Поможет разработать дачный участок, игровую площадку или маленький дворик. В библиотеке есть модели теплиц, уличной мебели, деревья, цветы и бассейны. Готовый проект ландшафта можно рассмотреть в трехмерном изображении и загрузить в интернет, чтобы получить оценку других пользователей.
Недостатки программы. Нет привычных для российского пользователя растений — ели, сосны, рябины и т.д. Не указать точные размеры объектов, только «подгонять» вручную.
Игровая площадка с бассейном в мобильном проекте
Какую же программу выбрать?
Если не хочется долго возится с планировкой и знаний в дизайне ландшафта немного, используйте программы из первой части статьи. Для тех, кто хочет прокачаться в дизайнерском направлении, советуем сразу брать платные версии из списка профессиональных программ. Тем же, кто много находится в дороге и не всегда возит с собой ноутбук, рекомендуем попробовать мобильные приложения.
Теперь, когда план вашего сада готов и полностью соответствует фактическим размерам, вы можете с легкостью составить схему системы автоматического полива.
- Изменение участка полива
- Добавление дождевателей (автоматически)
- Размещение водоразборных колонок
- Прокладка труб (автоматически)
- Выбор системы управления поливом
- Скачивание созданной схемы и списка покупок
Приложение myGarden поможет вам оптимально разместить систему автоматического полива и линии подачи воды. Изменения можно также внести вручную. По завершении планирования можно отдельно скачать схему со списком покупок.
Создание схемы системы автоматического полива
Приложение myGarden поможет вам оптимально разместить систему автоматического полива и линии подачи воды. Изменения можно также внести вручную. По завершении планирования можно отдельно скачать схему со списком покупок.
Настроить зону полива
Какие объекты должны попадают в зону полива, а какие нет?

В зоне полива
Если объекту позволительно намокнуть, установите значок зеленого цвета, например, для мобильного гриля или цветочной клумбы.

Вне зоны полива
В случае, если объект не должен намокнуть, установите значок красного цвета, например, для постоянно установленного гриля или теплицы.
Настройки полива учитываются при автоматической расстановке дождевателей. Для каждого объекта существуют предустановки. Вы хотели бы использовать настройки по умолчанию или установить дождеватели самостоятельно?
Существующий план полива
У вас уже есть существующий план полива. Для того чтобы скорректировать площадь полива, рекомендуется убраить все трубы/дождеватели и спланировать заново.
У вас уже есть существующий план полива. Для того чтобы скорректировать площадь полива, рекомендуется убраить все трубы/дождеватели и спланировать заново, либо обновить автоматически.
Расположить дождеватели
Вы можете расположить дождеватели автоматически или вручную
Изменить регион
Europe
All other markets
Ваша учетная запись GARDENA
Введите учетные данные.
Учетная запись GARDENA
Создайте учетную запись клиента сейчас
Нужно выполнить всего несколько шагов.
Создать учетную запись
Введите имя пользователя и пароль.
Активировать учетную запись
В ближайшее время вам будет отправлено письмо на адрес [!E-MAIL]. Подтвердите учетную запись клиента, нажав на ссылку активации в письме.
Расширить учетную запись
Расширить учетную запись
Войдите в систему.
Вы вошли в систему
Теперь вы можете пользоваться всеми услугами GARDENA!
Забыли пароль?
Введите адрес своей электронной почты
В ближайшее время вы получите электронное письмо с инструкциями по сбросу пароля.
Примечание
Это приложение не оптимизировано для данного размера экрана. Для достижения оптимальных результатов используйте планшет, ноутбук или ПК.
Все равно продолжить?
Поверните устройство на 90° для переключения на альбомную ориентацию.

Примечание
Это приложение оптимизировано для использования в альбомной ориентации. Для обеспечения оптимальных результатов этому приложению требуется больше места.
Если вы используете браузер, увеличьте (разверните) окно.
Если вы используете планшет, поверните его на 90 градусов для переключения на альбомную ориентацию.
Примечание
Это приложение не оптимизировано для этого размера экрана. Совет: используйте полноразмерное окно браузера для оптимальной работы.
Home, garden, DIY, woodwork business, & moving house blog

This is great, my own workshop and I got to build it myself. I’ve been looking forward to this for years and now I’m there. I still have a little to do including a workbench, shelving, storage and running power but the essence is there and I’d like to share how I got there.
If you want to build your own flat pack garden workshop then read on to see how I did it. If you’d like to build a workshop from scratch then this post will also be worth reading: How to build a garden workshop from scratch

I had a reasonable size space to work with for this project but decided to go for a 12 x 10ft build. This would allow me to leave a reasonable amount of space between the workshop and the garden boundary. I was tempted to squeeze in a couple of extra feet but this would leave it very close to my mulberry tree. It’s strongly advised not to build near trees or bushes as these over time can grow into the building and cause damage.
Before purchasing a garden building I recommend doing your research and reading online reviews to make sure you are buying something that is good quality and right for you. There are independent websites such as What Shed that do a really thorough Garden Buildings Direct review online. Sheds and outdoor buildings are pretty costly so you want to make sure you buy right the first time. That website also has discount codes for Garden Buildings Direct so it’s definitely worth checking out to help you make the right choice and save some money.
So the building was on the way but I needed some solid ground to put it on. I knew I had a few options here but I had to consider what I could actually achieve on my own with the tools I had. I ended up going for a paving slab base. This would offer me a robust, strong and level base to build on. This part of the project was probably the most physically challenging but is actually quite easy in terms of skills required. I’d repaired some of existing patio before so I had a little experience but never attempted anything of this size. Here’s how I did it.
Building a garden shed base or patio
Materials
For the base there were a few materials required to ensure a good strong surface for the shed to sit on. These included:
-
– This stuff is perfect for creating a solid surface to lay your slabs. It consists of 1mm – 40mm jagged stones that compact down to form a strong level surface. – Combined/mixed with sharp sand to make your mortar mix (Concrete) – Mix with cement to make mortar. – I didn’t use anything fancy here, just a basic slab to support the shed.
Tools
To complete this base you will need a few basic tools and one not so basic, the cement mixer. You can try mixing the concrete by hand but for the amount required it’s much easier to buy or hire a cement mixer.
-
– Moving your materials around the garden – Mix the mortar. I purchased one and now rent it out via Fat Llama – For applying the mortar to the base – Round edge shovels are ideal for digging into the MOT materials. Flat edge shovels or spades are better for moving larger loads – I created my own out of a sledge hammer and an old slab but you can also buy or hire one – The larger the better. – to tap the slabs into place – 8m is ideal – for marking out a level area – for marking out a level area – hand protection
Step by step guide for how to create a shed base
- I started by marking out the area with some wooden pegs and string. Square this off by measuring from corner to corner until both lengths are the same.
- Level out the area. This took a lot of digging and back pain but was essential to the overall build. The overall area needs to be flat but also requires a bit of run off for surface water. So don’t worry too much about levelling this perfectly.
- Fill the area with the type 1 MOT and level off by walking over the whole space with tiny stomps steps. I used enough for about 60mm depth. In some cases you might need to go a little thicker but as my soil is mostly clay it wasn’t essential. Clay is a very tough soil that hold weight well. To calculate the amount of Type 1 MOT you require you can use this calculator.
- As you can see I had a little help.
- I used a roller and makeshift compactor to create a nice flat surface. I used a piece of wood and spirit level to get this as level as possible. It’s important to compact the sub-base as much as possible to make sure the base doesn’t sink when all the extra weight is added after.
- Mix up the concrete. I used a cement mixer because the thought of mixing all that in a wheelbarrow or mixing tray was very off putting. You can purchase one for about £230 or hire one for about £15 a day. The mix should be about 4 parts sand to 1 part cement. Water is added after to make a wet mix. There are plenty of YouTube videos to help if you get stuck.
- Using a large blob in each corner of the slab and levelling off with a large spirit level. Each slab should have about a 6mm gap and level with the last. To get a nice level base you can use a long piece of wood to lay across the slabs and gently tabs each into place with a rubber mallet.
- Ensure you follow the string line as you go along which should have a 2cm drop for every 1m. This is to allow water run off.
- Once all the slabs have been laid leave to go off for 12 – 24 hours. Now to fill the gaps. Simply mix some slightly damp sharp sand with some cement, about a 1 part cement to 2 or 3 part sand. Then using a scrapper push the mix into the gaps and level off with a small pipe or similar shaped tool.
That’s it for the base. Now onto the workshop. It was relatively easy to put this building together as the instructions were pretty clear.

Building a flatpack shed step by step guide
There are a few key points to take note here to ensure a good sturdy build.
- Ensure the base is completely level. Any slight unevenness will affect the way the walls and roof fit together.
- Use two drills. One for drilling pilot holes and one for screwing. This will speed up the build.
- When screwing the walls together, only use a couple of screw to start with as it’s very likely you will need to adjust each slightly.
- I managed to build most of this on my own but there were a few times I required an extra hand. Thanks wifey 🙂
- Check all the parts and arrange into piles before you start. This makes it easier to find everything and speeds up the build.
- Don’t buy cheap drill bits from eBay. I went through a pack of 10 in two days!
- Avoid rainy days. Ideal time to build would be in the summer. I was caught out by a couple of rainy days that prevented me from building. You can’t fit the roof materials when wet.
- Think about what floor you want. I went for the cheaper floor on this model but wish I’d gone for the thicker flooring. This was about an extra £150 but I think it’s worth it. I added a cheap laminate floor just to strengthen it up a bit. This cost about £50.

So far This is just a big empty space. The next stages for me to finish this project and make this a fully operational workshop will be:
- Add some security. I won’t be putting anything in here until I’m happy it’s protected. I’ve purchase a decent smart home Yale alarm system, home security lighting and triple bolted doors.
- Workbench with storage. I’ve got some great ideas for a workbench I intend to build myself. Stay tuned for more on this.
- Fit lighting and electrical points. Not too sure how this is going to pan out as I’m not a big fan of electricity as you can read in one of my other posts.
- A suitable path. At the moment I just have some loose paving slabs laid in the grass but this isn’t ideal so I’d like to lay a proper path with a nice border.
That’s it for now but as always, if you’d like to know more just drop me a mail.


If you liked this post then take a look at some of my others for some great ideas.
New build properties tend to be a blank canvas – indoors and outdoors. So how can you put your own stamp onto a new build garden and turn it into a beautiful outdoor room?
- Think very carefully about how you can use your garden
- Create a wish list. Which garden features are essential?
- Look at your design options. What’s your personal style?
- How much time do you want to spend on garden maintenance?
- Work out your total garden makeover budget?
- Consider asking a professional garden designer to help bring your ideas together
Turn that blank canvas into a useful space
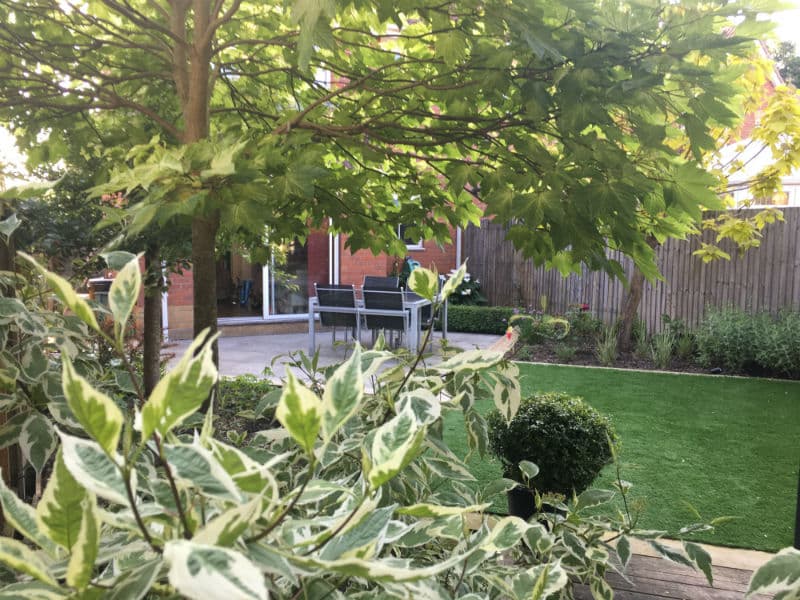
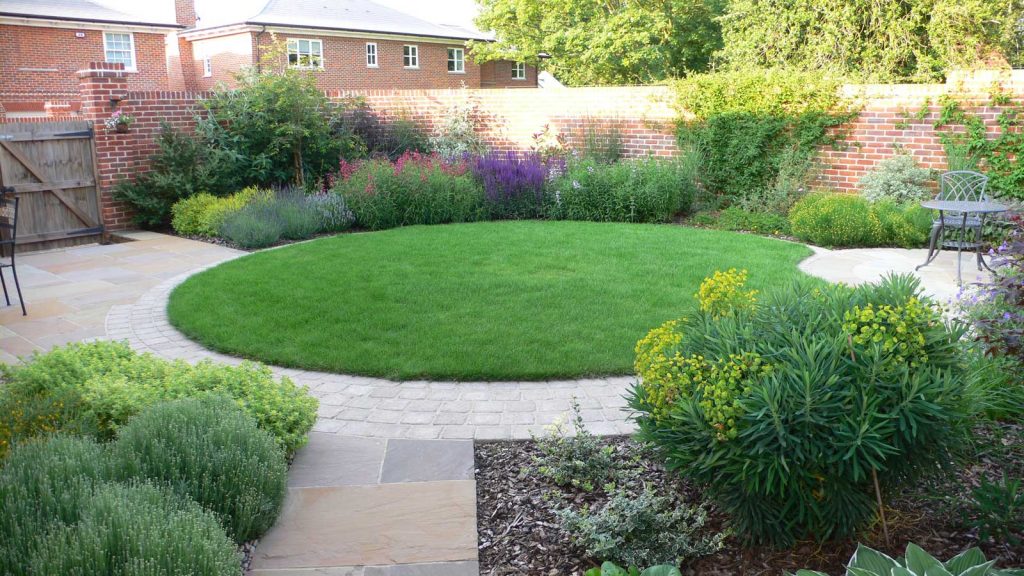
A family friendly new build garden with planting for privacy and space for al-fresco eating and outdoor play
In your opinion, what is a garden for? Is it a play area for children and pets? Somewhere for you to relax? A place that supports wildlife and the environment? A space for al fresco eating and entertaining?
A garden has so many potential functions and with clever design it really can multi-task. There’s no reason why you can’t have a wildlife friendly entertainment space that houses a home office and that looks beautiful and is loved by every member of the family.
So start by writing a list. Who is your garden for? and what features would they most want. Don’t forget to divide the list into “must haves” and “nice to haves”. Oh, and it’s also useful to make a note of what you don’t want.
New build garden ideas
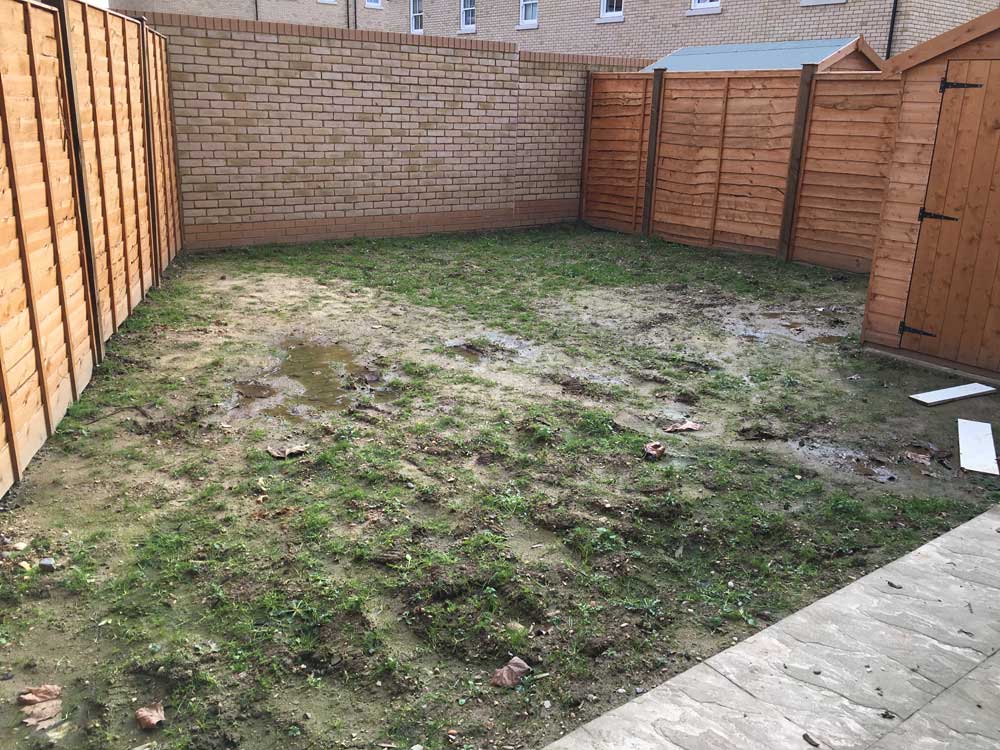
If your new build garden looks a bit like this – don’t despair. With a bit of TLC and the skills of a garden designer, it could be transformed
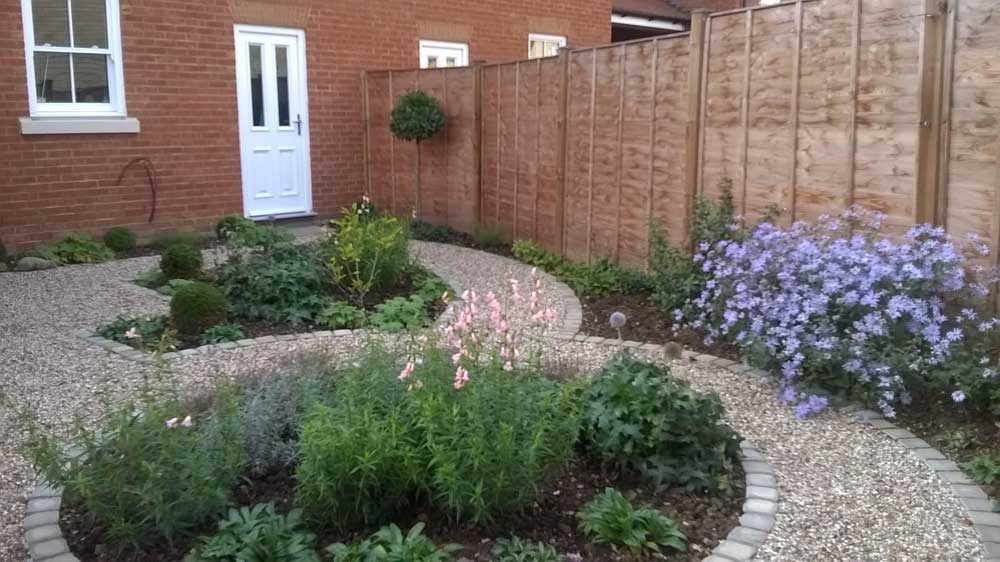
The same garden after some attention from a garden designer and a skilled landscaper.
Easy maintenance, packed with interest and beautiful from all angles – even the view from the bedroom window has been transformed.
Bringing your personality into the garden
Personality and style are hard to define. But when you see them you just know. When I’m designing a garden for a client I like to visit the garden and get to know the people who will use it. Subtle signs like what they drive, how they dress and even which mugs they use for tea and coffee tell me a lot about their likes and dislikes. If they can name or describe their favourite plants, I know they’ll be interested in the planting design. If they talk about surfaces then they’ll probably be drawn to the precision of hard landscaping.
A traditional lawn with a modern twist. Never be afraid to use shape and texture to bring personality into your garden
Do you want intimate spaces with lots of privacy or do you want your garden to feel big, spacious and open?
If you are designing a new build garden and you’re not sure what you want, why not visit some inspirational gardens? Take photographs of the elements you love and add them to a mood board. Pinterest is a great place to look for ideas. I just typed “new build gardens” into the search bar and found all sorts of ideas – some great, some not to my taste.
In the early stages of garden design, concentrate on the layout, the hard landscaping (paths, patios, decking etc). Furniture, accessories and plants come later.
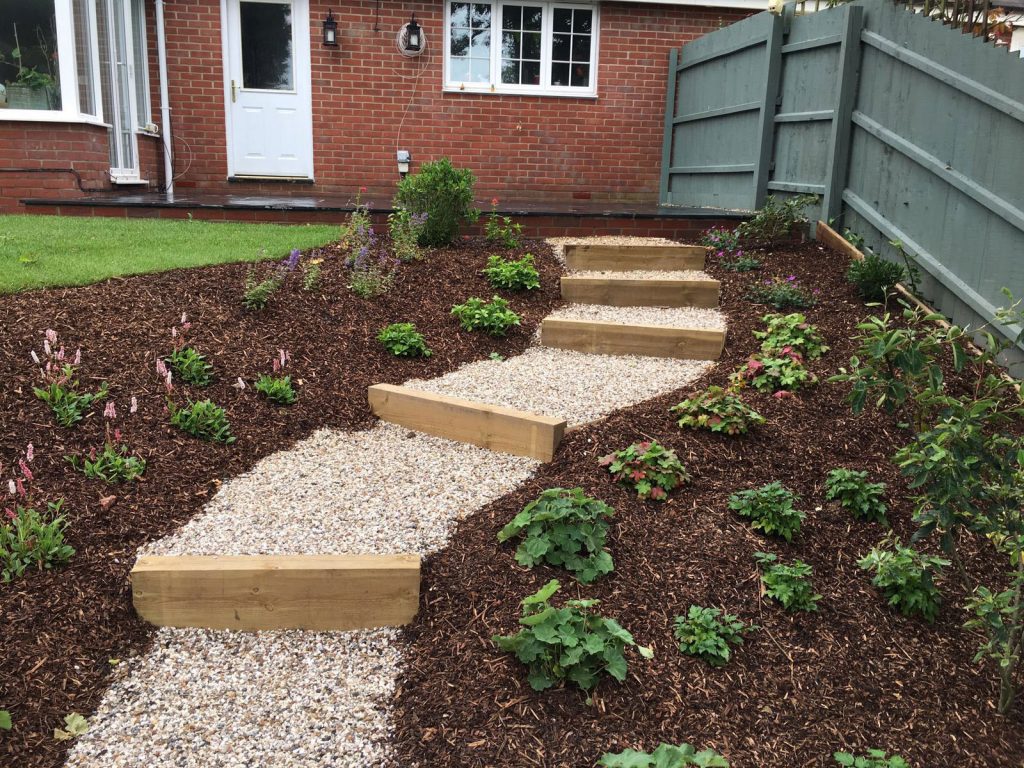
Embrace the characteristics of your new build garden. This slope has been turned into a unique feature by bringing in a winding path and some gentle steps.
Garden Maintenance
Something to think about before you even begin your design is maintenance.
Too busy for gardening? A cottage style garden crammed with plants may not be for you…unless of course you plan to have help.
New to gardening but keen to learn? Why not include some raised beds or a small greenhouse so that you can experiment with seeds, cuttings and vegetable growing?
Hate mowing? There are all sorts of alternatives to natural lawns. Including artificial turf, low maintenance groundcover plants, paving, gravel…..the list goes on.
Budgeting for your new build garden
Once you start factoring in structures, materials, labour, plants and accessories it’s very easy to lose control of your budget. My advice is to set a budget before you start planning and talk to a garden designer who also understands build costs.
You may want to do some of the work yourself, but please do make sure you have the skills set first, otherwise you may run into unexpected costs. A badly laid patio will surely disappoint and you will still have paid for the sub-base, fixings, grout, tools and pavers.
You’ll find some helpful advice on budgeting for a new build garden on our sister website Holland Landscapes
Working with a garden designer
A good garden designer can save you money and help you create a really impressive garden. One that will truly enhance your life without busting your budget. A professionally designed garden will be somewhere you want spend time in, show off to friends and family and ultimately feel proud of.
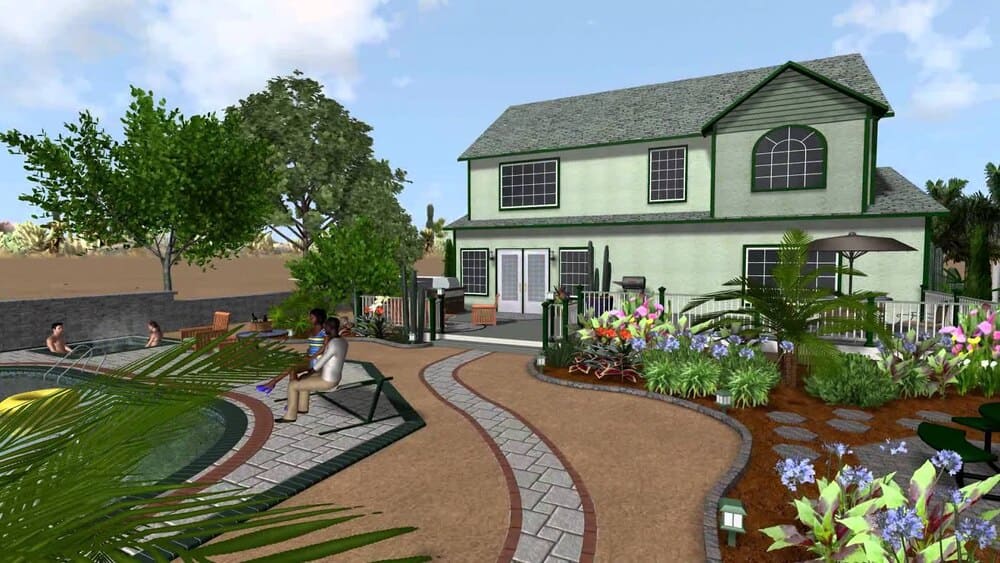
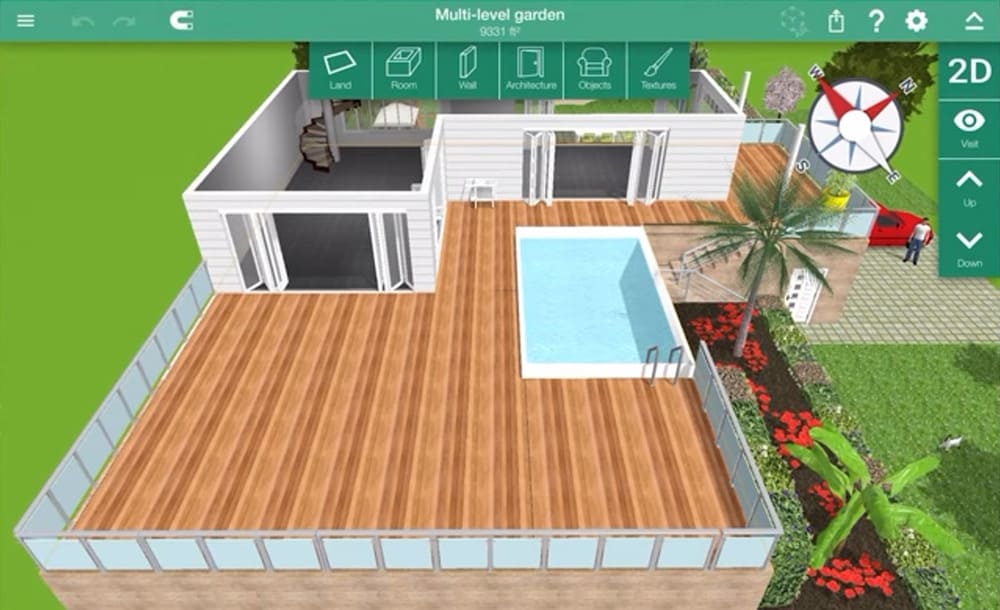
Design software helps you to visualise your new garden layout far more effectively than a 2-dimensional plan.
Once you are happy with the layout, your designer can add more features and details.
The Tapestry design team even have software that can lead you on a “walk” through your garden design – it’s almost as though you are really there
How much will it cost to design a new build garden?
A design for your new build garden will probably cost less than you think. Because the service is bespoke, it’s not possible to give a firm quote in a general article. However, as a rough guide, to assess your garden and design a layout with plant suggestions costs less than £500* for a 100m2 garden.
You can find out more by exploring our website. These pages will be particularly helpful
*price correct at the time of writing but may be subject to change
Need help constructing your new build garden?
Please be sure to protect yourself against rogue traders and inexperienced landscapers. You might like to read this article about tendering services and choosing reputable tradesmen to help construct your new garden.
Читайте также: