Gyro boy lego mindstorms
Обновлено: 22.04.2024

Модель робота RPS-GAM3 — «Камень, ножницы, бумага»
Автор: Alexandre Campos *** Для разработки проектной документации модели робота RPS-GAM3 — «Камень, ножницы, бумага» автор на 90% использовал САПР — систему автоматизированного проектирования LDraw (LEGO CAD). Эта.
EV3 Monkey
Wi-Fi подключение робота LEGO® Mindstorms® EV3 к сети Интернет
Технология Wi-Fi позволяет управлять роботом LEGO® Mindstorms® EV3 через сеть Интернет из любой точки мира, и не быть привязанным к кабелю USB или иметь ограничение по дальности управления через Bluetooth. Для организации.
Робот Wall-e LEGO® Mindstorms® EV3
АВТОР: ALEX (Алексей Валуев) робот передвигается с помощью гусениц; умеет крутить головой синхронно с руками; при запуске робот поднимает руку и говорит «WALL-E»; отходит назад, если поднести к глазам предмет; при.
Робот гуманоид lava r3x LEGO® Mindstorms® EV3
Автор: Лауренс Валк LAVA R3X: гуманоид, который ходит и разговаривает В этой книге, Вы можете найти сборочные чертежи и рабочие программы для создания мобильных роботов, роботов животных и машин, но , пожалуй , одним из.
Робот EV3MEG LEGO® MINDSTORMS® EV3
Робот — краб EV3MEG. Разработчик Мартин Боогаартс (Martyn Boogaarts) Дружелюбный робот-помощник, у которого лучше всего получается перемещаться по линиям разного цвета при помощи датчика освещенности, который позволяет ему.
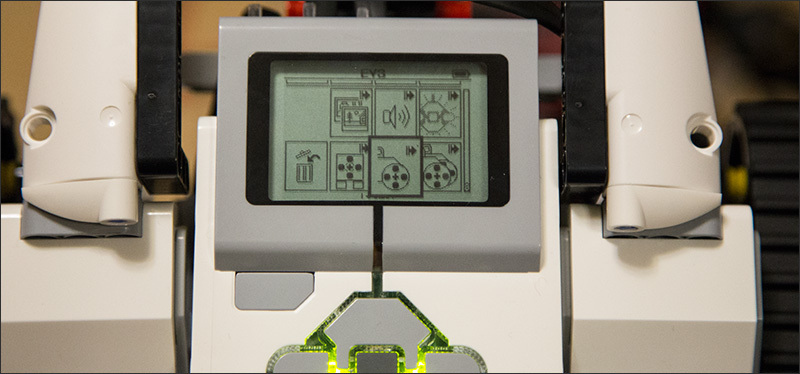
Робот «Gyro Boy» LEGO® MINDSTORMS® Education EV3
В среде разработчика LEGO Mindstorms Education (LME) EV3 есть все необходимое для создания робота «Gyro Boy»: -> Загрузить и установить среду разработчика LEGO Mindstorms Education (LME) EV3 ( Система Графического Программирования для.
Занимательная робототехника
Краевой центр образования получил в феврале 2016 г. достаточное количество наборов третьего поколения Lego Mindstorms Education EV3 для проведения занятий по робототехнике. *** МЛАДШАЯ ГРУППА Занимательная.
Инструкция по сборке роботов начального уровня на базе LEGO Mindstorms EV3
Автор: Дэмьен Kee. Pобот: RileyRover_BI -> Открыть или загрузить инструкцию сборки робота в PDF формате Загрузить и установить среду разработчика LEGO Mindstorms Education (LME) EV3 ( Система Графического Программирования для.
Робот щенок (Puppy) LEGO® MINDSTORMS® Education EV3
Конструкторы роботов Meccano «Meccanoid G15» и «Meccanoid G15 KS»
Французская фирма Meccano производит два конструктора роботов-андроидов. Это большой, ростом с первокласника, модель Meccanoid G15KS и поменьше Meccanoid G15, ростом с воспитанника детского сада. Средняя цена: первого, на российском.
Робот-стрекоза. Идея для воплощения в реальность
Исследователи Технологического института Джорджии разработали робота-стрекозу, который может поместиться в ладони. Устройство, именуемое TechJet Dragonfly, умеет летать и парить в воздухе, как и положено крылатому.
This tutorial provides step-by-step instructions to build BALANC3R, a self-balancing LEGO MINDSTORMS EV3 robot.
Requirements
Building Steps
Build the robot by following the steps in order. Click on the pictures for a bigger image. Be sure to connect the motors and sensors to appropriate port on the EV3 brick as indicated by the port icons.

The following two steps are for the LEGO MINDSTORMS EV3 Gyroscopic sensor only. Skip these steps if you have another sensor.
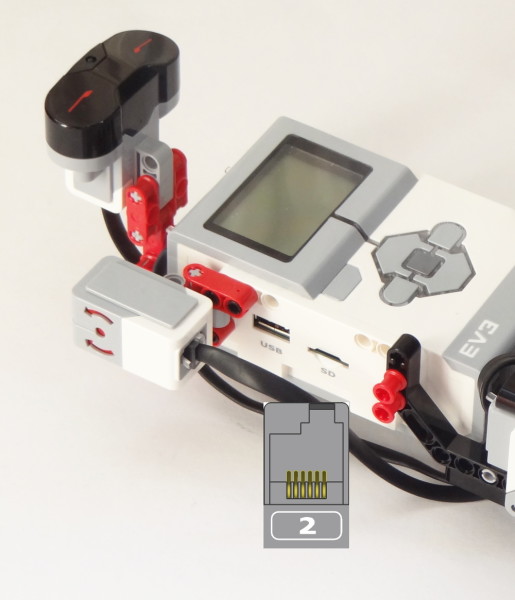
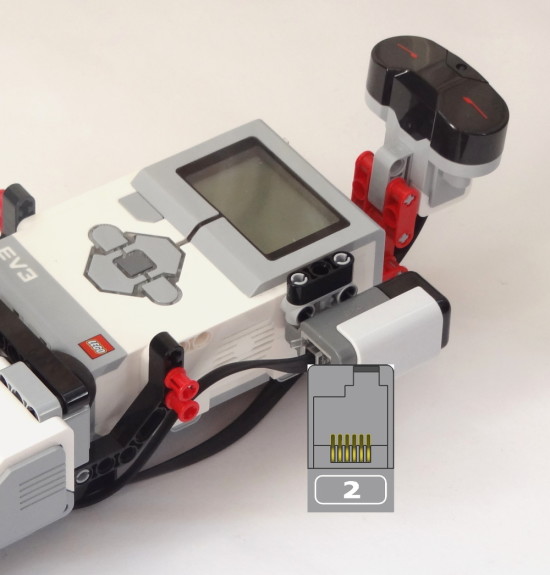
Attach the LEGO MINDSTORMS EV3 Gyro sensor as follows. Be sure to connect it to the side of the EV3 brick with the USB port.
The following two steps are for the HiTechnic Gyroscopic sensor only. Skip these steps if you have another sensor.
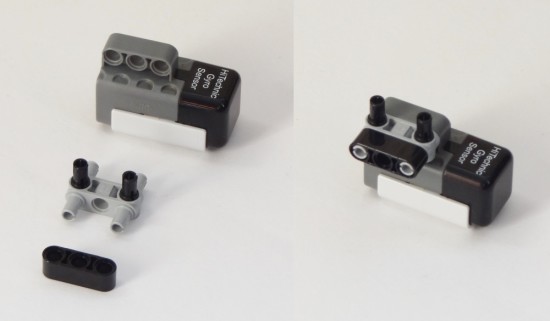
Attach the HiTechnic Gyro sensor as follows. Be sure to connect it to the side of the EV3 brick with the speaker.
Programming
Now that you’ve finished building your robot, you’re ready to program it. See this article for instructions.

Click to go to the programming tutorial.
Great project Laurens. Looking forward to the code next week.
Nice!Really looking forward to the program. I’ve been trying to wrap my head around the “segway”-programming for some time. Always ending up with my robot falling flat with both wheels full throttle in random directions:) Please tell me there will be an step by step tutorial for the programming as well! I’m dying to get it all explained to me! You are doning a great job! Thanx /Tomas
Just finished building your Formula EV3 Race Car. Enjoyable project. I plan on having a programming joy using RobotC. But yet, the remote control program is keeping me busy driving the car.
In the meantime, I having been looking at your BalancE3 robot. I will have to use my NXT motors instead of the EV3 motors. It will be interesting to see if your program will work with no problem.
Great to hear that robot was fun to build. Maybe after you’ve tried the BALANC3R project, you can make the Formula EV3 Race car balance on its two rear wheels, and continue controlling it with the remote 😀 (It’s one of the challenges at the end of the balancing tutorial)
The NXT motors are indeed quite comparable. Actually, I find them to be slightly more precise because they seem to have less backlash, which is good for balancing.
When rotating in place, you’ll notice that BALANC3R balances almost perfectly, while it moves back and forth while trying to stand still. That’s because when standing still, it constantly moves back and forth across the backlash. While turning, it’s always on one side of the backlash.
Can you use the dexter industries gyroscope sensor for the balanc3r?
Unfortunately, not at this time. I was going to add support fot it, but their sensor block didn’t work, or wasn’t fast enough.
Hello,guys! Valk,Can you add a sound sensor?
Hello Laurens,
I’m sorry that I posted this comment here but it wouldn’t work on the other page. I bought your book on my kindle but I saw the BRICK SORT3R so I put in the password in figure 15-9 and it didn’t do anything when I submitted it just looked liked it refreshed the page. Am I doing any thing wrong?
sorry for posting on this page it was one of the pages that didn’t have passwords on it,
I think $180 is a bit too steep for a recolored NXT. It would be cool if LEGO could make falceeatps in different colors that you could swap out (A clear one to display the internals would be awesome!)
Great site and book. I will order that. I am taking and advanced Robotics course this fall and we will be using EV3. But a lot of advanced programming will be in leJOS. Do you have a book recommendation for leJOS programming?
Thank you and keep up the great work.
Best wishes
I have used and enjoyed your EV3 book very much.
The Balanc3r ‘bot is fantastic!
I added an Arduino UNO, Emic2 text to speech module, EasyVR voice recognition module, Bluetooth module, Pixy CMUcam5 video camera, and a FrSky RC receiver to my Balanc3r ‘bot that I call Wilber.
He is to have 5 modes of control and speech:
1) IR control using the EV3 Beacon
2) Voice recognition control
3) Bluetooth-cell phone App. 1
4) Bluetooth
5) RC control
6) Video control
Again, thanks for creating such a great platform!
Thanks a lot for your comment. Sorry I didn’t see it before—I have to manually review any comment with a URL in it to reduce spam.
Glad to hear you liked the book. The extended Segway project with sound is impressive, nice work!
Can you post the programing using absolute-IMU?
Of course!
I can’t!
Hey Laurens,
I have buildet jour balancer and i have building a line follower from that, i can give jou the instructions and the ev3 programm, THATS REALY WORK!
Hey laurens peter here!
I need a challange to build an robot, why an DUCKS3GWAY or a realy fast car
Or… Can jou reply and write it?ok. HAPPY HALLOWEEN.
Laurens hello do you reply??
You Fokin Wot M8 1v1 Butta crumpett Wot Amayzing Speqtackula Penus You Wot
Laurens,
Enjoying your excellent book received as Xmas gift.
Have you published any new build instructions as I’ve completed just about everything out there, but just not creative on my own at 78, ha.
Thanks for your feedback!
You can also build all 12 bonus projects in the LEGO software under the “more robots” tab. I designed the RAC3 Truck.
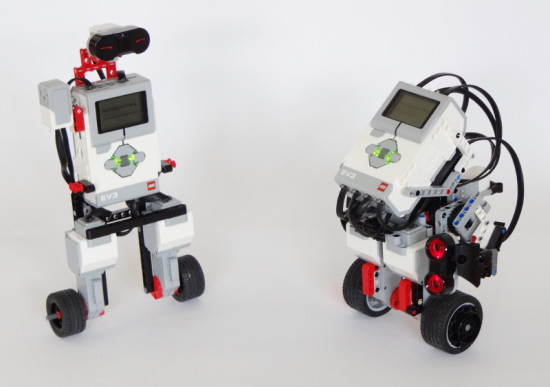
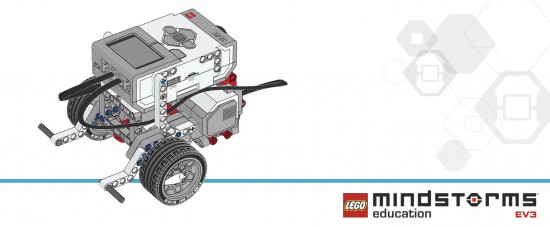
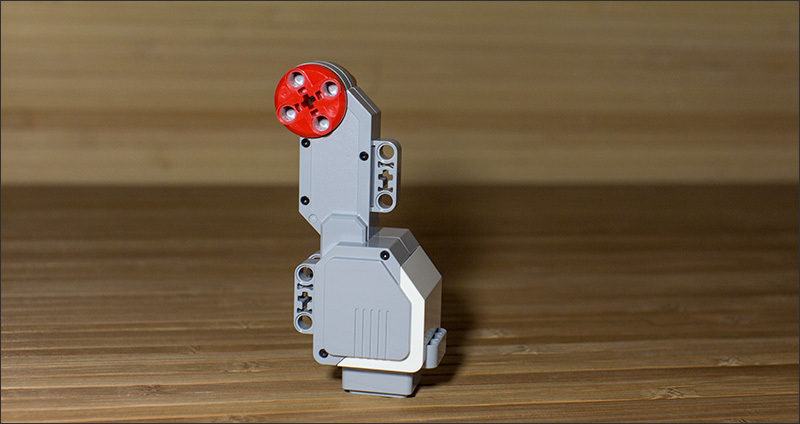
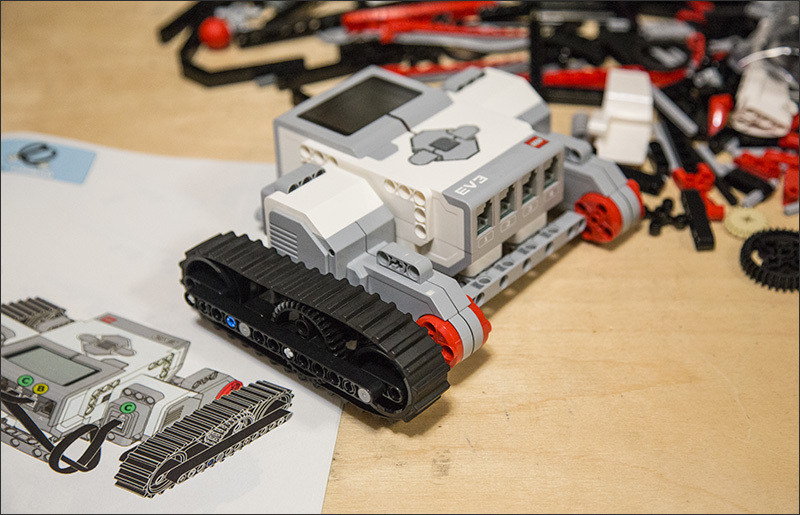
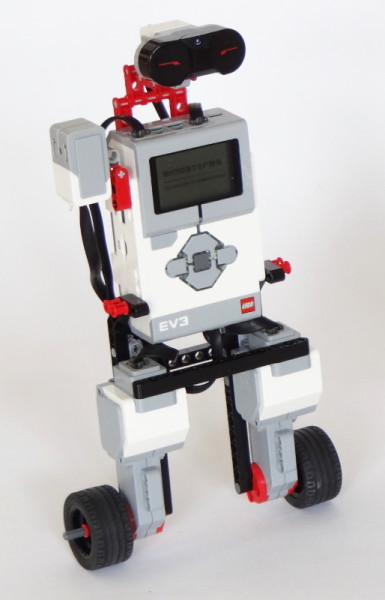
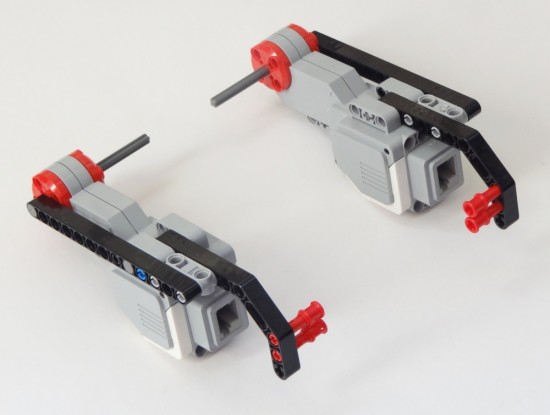
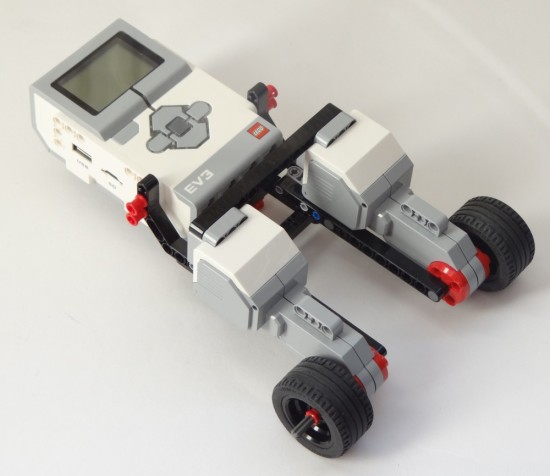
BALANC3R (left) and Gyro Boy (right)
This tutorial will show you how to build and program a self-balancing LEGO MINDSTORMS EV3 robot that can drive around a room. You can build and program BALANC3R (left) or Gyro Boy (right). Once your robot is up and running, you’ll be challenged to customize the construction and program to invent your own self-balancing robot.
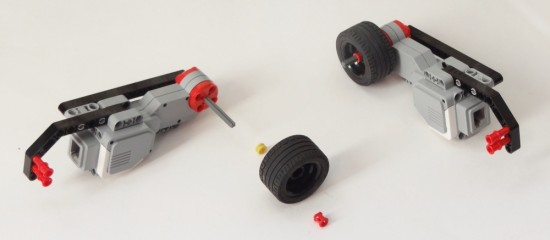
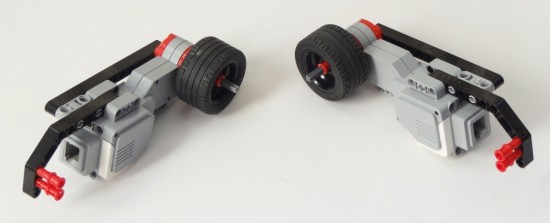
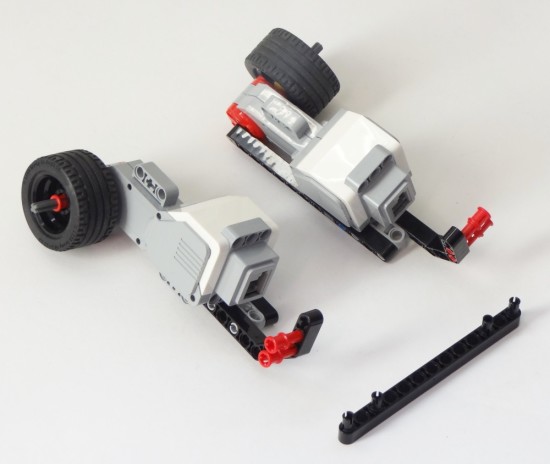
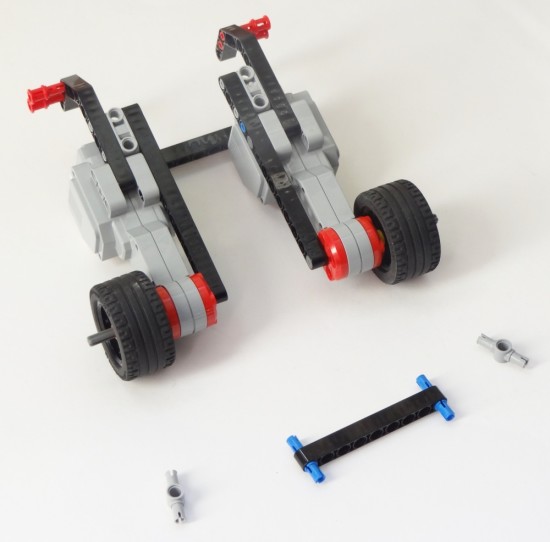
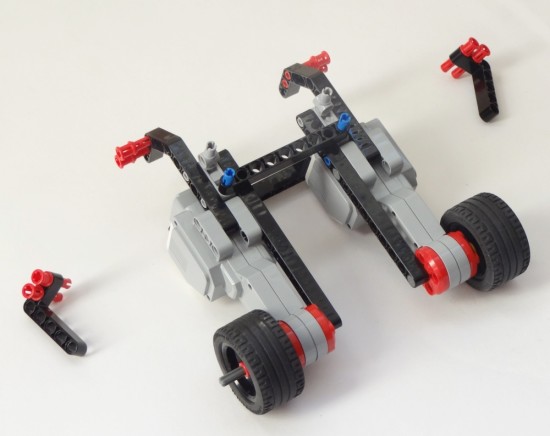
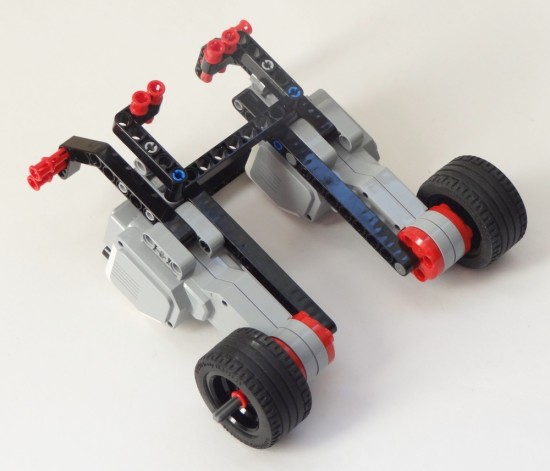
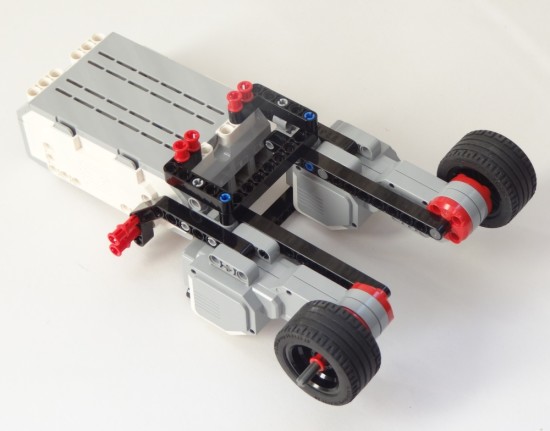
Step 1: Building a robot
To begin, choose the robot you want to build, and follow the respective step-by-step building instructions.
Requirements for BALANC3R:
Requirements for Gyro Boy:
Step 2: Installing the EV3 Gyro Sensor block
If you’re using the LEGO MINDSTORMS EV3 Home Edition Software, you’ll need to install the EV3 Gyro Sensor block before you can program your robot.
Step 3: Download the balancing robot project
- Right-click this link, click “Save Link As,” and save the project file to your computer.
- Launch the EV3 programming software, and open the downloaded project file.
Before you run the programs, let’s briefly examine how they work. The project includes four example programs, two for each robot:
- BALANC3R-Basics: Balance in place, turn right, and turn left
- BALANC3R-RemoteControl: Control the robot with the infrared remote
- GyroBoy-Basics: Balance in place, turn right, and turn left
- GyroBoy-AvoidObstacles: Drive around while avoiding obstacles
Each program consists of two configuration blocks, a balance loop, and a drive control loop, as shown in the figure below.
- The configuration blocks let you specify what the robot looks like, so that the robot knows how to balance. For example, the second setting of the first setting specifies the diameter of the robot’s wheels. The example programs come preconfigured with the correct settings for BALANC3R and Gyro Boy if you use the LEGO EV3 Gyro Sensor. If you use the NXT HiTechnic Gyro, change the Choose Sensor setting on the Initialize My Block to 1.
- The balance loop keeps the robot balanced. It measures and calculates the position and speed of the motors, and it determines the robot’s angular velocity (how fast it’s falling), as well as the robot’s angle relative to the ground. In turn, it uses this sensor information to calculate how to drive the motors in order to keep the robot up right. You won’t need to change any setting of the blocks in this loop.
- The drive control loop controls the speed and steering of the robot as it drives around a room using a simplified move block. This is the part of the program that you can easily customize to create your own program.
Step 4: Running the basic example program
You are now ready to download the example program to your robot.
- If you’ve built BALANC3R, begin with BALANC3R-Basics.
- If you’ve built Gyro Boy, begin with GyroBoy-Basics.
To start the program:
- Hold the robot upright with its wheels on the ground. Do not hold it tightly, but hold it loosely so that it’s just between falling forward and falling backward.
- Select the program and start it with the center button on the EV3 brick.
- You’ll first hear one beep. Keep holding the robot in place.
- You’ll then hear a double beep. Now release the robot and let it balance.
Your robot should now repeatedly balance in place for 7 seconds, turn right for 7 seconds, and turn left for 7 seconds.
Follow these steps if the robot doesn’t balance:
- If it doesn’t work on the first try, repeat the steps above a few times. After a while, you’ll know which is the correct “upright” starting position.
- Do not try to “help” the robot balance. Of course you should catch the robot before it falls, but trying to keep it upright with your hands is counter-effective.
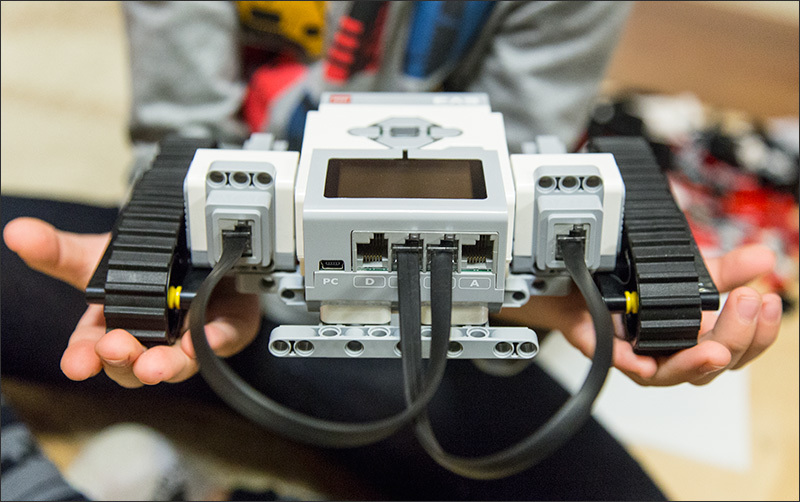
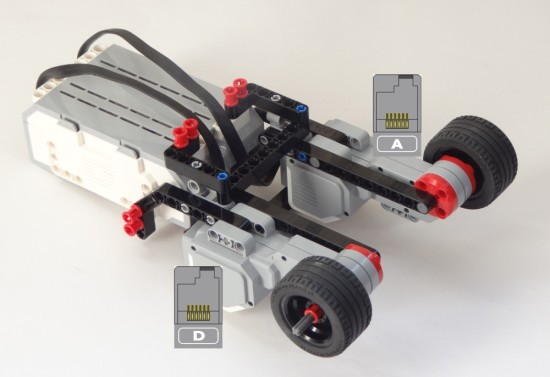
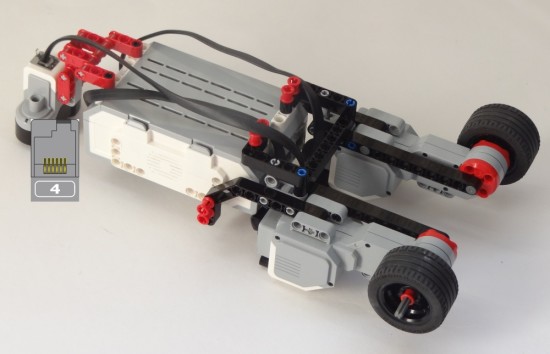
- Verify that the cables have been plugged correctly according to the building instructions:
- The two Large motors should be connected to ports A and D. (If you’ve accidentally interchanged them, that’s fine. The robot will confuse left and right turns, but balancing is unaffected.)
- The Gyro Sensor should be connected to input port 2, regardless of which sensor you use.
Step 5: Running the second example program
If you’ve successfully programmed your robot in the previous step, it’s easy to try out the other example program for your robot. The robot balances in exactly the same way, but the robot’s movements are a little more interesting:
- BALANC3R-RemoteControl lets you control BALANC3R with the infrared remote, as shown in the video above. Just press the buttons on the remote to make the robot drive forward, backward, and turn. (You’ll figure out the controls quickly.) If you don’t press any buttons, the robot just balances in the same place.
- GyroBoy-AvoidObstacles makes Gyro Boy drive around a room while backing up from obstacles, as shown in the video above. Before you run the program, make sure that the white beams of both the robot’s arms point downward. The program relies on this starting position to make sure the Ultrasonic Sensor doesn’t detect the floor as an ‘obstacle’ when the robot’s left arm points downward.
Step 6: Customizing the program
As you’ve learned earlier, the balance loop keeps the robot balanced while the drive control loop controls the robot’s speed and steering. The two loops run simultaneously, or at the same time. In the drive control loop, you use the Move My Block to specify the robot’s speed and steering, as shown below.
![movemyblock-ref]()
The Move block makes the robot drive and steer. In this configuration, the robot drives forward (30) while turning to the left (-15).
The robot keeps driving or turning at the specified rate until you run the block again with different values for speed and steering. The figure below shows the Move My Block in action in the basic example program you ran in step 4. The first Move block sets both steering and speed to 0, which makes the robot balance in place without turning. Next, a Wait block pauses the loop for 7 seconds, keeping the robot in the same place. Then, a second Move block sets the steering value to 20, making the robot turn to the right. After another 7 second wait, the robot starts tuning left by setting the steering value to -20.
![Controlling the robot with Move My Blocks in the drive control loop.]()
Controlling the robot with Move My Blocks in the drive control loop
Now that you’ve learned how to control the robot, it’s time to put your skills to the test with programming challenges. To solve these challenges, you can use the techniques from the LEGO MINDSTORMS EV3 Discovery Book, presented throughout chapters 1-9. Instead of using Move Steering blocks in On mode as in the example programs, you use Move My Blocks as shown above.
Challenges for BALANC3R:
- Make your robot drive around a room while avoiding obstacles with the Infrared Sensor in Proximity mode.
- Make your robot follow the Infrared Beacon. As you move the beacon around, the robot should follow you.
- Attach the Color Sensor in front of the robot’s wheels, and make the robot follow a line. You can print line following tracks for your robot from here.
Challenges for Gyro Boy:
- Make your robot drive in different directions based on the color it detects with the Color Sensor. To accomplish this, make the robot wait for the sensor to see either a yellow, red, green, or blue object. Then, make it drive in a certain direction for 3 seconds based on the detected color, before waiting for a new color signal.
- Make your robot show different types of faces/eyes on the screen as you interact with its sensors. Show an angry face if you press the Touch Sensor, show a happy face when you trigger the Color Sensor, and so on.
Step 7: Making your own balancing robot
In the previous steps, you’ve made BALANC3R or Gyro Boy balance on two wheels, and you learned to control it with the Move My Block. Now that you’ve got the essential components working, you’re ready to customize both your robot and your program. For example, you can turn BALANC3R into a life-like humanoid with arms, and make it talk to you. Or, go crazy and make any EV3 vehicle balance on its rear wheels. What about a self-balancing F1 style race car? Whatever you make, let others know in the comments below. Happy building!
Step 8: Further reading
In order to make this tutorial accessible for everyone with an EV3 set, I didn’t cover the details of the balancing algorithm. Rather, the design of this program makes it possible to control the robot even if you don’t know exactly how the balancing mechanism works.
However, many papers have been written about self-balancing robots, and I encourage you to read more on the subject as you explore the details of the EV3 program provided on this page. The balancing algorithm in this program is based on a Bachelor thesis written by Steven Witzand, which provides a good overview of the subject, along with Java source code that implements the balancing algorithm. In turn, this paper relies on the design and algorithm used in the NXTway-GS by Yorihisa Yamamoto, which you can study for further detail.
Educator Vehicle (with attachments)
![]()
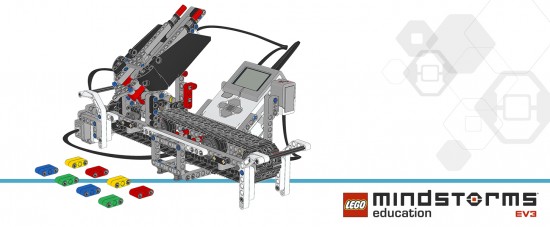
Sorter
![]()
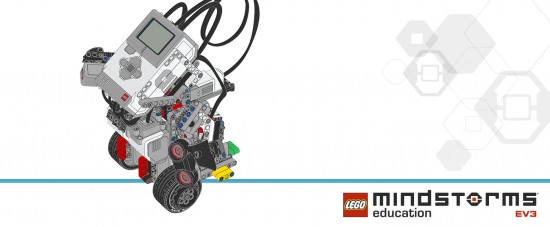
Gyro Boy
![]()
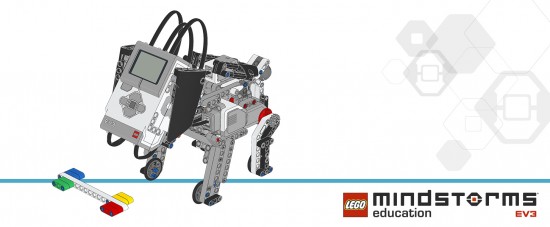
Puppy
![]()
Robot Arm H25
![]()
Where to find programs and project files:
You can find the programs for these robots within the LEGO MINDSTORMS EV3 Education software, which you can download for free via this LINK.
Thanks for creating these PDF’s. Saves me some work 😉
Are you doing the expansion models as well?
I need this one,thank you
tell me about it.
this does gio 4enogh
I have one already
Are you still here?
P.s i got new glasses and still couldnt find who asked
Advantage of the edu-set models is that they have space for the battery. Not all home-set models have that. Thanks LEGO, Laurens and Xander of course.
Thanks Lego for releasing these and Laurens for the PDFs. Is there any news on whether the we’ll be able to download the .ev3 files for these projects?
Yes, thank you. Several of the models look like great fun to build.
And I see some ideas to incorporate into some MOCs.Thanks! I’ve been bugging Lego Education to release these. These are a Huge Help!
I would love to build Gyroboy, but I only have the standard EV3 set. Would the additional gyro sensor do the trick, or is the edu-pack too different?
there is one called balanc3r on this website with a program
you can build it with the 45544 core set, thats no problem, but im a little bit unsure if you can use the 31313 set for it.
Hi
I am also wanting to know if LEGO will make the Education Core and Expansion .ev3 files available to download.
Regards GlenI too am interested in the project files for these robots. We have just introduced EV3 with our 8th graders and they are very interested in creating these robots.
Hi, it is great that these are on here, my son and I have managed to build the sorter with the EV3 kit and bits of his digger but as useful as the instructions are, doing something with it is only useful if the program is obtainable, which it isn’t.
I had camp last week and I had a challenge to build this sorter. I built it and downloaded the mindstorms programmer to my computer. It comes with all the programs to all of the listed builds. If may be a little confusin but it is manageable.
Does anyone know where to find the programming instructions for the Robots of the education pack? My team is looking for them all over the place and can’t find them. We can only build them with these instructions. Thanks in advance for any help.
Are there parts list available for these projects. The robotic arm requires a few parts that did not come in the basic set.
My name’s Joel to
That wasn’t the question,Joel Park
Nobody asked,dumb dumb
hehehe thats funey
can you please put up the directions for programming the puppy?
Thank you SO much for posting these!
Perhaps you can explain to these people that u need the lego education software to write the code for these projects? or where can we find the program code? please help us out 🙂
Well, that’s not true. The LEGO Education software has the ready-made programs. Sure, that’s easy, but you can also create your own programs for these robots using the Home Edition software, which is free.
The most complicated robot here is GyroBoy. I’ve created my own program for it, so I should be able to share it here soon. I don’t currently have time to build all of the other robots and create my own programs for them, though.
Hey Laurens! Can you upload the program for H25? If you dont have the program, can u pls give me the opportunity to create a post, cuz i have the H25 program, i programmed it with the program turtorial from the education site. Im ten years old, almost eleven 🙂
stop being a jerk to the person
hey im yum check out my youtube chanel
Hey Laurens, Where exactly in the Education software can I find the already made programs?
Thanks fjor making these builds avalilable for my lego students.
Hi,
Thanks for the PDFs. Indeed, my pupils want to build the four Robot models of the EV3 core set.
Does anybody know if there is some documentation / explanation about the Programs of these models? (Not the building instructions, but for the LabView programs, which are quite complex).
THANKS !The EV3 project files for the education models are unfortunately only available with the education version of the Mindstorms EV3 software, and so they are not available unless you buy that software for US$100. Apparently, the reason for this is to do with intellectual property, but I don’t really understand this argument: if someone has gone out and bought either the EV3 retail set (plus the additional parts to turn it into the EV3 education set), or they’ve bought the EV3 education set itself, then surely it should be no skin off Lego’s teeth to provide the EV3 project files for the education robots as they will have already gotten their money’s worth out of that customer when they bought the EV3 set.
They already provide the building instructions for free, so why not the EV3 project files to go with them? Yes, people can develop the robot programs themselves, of course, but not everyone wants to do that. Sometimes, building a robot and downloading an existing program to it is all people want to do.
Come on Lego — don’t just tease us with the PDF building instructions… give us the EV3 project files for the education robots… pretty please…?
Hi,
Can anyone direct me to the programs that come with these projects (SORTER, ROBOT ARM) ?
Anticipated thanksНесмешной и баянистый анекдот, но нельзя просто так взять и начать эту публикацию не с него – он в лучшем виде отображает суть того, о чём пойдёт речь далее. Впрочем, из заголовка вы и так поняли, о чём речь.
![]()
Осторожно! Публикация может вызвать непреодолимое желание завести сына.
Урок истории
Компания LEGO (название произошло от датской фразы «leg godt», «Играй с удовольствием») не нуждается в представлении – она была основана в далёком 1932 году, хотя первые знакомые всем пластиковые кубики появились значительно позже, в 1947. Примечательно, что кубики LEGO, выпускаемые в те годы, полностью совместимы с теми, что выпускаются сейчас.
История создания компании, выпущенная компанией Pixar к 80-летнему юбилею LEGO:
Сейчас компания производит около 20 миллиардов деталек в год, то есть более 630 штук в секунду. В текущем модельном ряду более 600 различных конструкторов и так уж получилось, что серия Mindstorms является своего рода вершиной технической мысли, самым-самым навороченным конструктором. Если вкратце, то она позволяет делать вполне себе полноценных роботов.
Как гласит википедия, серия LEGO Mindstorms была впервые представлена в 1998 году. Через 8 лет (в 2006) на свет появился набор LEGO Mindstorms NXT 1.0, а уже в 2009 — набор LEGO Mindstorms NXT 2.0. Сегодня речь пойдёт о LEGO Mindstorms EV3 – последнем (третьем) поколении
терминатораконструктора, который был представлен почти год назад, 4 января 2013 года (в продаже появился только спустя полгода).Отличия EV3 от NXT 2.0
В принципе, главная идея осталась прежней – серия предназначена для сборки программируемых роботов. Поэтому первым встаёт вопрос, а что же поменялось с момента выхода предыдущего конструктора и стоит ли покупать новый? Основное отличие заключается в обновленных датчиках/моторах и, самое главное, в интеллектуальном блоке EV3 (EV означает EVolution):
Как видите, разница довольно существенна – было бы странным, если бы за 4 года поменяли только разрешение экрана и набор наклеек.EV3 NXT Дисплей Монохромный LCD, 178x128 Монохромный LCD, 100x64 Процессор 300 МГц
Texas Instruments
Sitara AM1808 (ARM9)48 МГц Atmel
AT91SAM7S256
(ARM7TDMI)Память 64 Мб RAM
16 Мб Flash
Слот microSDHC (до 32 Гб)64 Кб RAM
256 Кб FlashUSB-хост Есть Нет Wi-Fi Опционально, через USB-донгл Нет Bluetooth Есть Есть Поддержка Apple-устройств Есть Нет Ещё одно отличие заключается в том, что серия NXT продавалась в нескольких версиях (в разные годы) и представляла собой разные наборы, базовые и ресурсные. У нового EV3 с этим попроще – пока он продаётся в основном варианте – 31313 (601 деталь), из которого можно наделать кучу всего. Но при желании можно докупить базовый набор 45544 (541 деталь) с дополнительными сенсорами и детальками (использовать детали от обычных конструкторов также никто не мешает). Кстати, обратите внимание на пятизначные артикулы – на такую нумерацию компания перешла в 2013 году.
Что касается совместимости, то тут было проделано всё возможное. Все NXT-сенсоры и моторы совместимы с EV3 и распознаются как NXT. EV3-сенсоры не работают с NXT, но EV3-моторы вроде как совместимы. NXT-кирпичик может быть запрограммирован софтом от EV3, но некоторые функции могут быть недоступны, а вот запрограммировать EV3-кирпичик NXT-софтом без сторонних решений не получится.
Внутри коробки
Ещё когда я сам был маленький и ездил с родителями в центральный Детский Мир (когда он ещё был), на Лубянку – уже тогда я не мог оторвать глаз от коробок с LEGO. Тогда не было ни Гиктаймс, ни даже Хабра, но с тех пор коробки остались всё такими же яркими и сочными, даже во взрослом возрасте активируют процесс слюновыделения ) В этом плане другим производителям есть чему поучиться.
![]()
Часть коробки, на самом деле, представляет собой (если её разрезать) трассу с различными цветовыми зонами, которую можно использовать для роботов с сенсорами цвета.
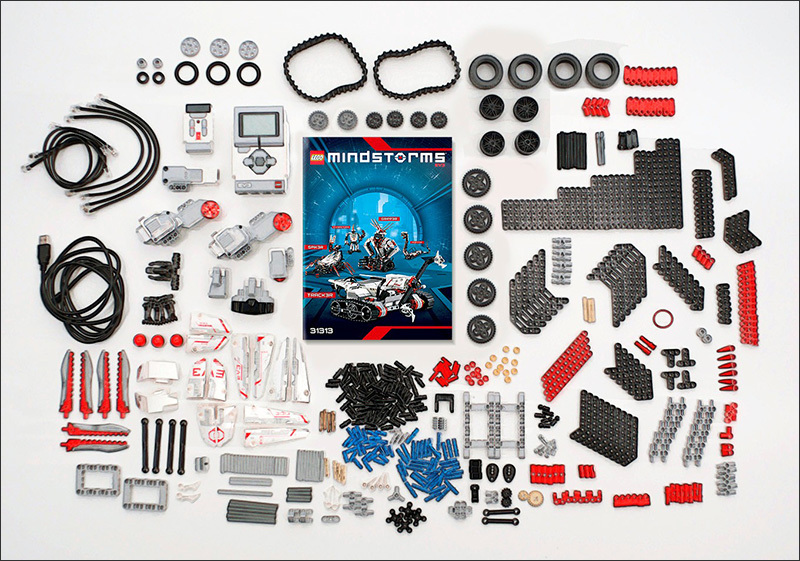
Все детальки аккуратно разложены по пакетикам, в комплекте – инструкция и набор наклеек. Давайте вкратце пройдёмся по тому, что положили в комплект.
![]()
![]()
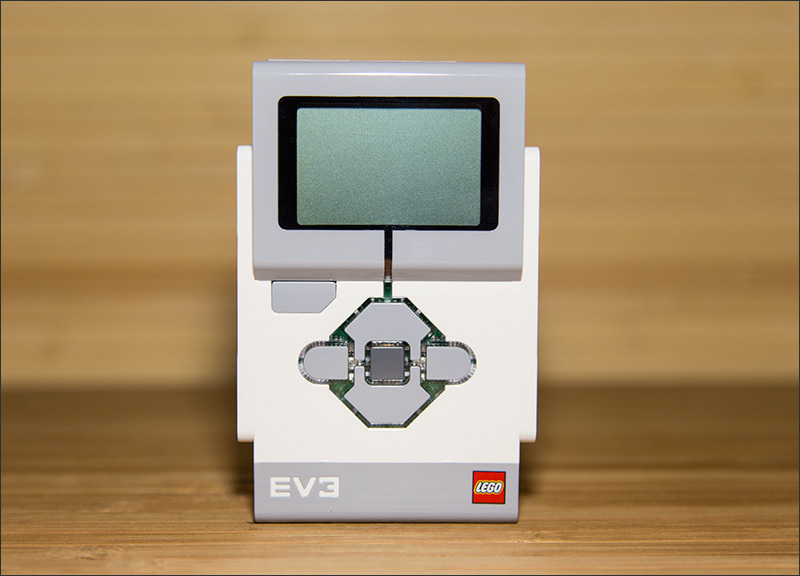
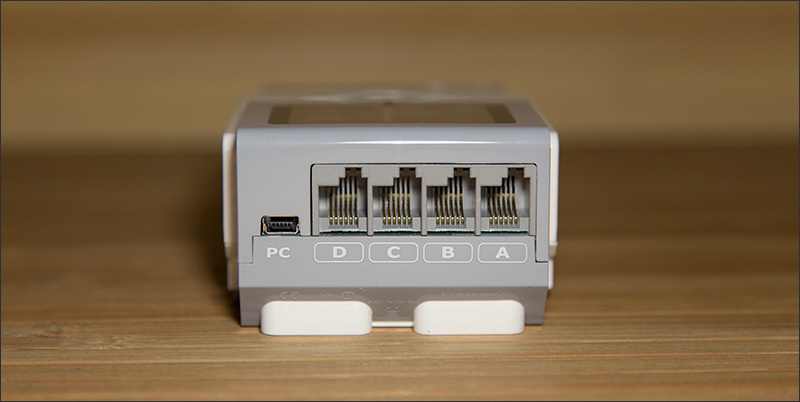
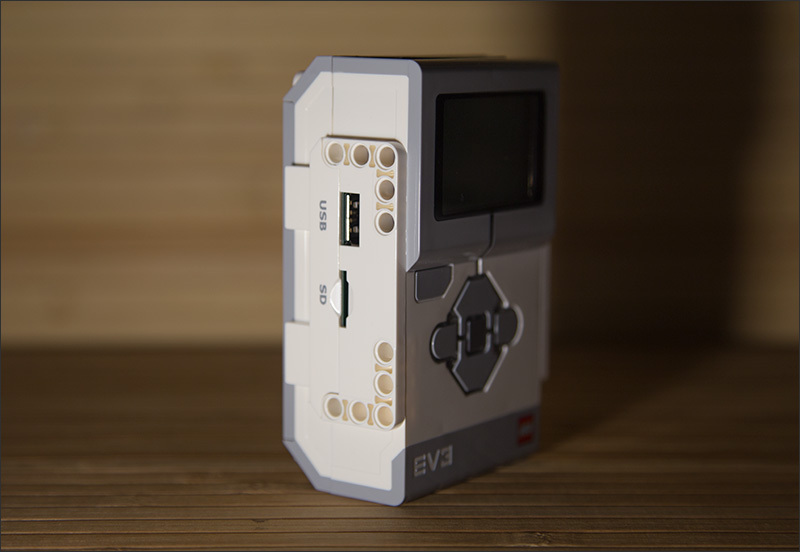
Сам EV3, он же интеллектуальный блок, он же сердце системы, он же «кирпичик» или «кубик». Служит центром управления и энергетической станцией для вашего робота и имеет следующие функциональные элементы:
![]()
– Многофункциональный монохромный дисплей с разрешением 178х128
– Шестикнопочный интерфейс управления с функцией изменения подсветки (3 цвета) для индикации режима работы
– 4 порта ввода (1, 2, 3, 4) для подключения датчиков
– 4 порта вывода (A, B, C, D) для выполнения команд
– 1 разъём miniUSB для подключения EV3 к компьютеру
– 1 порт USB–хост (для соединения нескольких EV3 в одну цепь, например)
– 1 слот для карт памяти формата microSD (до 32Гб) – для увеличения объёма доступной памяти EV3
– Встроенный динамик![]()
![]()
![]()
Кубик EV3 также поддерживает Bluetooth, WiFi (через USB-адаптер NETGEAR WNA1100 Wireless-N 150), для связи с компьютерами имеет программный интерфейс, позволяющий создавать программы и настраивать регистрации данных непосредственно на микрокомпьютере EV3.
» Большой EV3-сервомотор (2 штуки). Cоздан для работы с микрокомпьютером EV3 и имеет встроенный датчик вращения с точностью измерений до 1 градуса. Используя этот датчик, мотор может соединяться другими моторами, позволяя роботу двигаться с постоянной скоростью. Кроме того, датчик вращения может использоваться и при проведении различных экспериментов для точного считывания данных о расстоянии и скорости.
![]()
– Встроенный датчик вращения с точностью измерений до 1 град
– Максимальные обороты до 160-170 об/мин
– Максимальный крутящий момент в 40 Нсм
– Автоматическая идентификация программным обеспечением EV3» Средний EV3-сервомотор. Идеален для задач, когда скорость и быстрота отклика, а также размер робота важнее его грузоподъёмности.
![]()
– Встроенный датчик вращения с точностью измерений до 1 градуса
– Максимальные обороты до 240-250 об/мин
– Максимальный крутящий момент в 12 Нсм
– Автоматическая идентификация программным обеспечением EV3» Датчик цвета (EV3). Способен определить 8 различных цветов, хотя также может использоваться как датчик освещённости.
![]()
– Измеряет отраженный красный свет и внешнее рассеянное освещение, от полной темноты до яркого солнечного света
– Фиксирует и определяет 8 цветов
– Частота опроса до 1 кГц
– Автоматическая идентификация программным обеспечением EV3» Датчик касания (EV3). Позволяет роботу реагировать на касания, распознает три ситуации: прикосновение, щелчок и освобождение. Также способен определить количество нажатий, как одиночных, так и множественных.
» Цифровой ИК-датчик (EV3). Для определения приближения робота. Также способен улавливать ИК-сигналы от ИК-маяка, позволяя создавать дистанционно управляемых роботов, навигационные системы для преодоления препятствий.
![]()
– Измерения приближения/удаления в радиусе 50-70 см
– Радиус улавливания ИК-сигналов до 2 метров
– До 4 индивидуальных каналов приёма сигнала
– Получение удаленных ИК-команд управления
– Автоматическая идентификация программным обеспечением EV3» Удалённый инфракрасный маяк. Разработан для использования с ИК-датчиком EV3. Маяк излучает ИК-сигнал, улавливаемый датчиком – может использоваться в качестве пульта дистанционного управления микрокомпьютера EV3, передавая сигналы на ИК-датчик.
– До 4 индивидуальных каналов передачи сигнала (переключатель прямо на корпусе)
– Имеет кнопку и тумблер для включения/выключения
– При работе ИК-маяка горит зелёный светодиод
– Автоматическое отключение при простое более 1 часа
– Радиус действия до 2 метровВ отдельном пакетике смотаны провода для подключения датчиков и моторов к кубику, а также USB-шнур для подключения кубика к компьютеру.
![]()
Стоит отметить два важных момента. Во-первых, существуют другие датчики Lego, такие как:
» Гироскопический датчик (EV3). Цифровой гироскопический датчик EV3 позволяет измерять движение вращения робота, а также улавливать изменения в его движении и положении. Режим измерения углов с точностью до ± 3 градуса; встроенный гироскоп улавливает вращения с моментом до 440 град/с; частота опроса до 1 кГц.
» Ультразвуковой датчик (EV3). Генерирует звуковые волны и фиксируюет их отражения от объектов, тем самым измеряя расстояние до объектов. Также может использоваться в режиме сонара, испуская одиночные волны. Может улавливать звуковые волны, которые будут являться триггерами для запуска программ. Измеряет расстояния в пределах от 1 до 250 см, а точность измерений составляет ± 1 см.
А во-вторых, поддерживаются сенсоры и прочие аксессуары от сторонних производителей, таких как HiTechnic и Mindsensors – они предлагают всевозможные джойстики, инфракрасные датчики расстояний, магнитные датчики, компасы, гироскопы, акселерометры, таймеры, мультиплексоры, шаровые опоры, и т.д. Так что, если задаться вопросом, можно найти много всего интересного.
![]()
В общем, как вы уже поняли, LEGO – это для реальных пацанов!
Первая модель
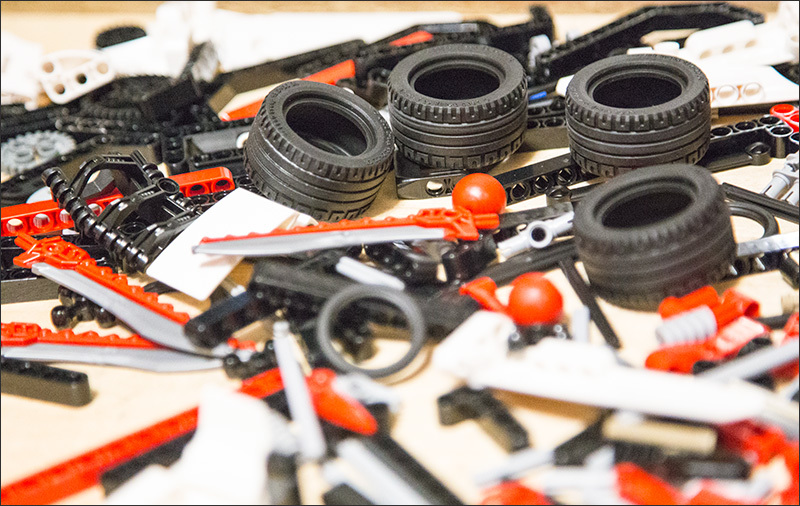
В комплекте с конструктором идёт бумажная инструкция, по которой можно собрать одну-единственную модель – некое подобие гусеничной самоходной машины.
![]()
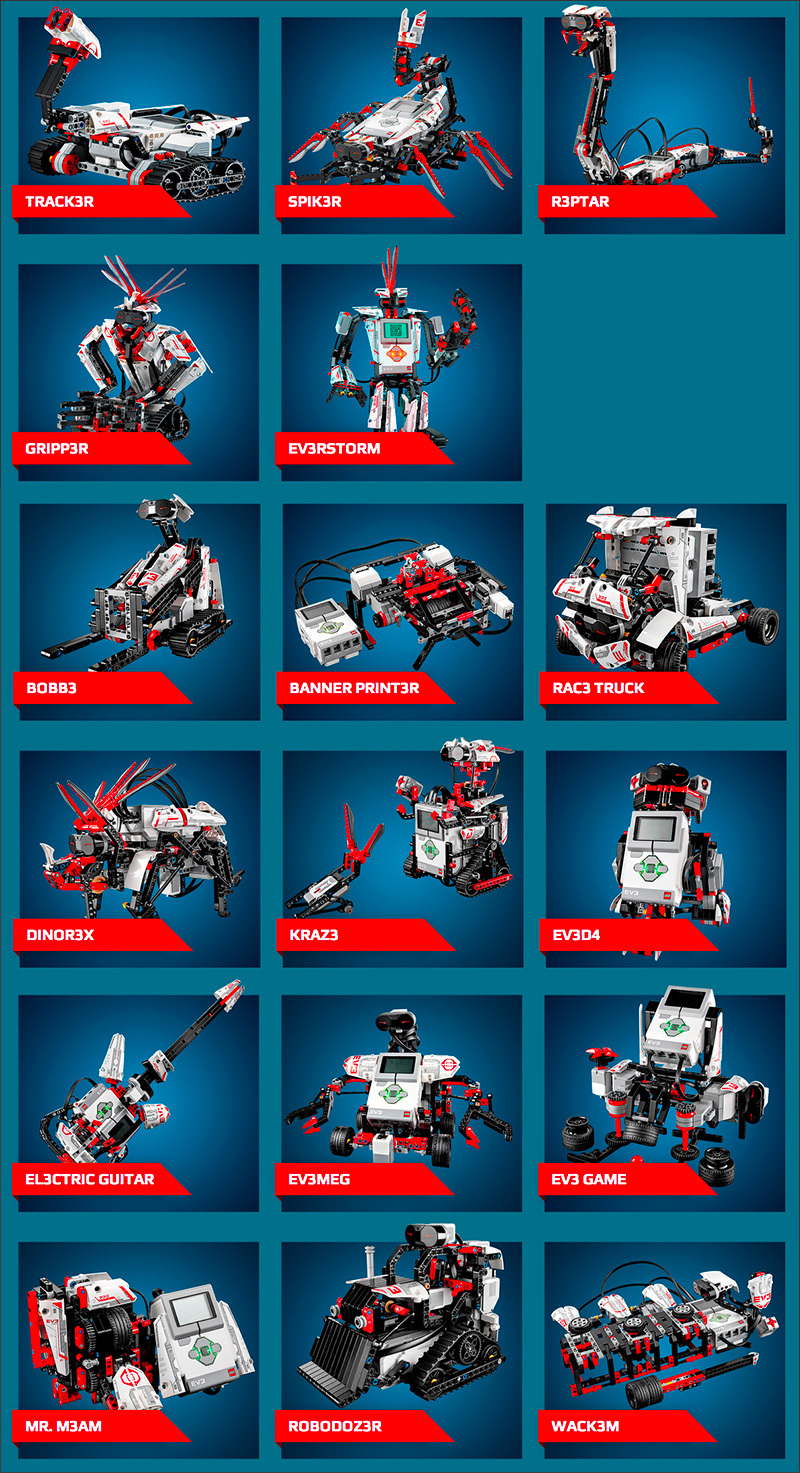
Сначала я удивился, ведь даже в самых простых наборах (серии типа LEGO Creator) всегда идёт несколько инструкций, а тут вдруг бумаги пожалели или места в коробке не нашли. Оказалось… что только на официальном сайте из набора деталей предлагается собрать 17 разных роботов! Поэтому 17 инструкций в коробке были бы действительно лишними (и для логистики, и для лесов природы). Вот названия роботов: EV3RSTORM, GRIPP3R, R3PTAR, SPIK3R, and TRACK3R. ROBODOZ3R, BANNER PRINT3R, EV3MEG, BOBB3, MR-B3AM, RAC3 TRUCK, KRAZ3, EV3D4, EL3CTRIC GUITAR, DINOR3X, WACK3M, и EV3GAME – инструкции для них придётся качать из инета, равно как и софт для подключения EV3 к компьютеру.
![]()
Инструкция наиподробнейшая, накосячить сложно. Сын сказал , что детали в пакетиках расфасованы не очень удачно – на первой же странице может потребоваться вскрыть 3 разных пакета, но это тоже мелочи.
![]()
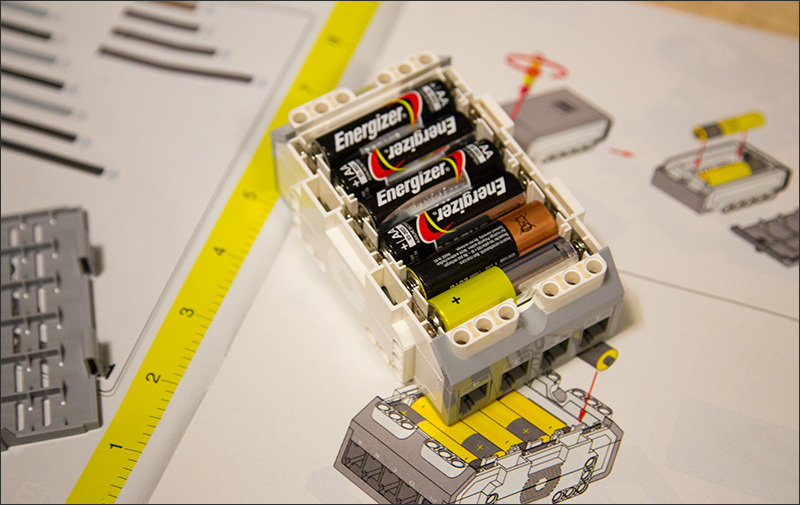
Кубик EV3 необходимо запитать, для чего можно использовать аккумулятор (нет в комплекте) или 6 пальчиковых батареек. Забегая вперёд – ещё 2 батарейки (но уже мизинчиковых) понадобятся для питания ИК-маяка (он же пульт ДУ).
![]()
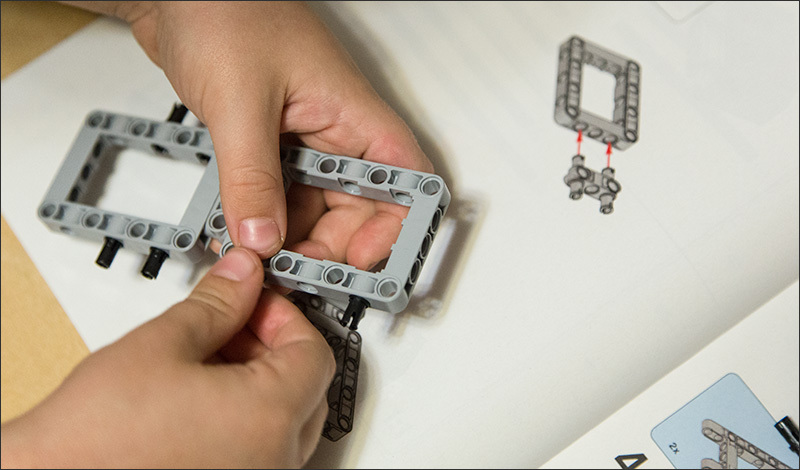
Первую модель ребёнок (7 лет) собрал примерно минут за 30.
![]()
Процесс оказался не таким увлекательным, как, например, сборка моделей LEGO Technics – в инструкции предлагается собрать далеко не самого интересного робота: в нём лишь крупные детали, среди которых были практически все датчики и двигатели – видимо, чтобы продемонстрировать работу каждого из них.
![]()
![]()
Но вот результат превзошёл все детские ожидания – впервые он собрал модель, которая могла двигаться сама: вперёд-назад, поворот, разворот на месте, крутила щупальцами…
![]()
![]()
Запуск осуществляется с кубика EV3, для чего следует нажать пару кнопок на лицевой панели. Некоторые действия можно запрограммировать прямо на кубике: выбрать количество итераций, настроить подачу звукового сигнала и так далее – в одной статье всего не рассказать, курите мануалы.
![]()
![]()
Программировать через компьютер собранную выше модель не пришлось. Тем не менее, возможность такая есть, при этом на разных уровнях хардкорности.
Ребёнку проще всего будет начать с предлагаемого производителем софта, который есть как под Windows, так и под OS X. Во втором случае дистрибутив весит 666 Мб, а установленное приложение займёт гигабайт. Оно называется LEGO Mindstorms EV3 Home Edition и разработано совместно с небезызвестной компанией LabView. На сайте LEGO довольно много обучающих программированию материалов.
Сразу после запуска перед нами возникает интерактивный «гараж» из роботов, которых можно собрать из набора:
Выбираем понравившегося и начинаем собирать: перед нами появится интерактивная инструкция по сборке, видеоролики, а также подборка различных миссий, которые можно выполнить с собранным роботом. Вот почему дистрибутив весил так много.
Не вижу смысла описывать всё в деталях: вы быстрее скачаете приложение сами и увидите, что там есть и на каком уровне. Разве что упомяну один из недостатков, который мне больше всего запомнился: не самый дружелюбный (особенно для детей) интерфейс – от приложения попахивает каким–то банк-клиентом.Нельзя ещё раз не отметить, что кубиком EV3 можно управлять со смартфона на операционных системах Android или iOS, для чего есть отдельные приложения.
Если всего этого оказалось мало, можете повысить градус хардкора. Для кубика EV3 существуют различные прошивки, которые позволяют расширить его возможности, скорость работы и т.д. Вот, например, альтернативная прошивка leJOS EV3 – прошивка с jvm, позволяющая программировать EV3 на языке Java. Хотите на другом языке? Окей, гугл – в вашем распоряжении почти 60 вариантов на выбор: ASM/C/C++/Perl/Python/Ruby/VB/Haskell/Lisp/Matlab/LabVIEW и многое-многое другое.
Более подробно об этом я рассказывать не буду по нескольким причинам: во-первых, программист из меня полный false (все надежды на сына), во-вторых, пока мы успели собрать только одну модель (и на выходных возьмёмся за вторую), а в-третьих – вы уже и так оформили заказ на этот конструктор и скоро сами всё узнаете ;) Ну а если серьёзно, то статья и так уже огромная – вот лучше две ссылочки изучите: раз и два.
Ну и ещё большой плюс – это LEGO-сообщества, которых полно по всему миру. Можете быть уверены, что на любом из этапов экспериментов с роботами вы всегда сможете найти единомышленников и тех, кто сможет помочь с решением проблемы. Помимо дружелюбных сообществ, на просторах сети выложено огромное множество различных инструкций, моделей, исходников, видеороликов и обучающих материалов. Всё это означает одно: с Mindstorms вы не соскучитесь.
Читайте также: