
Как сделать из лего блендер
Обновлено: 24.04.2024
A Concrete Mixer on the Construction Site. Hi Parents. This video is supposed to review and show the toys functions in an .
SUBSCRIBE for more AWESMR kids videos :D Follow me on SNAPCHAT! ➞ username: awesmrkids Follow me on INSTAGRAM!
I recreated one of my favorites spider man scenes from far from home Work time: Around 160 hours Instagram: .
Monster truck jumps into blender in Brick Rigs Multiplayer Gameplay Stunts and jumps in Brick Rigs multiplayer gameplay!
Что если бросить Муравья Чипсы в Соковыжималку из Лего самоделка эксперимент ▽ Смотреть больше самоделок Лего .
LEGO 10294 Titanic Speedbuild Transformer | 10294 LEGO Titanic Rendered | Blender Geometry Nodes 3.1 Animation was .
A compilation of LEGO animation I've done in blender over the past several months. Models and materials from Mecabricks: .
LEGO Monster Truck VS Worlds BIGGEST BLENDER - Brick Rigs Gameplay Challenge - Lego Stunts Today on Brick Rigs .
Directed by Phil Lord & Christopher Miller, The LEGO ® Movie is an original animated film that follows the adventures of Emmet .
Hey, in this video I am crushing lego cars in blender pits. If you liked my video, please click the like and subscribe button.
Что если бросить Чипсы в Соковыжималку из Лего (самоделка) ▽ Смотреть больше самоделок Лего ▽ ▷ Как сделать из .
Will it blend? Lego Vs Mega Bloks Vs Best Lock, Disney Cars, The Trash Pack & Zombie Zitties just for toy town fun. In the search .
In the midst of the chaos of the Galactic Clone Wars, a group of lone surviving Clone Troopers, along with their Jedi General, .
Lyrics and animation by me Lyrics: Snap in the lower back Girl let's hang you from a web With dramatic music Just make it a sad .
Over two years in the making, this is the world's first Universal LEGO Sorting Machine, an AI-powered automated sorting machine .
How Many Lego Ragdolls Can I Fit Into a Blender? - Brick Rigs Funny Moments Gameplay Camodo Gaming returns to the Brick .
Sound 1 and 3 are from @Sneekymeeky6 on Tiktok Sound 2 is from the: close personal acquaintance Sound 4 is from Tiktok .
Animations from the last months subscribe Some sounds that I used are from TikTok I made the animations using blender and .
please subscribe so we can get to 100k subscribers Some Inspiration and audios in this video are made by: JanoBot, .
Experiment Blender Vs Lego Minecraft | The Crusher Subscribe to my new youtube channel "Toy's And Tech Experiment .
Please subscribe cuz getting a silver playbutton would be cool These are my most favorite and funniest blender animations that I .
В этом уроке мы рассмотрим то, что необходимо знать новичку о моделинге и работе с сеткой. Ссылка на референс к .
This is my full scene recreation of the "You're Not Peter Parker" scene showed in the Spider-Man No Way Home trailer The .
My animation of Lego car factory. Made in blender. Initially I planed to made a simple car building instruction, but it went a little far.
Hello Mecabricks Community,
Today I'm proud to present to you my posable blender rig. Steps to use the rig as well as download links are available below. In addition, I have included a few default animation cycles to get you guys started.

Using Rig With Mecabricks Blender Template

Now that you have the scene set up it’s time to append the rig into your scene
File > Append> Minifigure Rig> Object> Part4 +Armature> Append> S> Scale
Head over to the materials tab and assign the correct materials corresponding with the unrigged Minifigure instead of the default material on the rig.

Tab Into edit mode with the rigged Minifigure selected. Go into the vertex groups sections and select the part that needs materials to be adjusted.

With all the vertices of an object selected navigate back to the material tab. Hit the + next to materials to add a new material below the main one. find the material the corresponds to the selected object. With the material, set hit Assign to apply the material to the vertices. Repeat step 4 and 5 until all the parts of the rig have the correct material assigned to them.

There now should be one issue with the materials that have decorations. For this, we need to open the compositing panel to unwrap and position the UVs onto the decoration. Find the drop down and the top of the screen and change the window setup from default to Compositing. In the node window along the top open the material tab and select the material for the torso design lastly along the bottom open the decoration file.

In the 3D view window tab into edit mode. Next, go to back to the vertex group window and select the vertices for the torso. Hit U and select unwrap to project the vertices onto the torso design. Align the front and back vertices to the design and scale the rest of the unused vertices into a small section of the background color. Repeat this process for the head and other decorations This set can be confusing so if you are unfamiliar with UV mapping I suggest you watch a video on how to UV unwrap in Blender.

Change the window layout from compositing back to default. The last step is to attach weapons,hats,hair or anything you want the Minifigure to be wearing. In this case, I have a hair piece that I want to be attached to the rig. To do this align the object and scale so that it is in the position that you want it to be. For hair, this would be on the top of his head
. With the object selected hit, alt> p> Clear and keep transform. In pose mode select the bone that you want the object to move with (Head bone for hair). Next, select the object. Holding shift select the bone. The bone should be blue. Hit control> p> Bone. If you did this step correctly now when you move the head in pose mode the hair should move with the rig.

That's it! You can remove the unrigged Minifigure now that we are done. Hit S to scale the Minifigure to the scene and pose him as desired.
Pre Made Animations
Thanks for stopping by hopefully we can see some awesome animations coming from this! Feel free to ask any questions in the comments.
Realistic Rendering made easy
If you are wondering how you could create beautiful images of LEGO models such as the ones you can see in the Mecabricks gallery, this add-on for Blender is the perfect starting point.
Software and files needed
• Blender
Important
It is not recommended to scale the parts as it will break the materials. If your blend file is not configured to use mm as the unit of measurement, the imported model may appear big in the viewport. Move the camera away and set the clipping distances appropriately for the viewport and render cameras.
If you wish to scale the model, you shall go through the materials one by one and change the input scale value.
Support
For support regarding the Lite Add-on, please use this thread in the Mecabricks forum.

Mecabricks add-on versions
revision 3.1.5 [19 May 2022]
- Fixed SSS radius for Cycles X
- Changed default roughness to improve transparent materials
- Added solid material 368 vibrant yellow
- Removed Blender template file from package
- Remove instruction manual from package
- Zip file downloaded from Mecabricks can be installed directly in Blender
revision 3.1.4 [05 Oct 2020]
- Updated template with settings optimized for Blender 2.90
- Allowed the add-on to run on Blender 2.80
- Viewport automatically switches to object mode before importing a model
- Set default extension of all textures to EXTEND
- Added glitter materials 341 and 251
- Added opal materials 360, 362, 363, 364 and 365 - Identical to transparent materials
- Updated geometry loader to handle custom split normals
- Updated normal builder to exclude bevel node when specified in configuration files
revision 3.1.3 [03 Feb 2020]
- Added back colour preview in viewport solid mode
- Fixed issue with old decorated transparent parts
- Tweaked decoration material
- Upgraded python code
revision 3.1.2 [16 Jan 2020]
- Default value for texture extension is set to CLIP
- Added 1199 in the material list
- Fixed error log for materials not found
revision 3.1.1 [15 Jan 2020]
- Fixed bugs for Blender Windows
revision 3.1.0 [14 Jan 2020]
- Add-on fully rewritten to handle the new Mecabricks part system
- Meshes imported are the original version as modeled not as triangulated by Mecabricks
- Removed support for Blender 2.79
revision 3.0.5 [10 Jun 2019]
- Fixed issue with decorated elements
- Controlled SSS radius with a mathematical function
- Updated value of black rubber material
- Updated units in template file
- Added Vibrant Coral color to add-on 2.0.8 for Blender 2.79
revision 3.0.4 [18 Apr 2019]
- Fixed Milky material
revision 3.0.3 [17 Apr 2019]
- Improved transparent material. Lamps located inside transparent elements (decorated or not) are now correctly lighting the scene
revision 3.0.2 [13 Apr 2019]
- Updated all materials. They are now based on the ones available in the advanced add-on
revision 3.0.1 [31 Jan 2019]
- Added opacity parameter for viewport materials. This is required by the latest Blender 2.80 build.
revision 3.0.0 [30 Jan 2019]
- Updated add-on to make it work with Blender 2.80
- Accepts new Mecabricks file format .zmbx instead of Collada .dae
- Improved import speed
- Added value for new material Vibrant Coral 353
- Updated value for material Transparent 40
- Updated rubber material
- Includes Add-on 2.0.7 for official version of Blender 2.79
revision 2.0.8b1 [03 May 2018]
- Added Add-on 2.0.8b1 for Blender Daily Build
- Add-on 2.0.7 for official version of Blender 2.79 is still included
revision 2.0.7 [17 Feb 2018]
- Updated values for 150 and 139
- Added materials 334, 346 and 1106
revision 2.0.6 [15 Oct 2017]
- Removed add-on preferences.
- Update template with pre-defined settings for filmic and denoiser.
- Updated materials and removed scale input.
- No backward compatibility with Blender versions lower than 2.79.
revision 2.0.5 [01 Aug 2017]
- Fixed issues with transparent decorated parts.
- Imported parts are automatically added in an empty object named after the model.
- After process is completed, only the empty object is selected instead of all imported parts.
- Added backdrop to template files.
revision 2.0.4 [24 Jun 2017]
- Adapted the code to make it work with the workshop exporter update.
- Fixed material replacement bugs.
- Updated mb_decoration to make it work with multi-transparent parts and parts having transparent inserts.
revision 2.0.3 [17 Jun 2017]
- Updated Default Shaders to have similar input values for both Default and Principled.
- Updated Pearlescent and Metal materials for Principled shaders.
- Fixed a bug with transparent parts in mb_decoration.
revision 2.0.2
- Corrected a bug that could prevent the add-on from importing models.
revision 2.0.1
- Added option to use shaders made with Principled BSDF.
- Added a new template that includes settings for the new denoiser.
These settings currently only work with Blender daily builds (2.8 excluded)
revision 2.0.0
- Script has been converted to an add-on. Models can be imported in any Blender scenes.
- Materials have been updated
- Decoration shader automatically detects base material and decorated areas to apply the correct materials.
revision 1.8.9
- Updated replace.py to make the script work with the DAE exporter improvements
revision 1.8.8
- Updated transparent material
- Updated chrome material
- Set unit system to metric and updated viewport scale
- Simplified set up process
revision 1.8.7
- Updated transparent material
- Turned on reflective and refractive caustics
- Increased glossy and transmission bounces
revision 1.8.6
- Redesigned rubber material. Node includes inputs to tweak the procedural bump map values.
- Updated rubber black hex and rgb values
- Updated pearlescent material and added a procedural marble texture (Thanks to Cynaptic)
- Fixed bump map scaling issue
- Updated default render samples value from 1000 to 600
- Updated normal wiring for all materials
revision 1.8.5
- Added experimental script to apply a subdivision modifier to parts
revision 1.8.4
- Added support for bump maps
- Updated part names
revision 1.8.3
- Updated values for Orange 106 and Gold Ink 299
revision 1.8.2
- Template compatible with latest version of the Mecabricks workshop
- Work with multicolour flexible parts
revision 1.8.1
- Updated Transparent material
revision 1.08
- Updated value of Transparent material 40
- Updated value of Rubber material 1026
- Updated Transparent material
- Replaced custom Fresnel by default Fresnel for Solid material
- Replaced custom Fresnel by default Fresnel for Milky material
- Replaced custom Fresnel by default Fresnel for Rubber material
- Replaced custom Fresnel by Layer Weight for Pearlescent material
revision 1.07
- Corrected value for colour 119
- Removed "Display Relationship Lines"
- Updated Fresnel Node
- Changed subsurface scatering depth to 0.5mm to avoid black lines at edges
- Remove SSS from Chrome material
- Reworked Metal and Rubber materials
- Tidied up materials
revision 1.06
- Updated SSS node and mix shader
- Updated glossiness for some of the materials
- Fixed Speckle and Glitter materials
- Updated scale of default scene (1 instead of 0.02)
- Updated camera end clipping point
revision 1.05
- Update colour value of Gold Ink (299)
revision 1.04
- Update colour value of Medium Azur (322)
revision 1.03
- Update colour value of Light Nougat (283)
- Update colour value of Medium Nougat (312)
revision 1.02
- Fix shader issues with Blender 2.74 for Windows
revision 1.01
- Change subsurface scattering falloff to gaussian in order to avoid Blender 2.74 crashing under Windows.
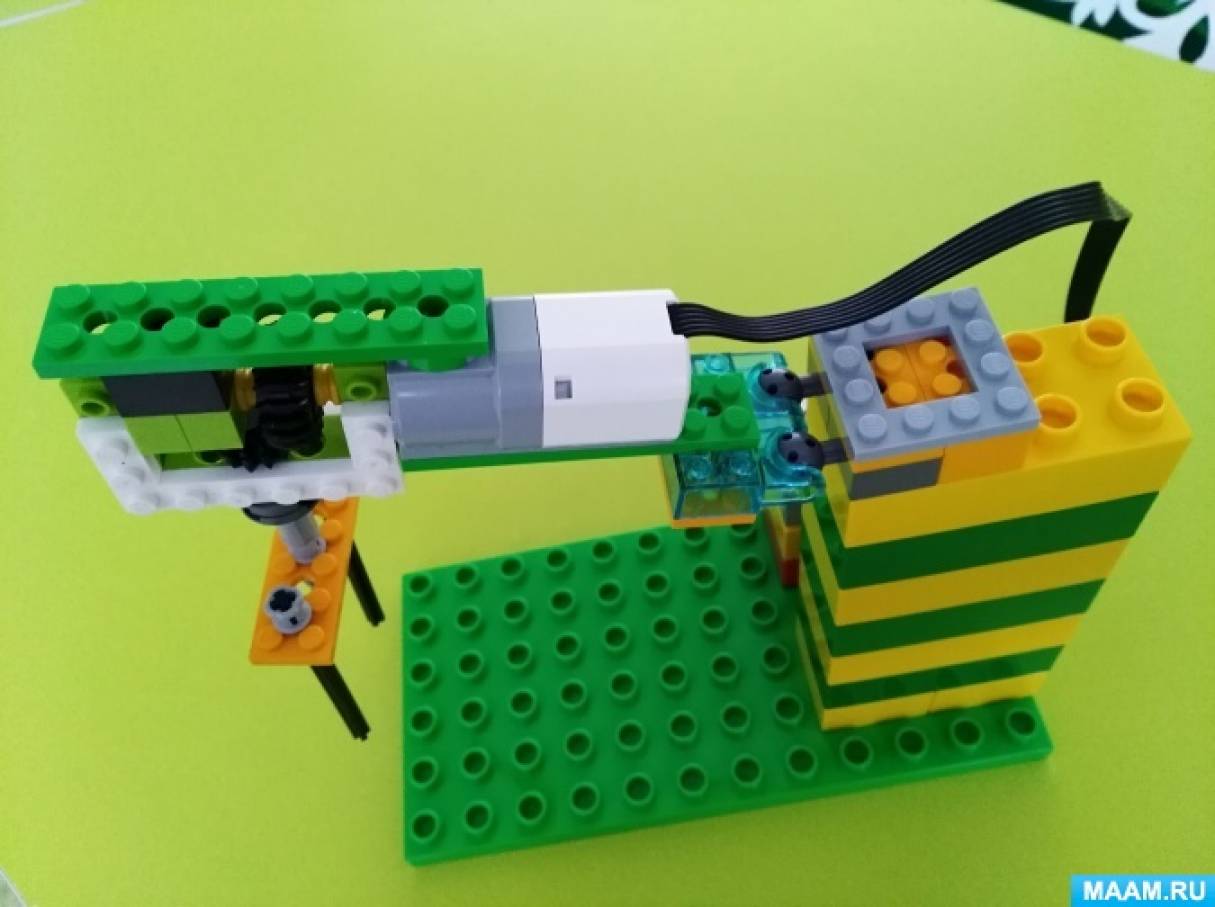
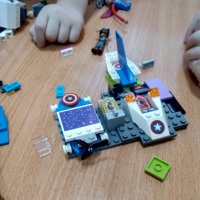
1. Создаем ручку – держатель, которая поможет с помощью кубиков с шарикоподшипниковыми креплениями поднимать и опускать миксер вверх и вниз.


2. Создаем нижнюю - винтовую часть миксера (изначально планировали использовать одну ось, но путем исследования, пришли к выводу использовать две оси с винтами, чтобы повысить качество взбивания).на оси надеваем круглые кирпичики, чтобы лучше взбивать.


3. Маленькое коническое зубчатое колесо, продеваем в балку 1x 3, чтобы создать коробку для угловой повышающей коническо - зубчатой передачи.


4. На 7 модульную ось надеваем зубчатое коническое колесо, закрепляем штифтами. Перед ним надеваем балку 1x3. Это нужно для будущей коробочки. Вставляем в мотор. На мотор одеваем маленькую зеленую круглую пластину.


5. Создаем кубик, соединяющий всю коробку. И Фиксируем ее крепко.


6. Коробка для угловой повышающей зубчато - конической передачи готова.


7. Соединяем нижнюю часть с механизмом. Миксер готов. Присоединяем его к подставке, сделанной из LEGO DUPLO подключаем к смарт хабу. Создаем программу и подключаем наш миксер.


8. Cоздаем программу для запуска миксера. Мотор крутится влево 5 секунд и вправо 4 секунды. Программу можно изменять. (например зациклить, или крутиться только в одном направлении)

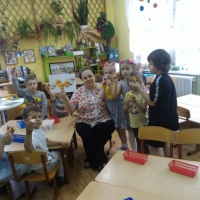
Конспект занятия по конструированию «Озорные утята» (Конструктор LEGO) в старшей группе Конспект занятия по конструированию «Озорные утята» (Конструктор LEGO) в старшей компенсирующей группе, ко дню домашних птиц на МААМе. Автор:.

Конспект занятия с использованием конструктора LEGO WeDo «Путешествие в страну LEGO» для детей подготовительной группы Цель: создание модели «Самолет» по пооперационной карте с использованием конструктора LEGO WeDo. Задачи: • обучающая: продолжать формировать.
Конспект занятия в старшей группе по конструированию «Город» по замыслу с использованием Lego Education Wedo Конспект занятия по робототехнике с конструктором LEGO Education Wedo. Старшая группа Тема «Город» по замыслу. Цель: формирование умений.
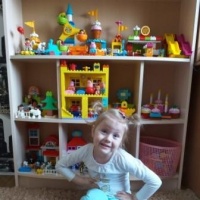
Конструктор Lego Duplo, как средство гармоничного развития ребенка Конструктор Легo - это занимательный материал, развивающий детскую фантазию, воображение, творческое начало. Конструктор дает возможность.
Конструктор «LEGO» — прекрасное увлечение моего внука Артёма Где-то прочитала, что конструктор «LEGO» - это счастье для детей. Действительно сколько радости, да и пользы приносит детям этот замечательный.
LEGO-конструктор в детском саду в качестве дополнительного образования. Часть первая .
Мастер-класс по сборке лэпбука «Девочки и мальчики» Доброго дорогие коллеги! Вот подошел к концу отпуск и я снова в работе. В программе дошкольного образования присутствует образовательная.
Мастер-класс по сборке лэпбука «Красная Книга» Мастер-класс по сборке лэпбука "Красная книга" Распечатываем фон. Формат А4 или 2 листочка А4 Собираем конверт. Все конверты в данном лэпбуке.

I use LEGO CAD to document some of my own creations (or "MOCs," as custom sets are called in some digital LEGO communities). The advantage of computer-aided design (CAD) is precision. When you use CAD to build something in virtual space, you can reasonably expect that it can be built in the real world. While the LEGO CAD applications I use don't have simulated physics to verify the structural integrity of my designs, I do lay every brick in the software to mimic a model I've made in real life.
More Great Content
LEGO bricks aren't just raw materials for design, though. They're also an aesthetic, as evident from LEGO-themed video games and movies. If you're less concerned with precision, but you still want the look of LEGO bricks, there's a great plugin for Blender called Bricker that can convert your 3D models into LEGO models with the click of a button.
Install Bricker
You can buy Bricker for $65 USD from BlenderMarket, and it's licensed under the GPLv3. Paying for it helps fund development and support.
To install Bricker, launch Blender, click the Edit menu, and select Preferences. In the Preferences pane, click the Add-ons tab on the left.
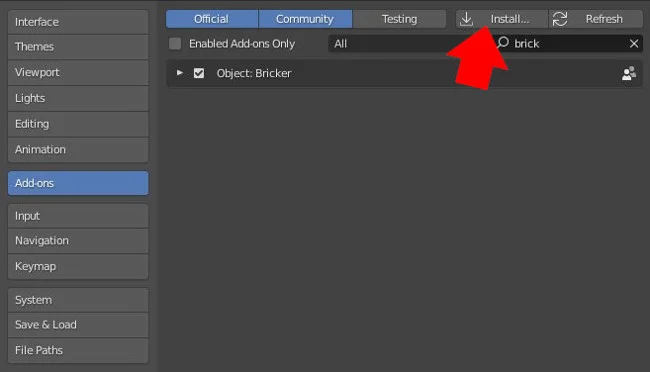
Start typing "Bricker" in the search box in the upper-right of the Add-ons pane, click the Install button, and select the Bricker ZIP file when prompted.
Convert a 3D model to LEGO bricks
Whether you have the universal starting point of a plain, gray cube, an elaborate model of your own creation, or something you've downloaded from a Blender model hub, you can give Bricker a try right after installation.
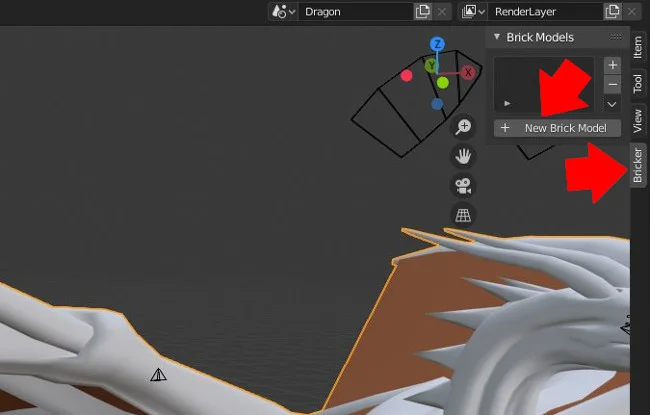
First, click on the model you want to convert into a LEGO model. With your model selected, press the N key on your keyboard to open the Properties panel. Click the Bricker properties tab, and click the New Brick Model button.
Now that you've added the model to Bricker, click the new Brickify Object button in the Bricker panel.
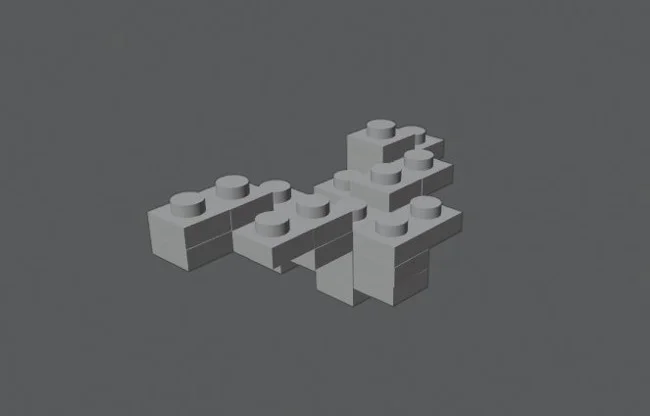
The default settings render a pretty blocky model, with mostly 2x10 bricks, no plates, and not much detail.
But there are plenty of options in the Bricker plugin for you to customize, and they show up in the Bricker Properties panel once you brickify a model.
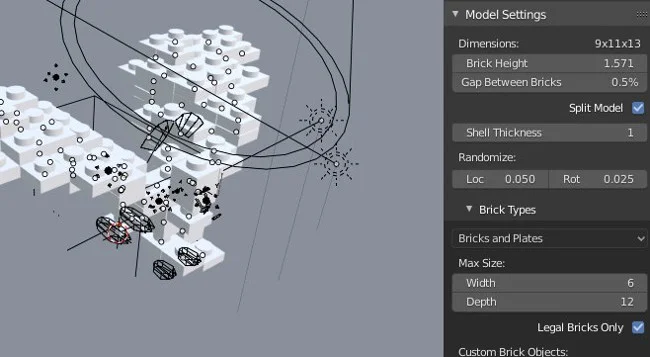
- Brick height sets the height of each brick in the model. A larger setting produces a less detailed model because fewer bricks are used for the sculpt.
- Split model makes every rendered brick an object you can move in Blender. Without this enabled, your model looks like lots of bricks but acts as if they are all glued together.
- Brick types controls whether your sculpture is made of bricks, plates, both bricks and plates, tiles, and so on.
- Max size sets the maximum size for bricks and plates in your sculpture.
- Legal bricks only ensures that all the bricks are based on real ones. For instance, enabling this prevents it from generating a 3x7 brick or a 2x11 plate because there are no such pieces in the LEGO catalog (or at least not in the LDraw Parts library).
In the Detailing panel, you can control whether the undersides of the bricks are flat (which isn't very realistic, but "cheaper" to render) or detailed to mimic the underside of an actual LEGO piece.
After changing a setting, you must click the Update Model button, near the top of the Bricker property panel, to re-render your sculpture.
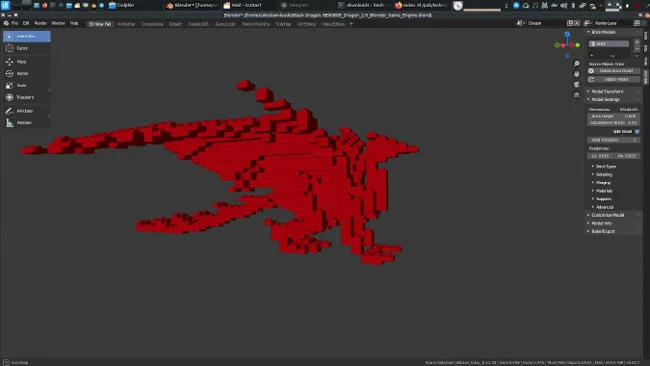
Brickify your designs
Bricker is a fun stylistic plugin for Blender. While it probably won't be your go-to tool for designing real LEGO sets, it's a great way to sculpt, draw, and animate with virtual LEGO. If you've been putting off your LEGO stop-motion movie magnum opus, now's the time to get started in the virtual world.

Play with virtual LEGOs using open source tools
Open source virtual LEGOs allow you to build anything you can imagine.

10 things I learned about making LEGO bricks glow
Learn about the expected and unexpected problems with a DIY lighting project in this Lightning Talk from All Things Open.
Читайте также: