
Lego marvel super heroes minikit
Обновлено: 13.05.2024
How to find missing Minikits?: In-game the Minikits will appear simply as a “Lego Mini Kit”, which looks like a black scubadiving air bottle with bright red and green lights on the right side of it. It can be confirmed as being Minikits simply by walking into to it, as the on-screen counter will then tell you that you’ve collected another Minikit.
Collecting Tip: You can select Free Play to replay Story Missions, which allows you to use all characters you have unlocked. So after beating the game, first try to have as many characters unlocked (with all the abilities needed) before you go for many of these Minikits. — The start of each video shows the characters needed to find all 10 Minikits in said level.
Note About Progress: You can track your Minikits collecting progress as you find each one, as the current count will then (for a few seconds) be indicated on the bottom-left of your screen. — After you’ve completed each level the game will tell you, on a results-screen, how many Minikits you’ve picked up in total.
Where to find all Minikits in Lego Marvel Super Heroes? The in-game collectibles locations for the Minikits are described in this detailed video guide.
The Minikits are listed in the videos in the order that they appear normally.
Level 1: Sand Central Station Minikits
All 10 of the Minikit locations on the “Sand Central Station” level of Story Mode are shown in this video guide.
Timeline in minutes for the Level 1 Minikits Locations Guide:
Level 2: Times Square Off Minikits
All 10 of the Minikit locations on the “Times Square Off” level of Story Mode are shown in this video guide.
Note: Whenever one of the Minikits from a Free Play stage was already collected in Story Mode, they will still be shown how to unlock it. In the visual guide they are now replaced by a blue or purple stud.
Timeline in minutes for the Level 2 Minikits Locations Guide:
Level 3: Exploratory Laboratory Minikits
All 10 of the Minikit locations on the “Exploratory Laboratory” level of Story Mode are shown in this video guide.
Timeline in minutes for the Level 3 Minikits Locations Guide:
Level 4: Rock up at the Lock up Minikits
All 10 of the Minikit locations on the “Rock up at the Lock up” level of Story Mode are shown in this video guide.
Timeline in minutes for the Level 4 Minikits Locations Guide:
Level 5: Rebooted, Resuited Minikits
All 10 of the Minikit locations on the “Rebooted, Resuited” level of Story Mode are shown in this video guide.
Timeline in minutes for the Level 5 Minikits Locations Guide:
Lego Marvel Super Heroes Minikits Locations Guide continues on Page 2 with Level 6.
To receive this minikit , you must melt four golden boards placed on the first stage. First can be found at the beginning - right behind you.

Second is hanged on the wall in the passage on the right.

Third can be found near to the lift pit, on the right wall.
The last golden board is located in the lab, opposite to the next lift. To go there, you must use Jean Grey's power to take control over the scientist standing on the right. Use him to switch the computer on. When the sewer appears, pass through it using Mr. Fantastic superpower.
Minikit 2

Choose Magneto and enter to the one of the first laboratories, looking for the big batteries . Lift them to the power point to open the door.
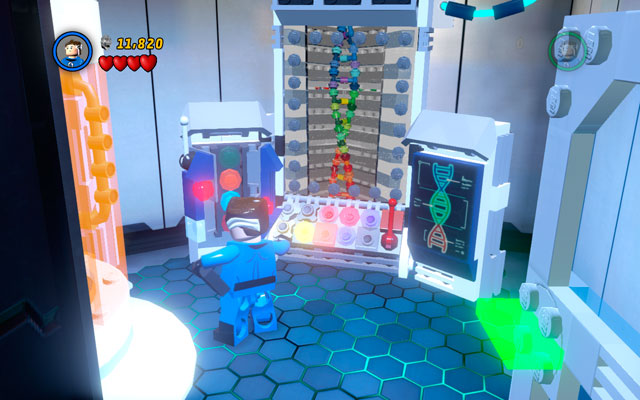
Enter to the newly opened room and use Mr. Fantastic to arrange the DNA code in the right order (showed above).
Minikit 3

Standing near to the lift pit choose any big character (like Hulk ) and yank two green handles located on the left. Now toss Captain America's shield at the patriotic panel , so you can unlock the next minikit .
Minikit 4

In the corridor located after the lift pit use Jean Grey's telepathic abilities to take control over the scientist hidden on the right. Go to the computer as him and switch it on.

When the sewer appears, pass through it using Mr. Fantastic superpower. After that charge both batteries using Thor or Storm to unlock the next minikit .
Minikit 5
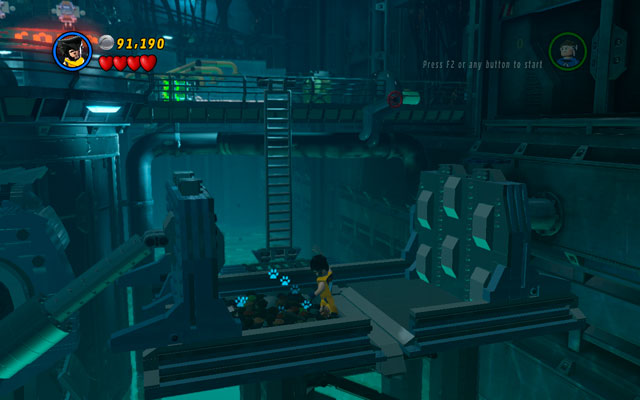
In the underground of the building choose Wolverine and go to the right corner of the location. Climb down using the ladder and then dig up a minikit from the sandbox .
Minikit 6

The way to obtain this minikit is a bit complicated. First of all, go to the highest floor of the building and turn right. There use Jean Grey's ability to telekinetically turn the violet valve . After that jump down and build the first spider .
Choose Venom and go to the middle floor, turning left. Destroy all boxes, uncovering black pool. Pass through it (do not mistake it with similar, but deadly pools !) destroying all objects in the new area. Now build second spider from the debris .
Climb to the highest floor and turn right, using any big character to destroy the shining wall . After that build the last spider and finally receive a minikit .
Minikit 7
In the further area go to the corridor filled by cages . Wait for the enemies to break from inside and then look for a pool of water . Freeze it using Iceman abilities, so you can melt newly created ice block as Human Torch .
Minikit 8

On the same floor turn left and enter the big shining room with the red button hidden inside. Melt golden vent using Human Torch fire beam and pick up a minikit .
Minikit 9

After a short play with the huge speaker you will be moved to the long corridor. Choose Magneto and lift up the metal box standing on the left. When the claw switch appears, use Wolverine's talons to unlock the mechanism - you will receive a minikit and rescue Stan Lee at the same time.
Minikit 10

During the fight with Venom fly to the upper floor and destroy all obstacles found there. Then use Galactus to construct a special lock - open it to uncover the last minikit .
Become a superhero in the LEGO world! This guide to LEGO Marvel Super Heroes contains a complete walkthrough with descriptions of every single mission in the main (and bonus) campaign, with specific solutions to all the important fights and riddles.
Last update: Wednesday, May 11, 2016
This guide to LEGO Marvel Super Heroes contains complete walkthrough, describing every single mission in the main (and bonus) campaign, with specific solution to all important fights and riddles. Text is reader-friendly: players, who are not common with the LEGO genre should look to the Overall hints part, created especially for them. Nevertheless, more hard-core users can read chapters Finishing the game in 100% and Deadpool bonus missions, which are more advanced. Notice that separate chapters of the text focuses on the duels with the bosses and fighting tactics! Furthermore, guide contains description of all collectibles: minikits, comic books, gold bricks, character tokens and Deadpool red bricks . In this compendium you can also find useful information about every Stan Lee in Peril location - both in campaign missions and in the New York city area. Every playable character in the game was described in detail - which applies not only for superheroes, but for arch villains and common people too. Separate parts of the text focuses on the vehicles and different ways to seize them. In this guide you will also find a lot of interesting, useful and transparent maps, which are referring to every significant part of the game (eg. collectables, characters, locations). We hope you will enjoy them!
To sum up, this guide contains to LEGO Marvel Super Heroes :
- A detailed walkthrough for the main campaign and all bonus missions;
- Clear instructions referring to boss fights;
- A lot of colorful illustrations, especially useful when solving riddles;
- List of activities demanded to beat the game in 100%;
- Location of all Deadpool bonus missions (with instruction how to unlock them);
- Location of all collectibles: gold bricks, red bricks, minikits, character tokens and Stan Lee in Peril ;
- High-quality maps;
- Description of every playable character and unlockable vehicle (containing instruction how to seize them);
- Useful advices, referring to various aspects of the gameplay.
Katarzyna Grobelska & Maciej "Czarny" Kozlowski
About LEGO Marvel Super Heroes Game Guide & Walkthrough
last update : May 5, 2016
Guide contains : 114 pages, 1019 images, 9 maps and annotated illustrations.
Use the comments below to submit your updates and corrections to this guide.
100% Walkthrough guide showing all 10 Minikit Locations, Red Bricks and Gold Bricks.
All locations are per video

5

1

1

| 5,273 | уникальных посетителей |
| 303 | добавили в избранное |

Tabloid Tidy Up (Red Brick X4, Doctor Octopus - Ultimate)
A Shock Withdrawal (Red Brick Ghost Studs, Moon Knight)
01:12 to 01:28 - Character Token - Moon Knight Unlocked
05:07 - Deadpool Red Brick - Ghost Studs Unlocked
05:37 - Stan Lee in Peril Location
House Party Protocol (Red Brick X10, Heartbreaker)
01:47 to 01:57 - Deadpool Red Brick - X10 Multiplier Unlocked
02:11 to 02:30 - Character Token - Iron Man (Heartbreaker)
02:59 - Stan Lee in Peril Location
Nuff Said (Gold Brick Detector, Ms. Marvel)
01:10 - Character Token - Ms. Marvel Unlocked
03:17 to 03:39 - Deadpool Red Brick - Gold Brick Detector Unlocked
04:06 - Stan Lee in Peril Location
Feeling Fisky (Red Brick X6 Multiplier, Kingpin Henchman)
01:36 to 01:54 - Character Token - Kingpin Henchman
02:06 to 02:20 - Deadpool Red Brick - X6 Multiplier
02:44 - Stan Lee in Peril Location
Put Up Your Dukes (Minikit Detector, Wolverine - Cowl)
00:50 - Deadpool Red Brick - Minikit Detector
03:09 - Stan Lee in Peril Location
03:23 - Character Token - Wolverine (Cowl)
Stunt Show Surprise (Attract Studs, Mandarin - Film)
01:04 - Deadpool Red Brick - Attract Studs
01:25 - Character Token - Mandarin (Film)
01:45 to 02:08 - Stan Lee in Peril Location
Reptilian Ruckus (Red Brick X8, Thing (F.F.) Character Token)
Stranger Danger (Fast Build, Invisible Woman (F.F.)
01:26 - Character Token - Invisible (F.F.)
02:40 to 02:59 - Stan Lee in Peril Location
04:18 to 05:04 - Deadpool Red Brick - Fast Build
Thrill of the Chess (Token Detector, Green Goblin - Ultimate)
02:00 to 02:10 - Deadpool Red Brick - Token Detector
03:11 - Character Token - Green Goblin (Ultimate)
03:40 - Stan Lee in Peril Location
Bro-tunheim (Mini Character Red Brick, Thor-Classic)
01:00 - Deadpool Red Brick - Mini Characters
01:13 - Stan Lee in Peril Location
01:34 to 01:43 - Character Token - Thor (Classic)
In this mission, there are ten Minikits, one character card and one Stan Lee in peril. As mentioned in the introduction, collect hidden secrets in Free Mode.

The first Minikit can be found right after you regain control over your characters. Walk towards the right side, destroy all the containers, and assembly a terminal and a cable. Use the panel as Ms. Marvel, make your way through the labyrinth to unlock the safe and get your first Minikit. Now destroy the present, and use the scattered blocks to build the treasure.

The second Minikit is not far from the first one. Approach the beds as Doctor Strange and use Magic to lift the mix tape and drop it into the tape deck. The surrounding characters will start dancing, and you will be rewarded with another Minikit.

The next Minikit is located on the same deck as Minikits 1 and 2. Go to the left side and destroy the yellow container. Shoot at the colorful shields above you in a specific order: yellow-blue-red. This will unlock the Minikit.

This Minikit can be found in the second part of the mission. Approach the presented fountain and use a character with a laser to melt the ice (e.g. Iron Man). Use the valve to activate the fountain.

The next Minikit is located by the second fountain. You need to destroy five eye stalks, located randomly. All of them will appear in both water pools. Blast the fifth eye stalk to collect the Minikit.
Character card - Moon Knight

The next secret is located under the first rescue the civilians puzzle. Approach the golden door, and use Iron Man's laser to cut through it. You will find a character card on the other side - Moon Knight.

The next Minikit is right by the lake. Approach the gripper and destroy the yellow container on the right side. There is a pressure panel under the container. Keep it active until the gripper pulls out a green container from the water. Smash it to collect the Minikit.
Stan Lee in peril

Stan Lee is locked in one of the Starblasters. Approach him, and break the front glass with a character who can do that (e.g. Quake, Black Bolt or Howard the Duck).

This Minikit can be found in the third part of the mission - encounter with Eson the Searcher. Take a character, who can destroy cracked LEGO objects (e.g. Captain Marvel), send the hero to the presented spot (left side), and smash a breakable panel on the ground. Collect your Minikit.

Go towards the right side. There is a pile of debris that needs to be destroyed. Remove it, and you will find a trampoline that will shoot your hero up into the air. That's where the last Minikit will appear.
Читайте также: