
Lego technic automatic gearbox
Обновлено: 26.04.2024
A hack to light up your world!
Brighten up your builds with spinning lights! Check out the video to learn a cool hack for creating an impressive spinning light using your LEGO® Technic™ pieces and a pull-back motor. Why not have a go yourself?
Power up your paper planes!
Wish you could throw a paper plane further? Here’s a cool way to get your paper creations flying! Watch the video to see how adult creator Nard hacked the pull-back to create a cool launching device. Why not try your own hacks and see what you can create!
Hack the Epic Jump Launcher
Hack the Pull Back – Hack 3
Hack the Brick Toast Maker
Hack the Pull Back – Hack 5
Hack the Alarm Clock Stopper
Hack the Pull Back – Hack 1
The Move It challenge – Time-lapse
So many hours of hard work and planning played out in just a few seconds!
Episode 02 - Collaboration & Problem-Solving
The kids pair off to show off their off-road buggies.
Hack the… Hand Heli
Make a simple but effective propeller that you can launch across rooms!
Take your minifigures for a wild ride!
When you use your imagination, anything is possible! Check out this video to see how adult creator Nard hacked the pull-back to create a carousel for LEGO® minifigures.
See a counterweight in action
Ever wondered why a counterweight is so important when transporting a heavy load? Watch this video from the MOVE IT stunt to find out.
Can a car become a clock?
Can you use a car to make a clock? You can when you hack the pull-back! Check out this video to see how Alexander builds a table clock powered by a pull-back motor.
Brilliant board game hack!
Check out this cool video to see how Bre hacks a LEGO® Technic™ pull-back motor to create a board game timer. Feeling inspired? What cool hacks can you invent?
Porsche 911 GT3 RS
Celebrate innovative engineering and design from one of the world's leading car manufacturers with this stunning LEGO® Technic model. Developed in partnership with Dr. Ing. h.c.F. Porsche AG, this elegantly packaged LEGO Technic Porsche 911 GT3 RS with its sleek aerodynamic lines, adjustable rear spoiler and orange bodywork is packed with authentic features and functions that capture the magic of the iconic supercar, and the attention to detail is clear from the outset! Open the doors and you'lldiscover an elaborate cockpit with racing seats, working gearbox, steering wheel with gearshift paddles, detailed dashboard and a glove compartment containing a unique serial number. Lift the rear lid and you'll have access to a detailed flat 6 engine with moving pistons, while under the hood you'll find a storage area with suitcase. Red suspension springs, detailed brake calipers and original-design rims with special low-profile road-gripping tires add the final touches to this magnificent mod el!
Concrete Mixer Truck
Every big build needs a sturdy concrete mixer to get the job done. You’ll be turning concrete in no time with the LEGO® Technic™ Concrete Mixer Truck. Drive the truck then turn the mixing drum to prepare your concrete. Ready to unload? Turn the mixer drum counterclockwise to release the concrete. Use the funnel to guide the concrete where you need it, ready for your next construction project.
Mercedes-Benz Arocs 3245
Climb aboard the awesome Mercedes-Benz Arocs 3245! This huge, robust, 2-in-1 LEGO® Technic model is packed with authentic details and features. Turn on the included Power Functions large motor and engage the advanced pneumatic system (new for fall 2015) for complete control over an array of exciting motorized functions. You can operate the ultra-versatile crane arm mechanism, open and close the grabber, extend the outriggers or raise and lower the tipper body! Twin axle steering, double differential drive and fully independent suspension provide ultimate maneuverability, and the driver's cab tilts to reveal a detailed 6-cylinder engine with moving pistons. Open the cab doors to access the detailed interior with dashboard, blue seating and steering wheel with Mercedes-Benz logo. This meticulously detailed 2015 model also features an extendable crane arm, 4 suspended axles, double wheels on the 2 rear axles, opening tailgate, warning beacons, wing mirrors and comprises 2793 elements, making it one of the largest LEGO Technic models we have ever produced. An authentic white, gray and black color scheme and iconic 3-pointed Mercedes-Benz star add the finishing touches to this impressive model. When you feel like another building challenge, rebuild it into the rugged Mercedes-Benz Articulated Construction Truck.
Mobile Crane
Ready for an action-packed shift at the construction yard? You’ll power through the tasks with this awesome LEGO® Technic™ Mobile Crane. Steer into position, put the outriggers down then climb into the cabin to operate the crane. Raise the boom and extend the telescopic arm to impressive heights, (up to 78cm!). Then use the hoist to lift the concrete pillar before heading to the next job.
Heavy-Duty Excavator
Take on the toughest construction site challenges with this rugged LEGO® Technic™ Heavy-Duty Excavator. Check out the driver’s cabin, then rotate the body and move the arm just like on a real excavator. Raise and lower the shovel to transport the stones and use the 4 cones to mark out your route. Ready for an exciting new challenge? Rebuild your model into a cool tracked tractor with backhoe.
Land Rover Defender
Explore innovative engineering and design from one of the world’s leading vehicle manufacturers of city and all-terrain vehicles with this impressive LEGO® Technic™ Land Rover Defender replica model – an awesome display piece for the home or office. Developed in partnership with Land Rover, this detailed reproduction captures the vehicle's beautifully crafted and sculpted surfaces, and comes with a host of realistic functions, including All Wheel Drive with 3 differentials, independent suspension on both axles and a working winch. Open the doors and you’ll discover an elaborate cabin with a working steering wheel, detailed dashboard and a new-for-October-2019 transmission system with 2 levers for engaging high or low gear ratios and a selector for changing gear – the most sophisticated LEGO Technic gearbox to date! You can also fold the rear seats forward to view the 4-speed sequential gearbox, lift the bonnet to view the in-line 6-cylinder engine with moving pistons or turn the rear-mounted spare wheel to open the tail door. A removable roof rack with storage box, pannier, ladder and traction mats, plus a set of original-design rims with road-gripping tires add the final touches to this magnificent model.
Getaway Racer
Cruise the streets with this cool, powerful vehicle featuring massive extra-wide rims with low profile tires, huge vertical exhaust pipes, heavy-duty front bumper and awesome dark-gray and black color scheme with cool flame stickers for a real bad-guy look. Activate the powerful pull-back motor to make a quick getaway!
Mack Anthem
Enjoy a rewarding and innovative building experience with this exceptional 2-in-1 LEGO® Technic 42078 Mack Anthem truck. Developed in partnership with Mack® Trucks Inc., this meticulously detailed replica model features an array of realistic details and functions. Open the doors and you'll discover a well-equipped driver's cab complete with a detailed dashboard and steering wheel, sun visors, adjustable seats and a bunk bed, while under the hood you'll discover a 6 cylinder straight engine with moving pistons and spinning radiator fan. You can steer the truck into position, lower the landing legs, extend and secure the outriggers and operate the synchronized crane arms to lift the container onto the detachable trailer. And when you feel like another building challenge, you can rebuild it to create the iconic Mack LR garbage truck featuring an array of authentic details.
Mini CLAAS XERION
Love tractors? Love building? Then you’ll love this LEGO® Technic™ Mini CLAAS XERION (42102) tractor. In the famous CLAAS colors, this eye-catching tractor is top of its class. And its good looks are just the start. This powerful machine is packed with features to tackle jobs in the field or farm. Great news for busy farmers; the tractor rebuilds into a Harvester, with steering and rotary cutter.
Rescue Helicopter
Carry out heroic rescue missions with the LEGO® Technic™ Rescue Helicopter. This realistic model comes with a cool red, white and black color scheme and an array of realistic features and functions. Spin the rotors, open the side and rear doors, and operate the winch to lower the rescue stretcher… it's just like the real thing! Rebuild this set to create a futuristic Concept Plane.
Dragster
Engines ready! Drivers ready! Pull back, release and GO, GO, GO! Dragster racing has to be the ultimate speed challenge, so put your building skills to the test and create this awesome LEGO® Technic™ Dragster car. Just pull back and release to see it speed along. Then lock in the wheelie bar to perform heart-pumping wheelies. Want more action? Rebuild the Dragster into a super-fun pull-back Hot Rod.
Stunt Show Truck & Bike
It’s the ultimate test of speed, skill and precision. Pull back the motorcycle to send it racing towards the ramp. Then watch as it soars through the ring of fire in a display of pure bravery. Just switch the ramp back into a trailer and fix to the truck ready to transport your bike. Want a new challenge? Rebuild the LEGO® Technic™ Stunt Show Truck & Bike model into a cool Stadium Truck set.
Build the new LEGO® Technic McLaren Senna GTR!
Can you beat the timer? Play and complete all the challenges in time to build the new LEGO Technic McLaren Senna GTR.
Check out popular videos
Meet the female stars of motorsports
We’re celebrating the achievements of female drivers in motorsport. - Sports car racing driver Christina Nielsen from Denmark was the first woman to win a major full-season Sports Car Championship in North America. - The first woman to compete in a Formula 1 race was Italy’s Maria Teresa De Filippis in 1958. - The woman who competed in the most F1 Grands Prix is Italian driver Lella Lombardi. - There have also been several female test drivers and development drivers in motorsport including Susie Wolff and Jamie Chadwick.
The biggest challenge ever?
Big. Bold. Ambitious. There was nothing small about the Move It challenge! Watch the video to be blown away by the size of this stunt and get inspired to create your own Move It builds.
Hack the… Pulley
Can you defy gravity using a Pull Back motor…?
Watch the MOVE IT stunt blooper real
Sometimes the best moments in any challenge are when things don’t go to plan! Check out this blooper video to see some of the funniest bits of the MOVE IT challenge.
Hack the Kicks Sender
Hack the Pull Back – Hack 7
Are you ready to Hack the Pull Back?
Our little Pull Back motor can be used in (literally) millions of ways. So to see exactly how many, we want YOU to hack it and rebuild it into something totally awesome and unique!
Cool solutions for everyday problems
See how Damien uses LEGO® Technic elements to help him enjoy his favorite TV show. And discover why mistakes don’t matter when it comes to inventing cool stuff! Check out all the videos from the Move It stunt for more inspiration.
Using a weight to move a weight!
It’s a simple yet brilliant theory – use a weight to move a weight! Go behind the scenes of the MOVE IT stunt in this cool video and see how a 24-ton counterweight was used to move the heavy load.
Creative problem-solving in action
Your hands are full. But you need to open the door! What do you do? Discover how Anika found a solution using LEGO® Technic elements. Discover more about the Move It challenge.
Top tips to supercharge your hacks!
Want to make YOUR pull-back hacks the most epic hacks EVER? Check out the video and learn from inventor Joseph as he hacks a pull-back motor to invent a paper airplane launcher.
Asphalt 9: Legends Grand Prix
The LEGO® Technic™ McLaren Senna GTR model in Asphalt 9: Legends Grand Prix
Epic builds – Cool moves
Can you make a ball move using LEGO® Technic elements? What about a wheelbarrow? That was the challenge for these 2 robotics experts. Get inspired and discover more about the Move It stunt.
LEGO® Technic CONTROL+
Meet the most immersive play experience ever from LEGO® Technic: A richer way of controlling your vehicles through new electronic components and a free app for your smart device, working together to bring your play closer to how real-life vehicles function. CONTROL+ equals realistic multi-function control plus new awesome possibilities – like automation, authentic sounds, alternative ways of control, challenges and achievements and live data feedback from your model.
Check out the Beta version my Lego Technic Gearing Ratio Calculator Tool:
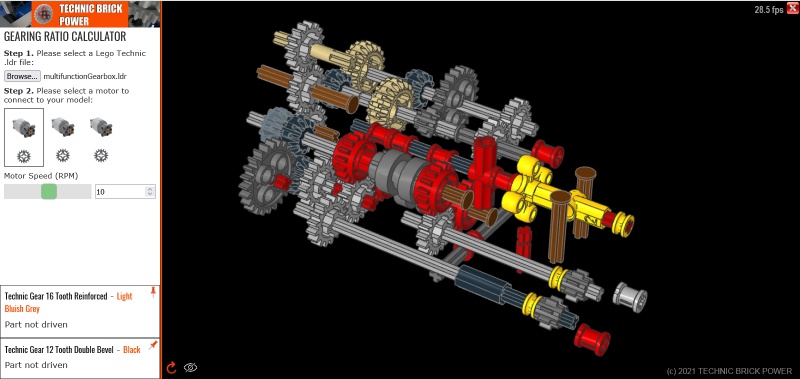
This tool allows you to upload your Lego Technic project .ldr file and analyse the gearing ratios between any two connected gears or axles. Currently supports most gears, axles, worm gears, some differentials, cv joints and universal joints. See the video tutorial on how to use it. It is a work in progress and I would love to hear your feedback on it. Click here to try it out.
Note: As of 25 Septemeber 2021 the tool supports CV joints, linear speed via the radius of the component and improves on the frame rate for higher numbers of parts in a model).
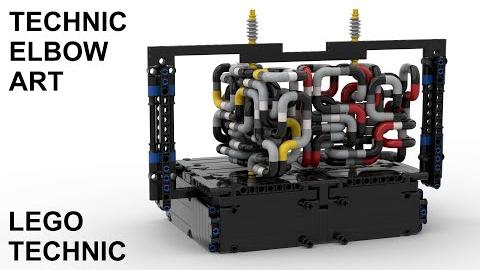
Technic Elbow Art
This is a tool to create "Lego Technic Elbow Art" - a series of intertwined elbow pieces as a single sequence. Choose your dimensions and search parameters and search for new dense solutions and set a record!
Download your Elbow Art as an .ldr file and build it yourself. Click here to try it out!
Lego Technic Powerful 2 Speed Auto Gearbox

Here I present my design for a compact and powerful Lego Technic 2 speed automatic gearbox.
The gearbox uses the Lego Technic Powered Up functions to detect speed and deduce torque from that to make gear switching decisions. The gearbox switches between a high gear of 1 to 4, to a low gea. read more
Lego Technic New 12/20 Gear High Speed Friction Test

The Lego Technic set 42140 App-Controlled Transformation Vehicle introduces two new gears - a flat version of the 12 tooth bevel gear and a flat version of the 20 tooth bevel gear. These gears are designed to have less friction.
In this follow up video I measure the high speed difference . read more
New Flat 12/20 Gear Friction

The Lego Technic set 42140 App-Controlled Transformation Vehicle introduces two new gears - a flat version of the 12 tooth bevel gear and a flat version of the 20 tooth bevel gear. These gears are designed to have less friction.
In this video I measure the difference in gearing efficiency. read more
Lego Technic Pi Day Machine
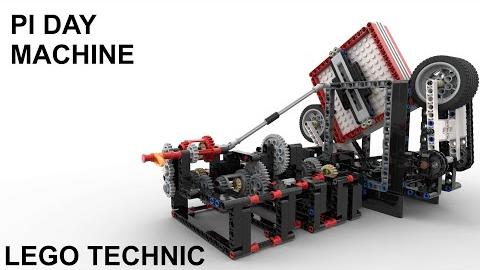
Here I present a Pi Day special Lego Technic machine that produces a gearing ratio of Pi/8 using a 56mm wheel driving a 13x13 square wheel.
The correctness of the ratio is confirmed by matching it with output of a 2 differential gearing system that produces a ratio of 355/9. read more
Lego Technic 100 Part 4 Speed Gearbox
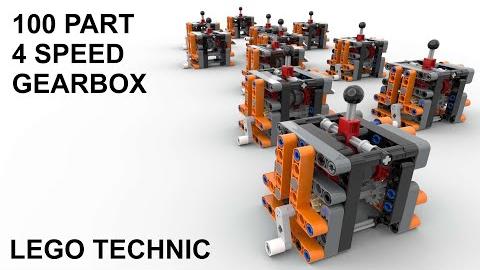
This video shows how to make a Lego Technic 4 Speed gearbox using 100 parts. The gearbox is a manual gearbox makes gearing ratios of 1/3, 5/9, 1/1 and 5/3.
The gearbox is demonstrated by hand and by using a Lego Technic Large Power functions motor.
Gearing Ratio Calculator Tool Help
Lego Technic Powered Up Tutorial 2 - Speed Control

A Lego Technic Table Tennis robot is demonstrated. The table tennis robot can launch balls at up to 10 m/s using two lego technic buggy motors driving a pair of 46mm wheels. The ball baskets holds up to 60 balls that can be fired at the player at an adjustable rate of between 1 ball per second to. read more
Lego Technic Elbow Art
Technic Elbow Art Tool
This fun tool is designed to search for "Elbow Art" solutions - these are artistic creations made out of a continuous sequence of connected Lego Technic "elbow" pieces (part number 25214) to create an intertwined spaghetti like model. Each step consists of adding a single elbow (with a length 2 axle to join it), an extended elbow (on a length 3 axle with a 1x1 liftarm), or an extra long extension (elbow joined with a length 4 axle and two 1x1 liftarms).
There are a number of adjustable parameters:
SPACE DIMENSIONS
X, Y, Z sliders. These set the dimensions of the search space that is being filled up. For example X=7, Y=10, Z=7 will try to fill a 10 high (Y dimension) box with a 7x7 base.
Loop. Tick this checkbox to create a continuous loop. If this is not checked the program will create an "axle mounted" piece of art that has a start and end point (see next paragraph on the axle coordinates).
Axle Coordinates: (Axle X and Axle Z). This option is only shown if you choose not to create a "loop". These are the coordinates of the "start" and "end" points of the elbow sequence. The idea of the design is that the resulting art piece can be mounted on an axle at the bottom and one at the top and rotated to create an interesting dynamic model. The X and Z coordinates of the axle are restricted to the be less than half of the X and Z dimensions due to the symmetry of the model. The coordinates start at (0,0).
SEARCH PARAMETERS
These are the parameters that can be set to alter the search algorithm. In general the number of solutions is incredibly large (exponential with the size of the search space) and cannot be searched in a practical amount of time. Therefore the search uses a few parameters to guide it and allows you try your luck with finding new records!
Random Seed. Since the search is randomized, this is simply a number that generates a predetermined "random" sequence and allows you to repeat the results of your search by using the same number. Change this parameter to try a different "lucky" search.
Max Elbows. This is the maximum number of elbows the search will try to fit into the space. If you want a less dense solution you can vary this parameter to limit the search to finding solutions with no more than this number of elbows. By setting this parameter you can also improve your chances of finding a record by making the search more efficient.
Search Loops. This is the number of search steps before the search terminates and presents the results (you can also press the"Stop" button to halt sooner). Increase this parameter to search for longer.
Rewind Loops. The search algorithm uses an exhaustive "brute force" approach meaning it will search across all possible solutions (eventually. if you have centuries to wait). It does this by placing pieces randomly and if no more pieces fit it undoes the last step and tries a different placement. This means most of the search time is spent on the "end" of the solution and the beginning will stay the same for a very long time. This parameter will "rewind" the solution back to near the beginning after this many steps. This allows the search to try a different starting sequence because if it began with a suboptimal starting sequence then it will not improve the final solution in a timely manner.
Rewind To. Once the "rewind loops" threshold has been reached the solution is rewound to the beginning with this many steps. For example a value of 4 would mean it will undo all steps back to the sequence that has just 4 elbows and continue from there with a new sequence for step 5.
ELBOW COLOUR CYCLE
Using these pulldown lists you can choose the sequence of elbow colours used in the model. Only available colours are shown.
JOIN COLOUR CYCLE
Here you can choose the colour cycles of the joins.
CONTROLS & BUTTONS
Use the "Search" button to start the search. Use "Stop" to stop it. Once solutions have been found you can use the ">" buttons to step through the solutions (bottom right of screen). Press the "LDR" button to download the LDR file of your solution.
SETTING RECORDS
Records are measured by the number of elbow pieces fitted into the selected space and axle coordinates. If you find a record you can enter your name and location (e.g. country)!
Good luck and enjoy.
Click here to try the tool.
Measuring Gearbox Efficiency

This video describes a method for measuring the efficiency of a gearbox using the Lego Technic Powered Up hub. Gearbox efficiency is defined as the ratio of the output power to the input power and here I show how to measure each of these values to allow you to calculate the overall efficiency.
Here I present a Lego Technic Remote Control Forklift model. The model uses articulated steering implemented with a Power Functions Servo motor, and is powered by a PF Large motor. The forks are raised and lowered with two PF medium motors driving worm gears which in turn drive via a 24 tooth clu. read more
Lego Technic Powered Up Tutorial 1

This tutorial is for beginner Lego Technic Powered Up programmers. It teaches how to turn motors on and off, read and set their axle angles as well as axle calibration using the Powered Up app on the google store or apple store.
What are you currently working on for the Gearing Ratio Calculator Tool?
Gearing Tool Update
I have updated the Gearing Ratio Calculator tool as follows:
- Fixed issues with knobbed wheel meshing
- Added CV joint support (ball and regular)
- Added wheel hub support
- Added a few steering wheels and fans and propellers
- Show linear speed based on the RPM and radius of the component
- Improved frame rate
What is the relationship between the number of teeth on a gear and it's radius?
Lego Technic 100 Part Mercedes RC Car
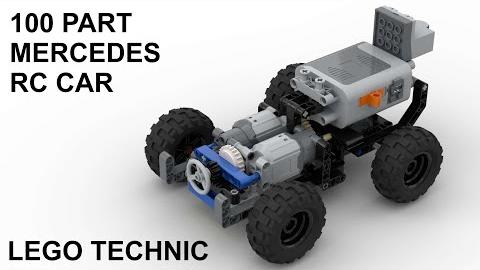
Here is a challenge to build a fully functional Remote Controlled Lego Technic car using only 100 parts. This video shows the result.
How do you make a 1:7 gearing ratio?
How do you make a 1:5 gearing ratio?
Lego Technic Gearing Ratio Tool Update
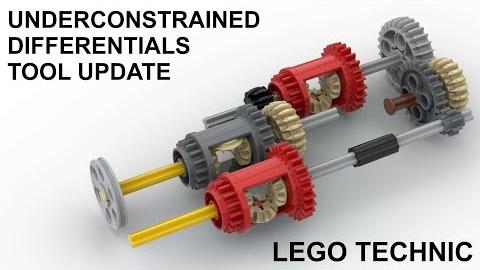
This video presents updates to the Technic Brick Power Lego Technic Gearing Ratio Calculator tool specifically on underconstrained differential systems. These are systems in which the differentials are not fully constrained and therefore have 1 or more degrees of freedom within them.

Всегда было интересно, реально ли сделать полностью идентичную модель автомобиля в масштабе 1:5 например? То есть, самому сделать двигатель, выточить поршни, трансмиссию, все узлы подвески, и вообще все всё, и потом запустить её
Коробки-автомат есть даже в лего уже. А наши автомобили ка ездили на ручной коробке, так и будут дальше ездить

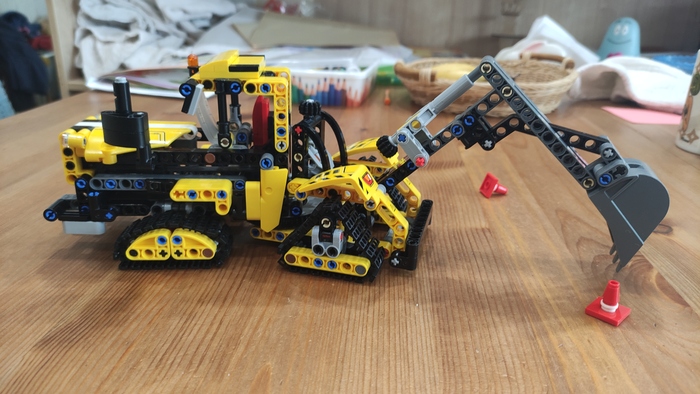
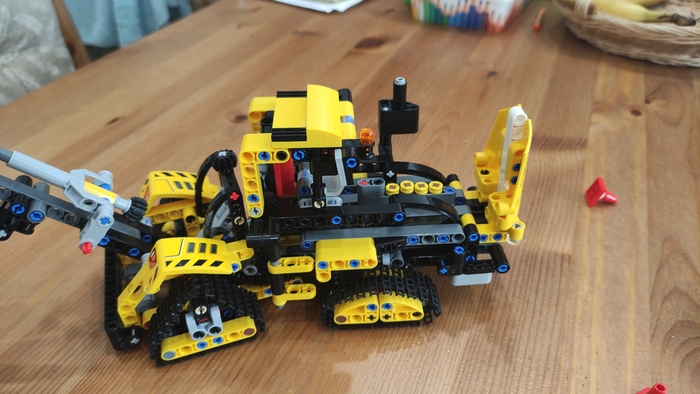
Тяжелый экскаватор Lego 42121 модель Б
Тяжелые времена настали для поклонников лего в России. Поэтому сегодня мой пост будет посвящен не новинке, а альтернативной модели на которую я уже делал обзор. Ссылка на обзор ниже.
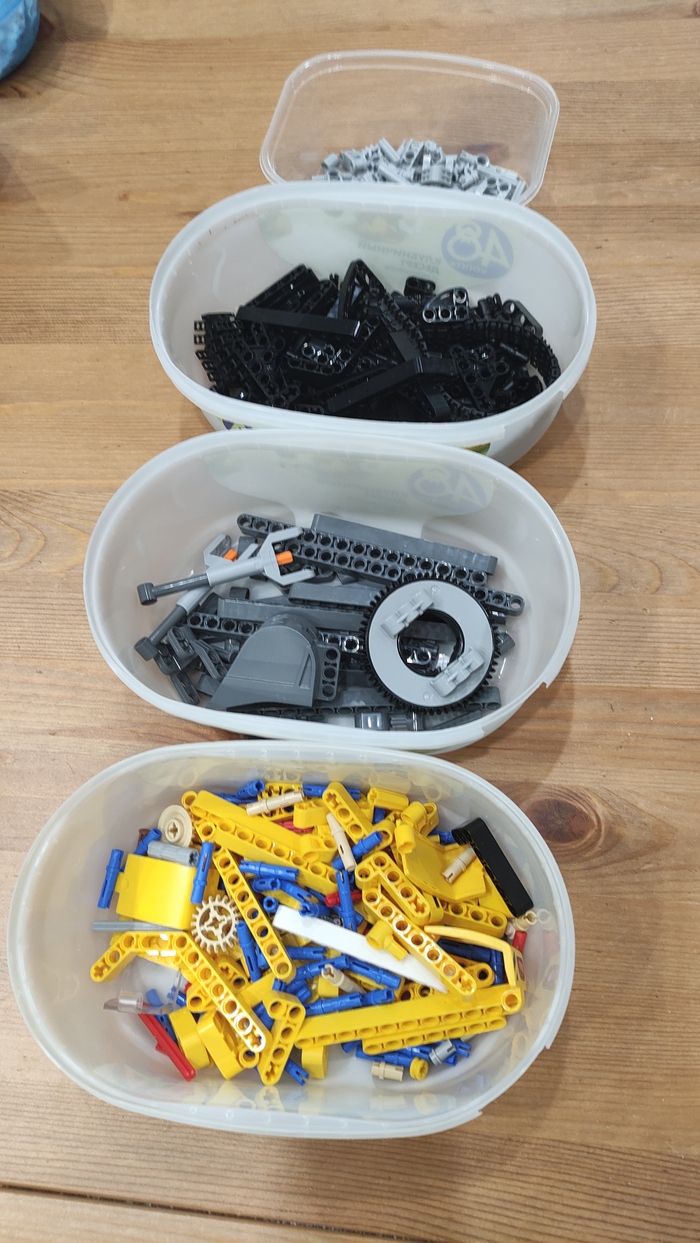
Что в итоге должно получится.
Разбираем на запчасти. В ход пойдут даже детали балок на 2, которые внизу кадра.
Так как это альтернативная модель, то этапов сборки не будет. Привожу несколько фотографий процесса.
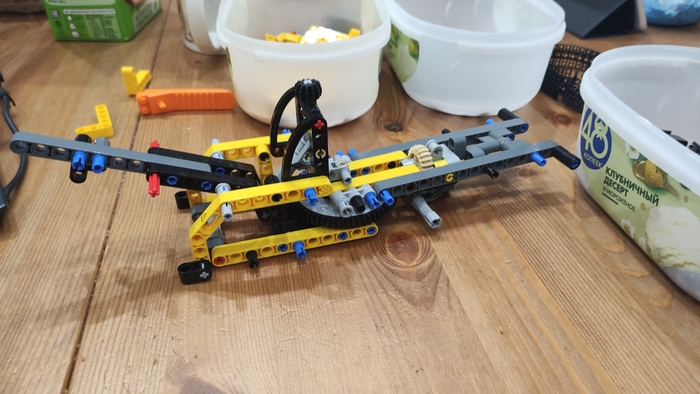
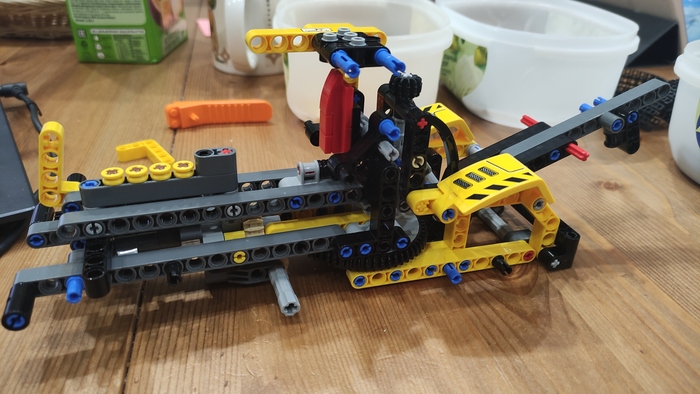
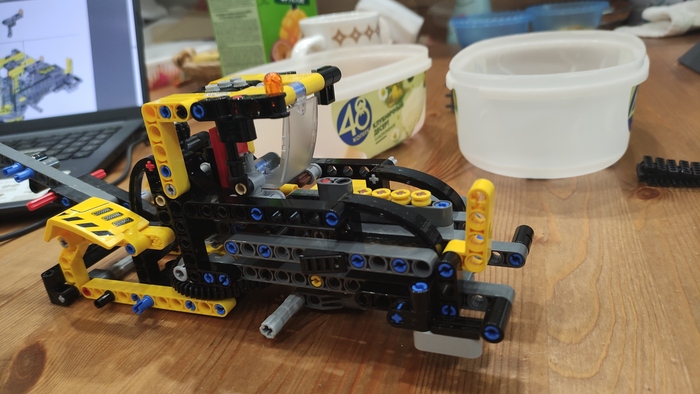
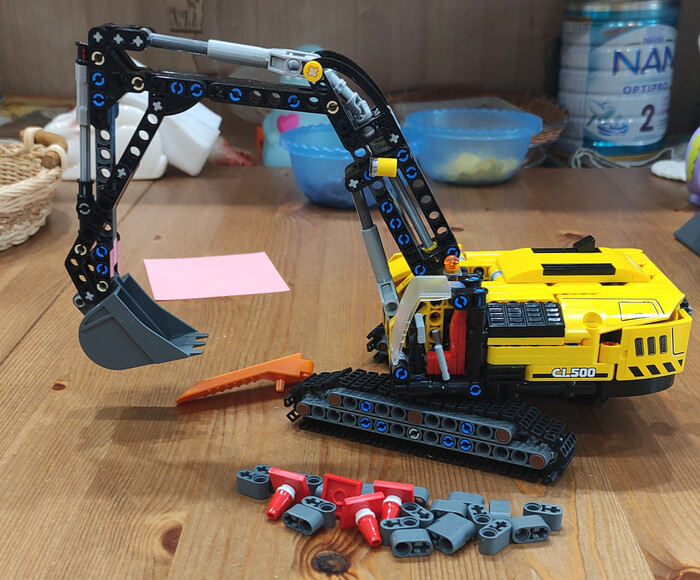
Вот что в итоге получилось. Экскаватор теперь больше похож на трактор на четырех гусеницах. Задняя часть может поворачиваться. Есть подобие мотора. Из конусов осталось только два, маленькие балки на 2 были задействованы в модели.

Деталей после сборки осталось не много.
Что имеем в итоге. Модель не дурна и задействует почти все детали из основного набора. Появился макет двигателя. Но при этом в конструкции ощущается, что модель сделана по остаточному принципу. Некоторые детали крепятся свободно и могут легко перемещаться, от сиденья в кабине осталась лиши спинка. Участь данной сборки уже предрешена - ребёнок поиграет несколько дней и соберу назад.
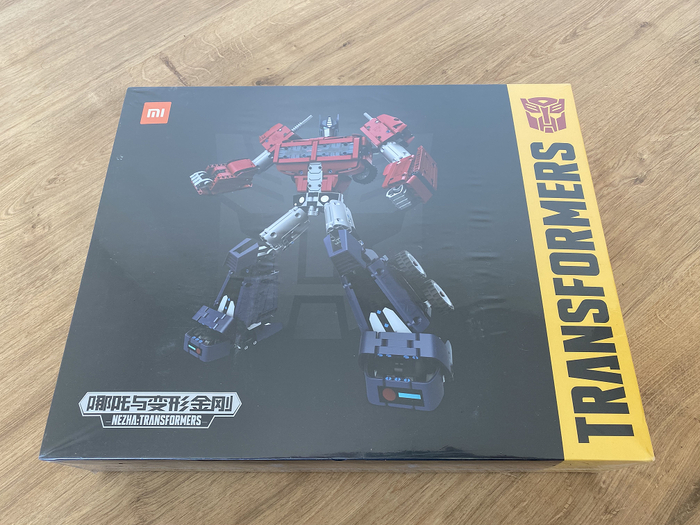
Xiaomi Mitu Transformers Optimus Prime QTZ011QI
В начале года появилась неожиданная новость, что Lego в коллаборации в Hasbro (по факту конкурентом) выпустит сборную модель Оптимуса Прайма в серии Creator Expert. Я начал гуглить хоть какие-нить изображения будущего набора, и обнаружил что уже существуют лицензионные lego-like трансформеры от Xiaomi. Правда официально лицензия распространяется только на рынок Китая и, как и другие наборы от Xiaomi, эти конструкторы выполнены в формате Technic. Причем по мимо собственно самого Оптимуса Прайма в это серии есть еще четыре трансформера – Бамблби, Мегатрон, Старскрим и Гримлок.
В прочем, в наших магазинах в наличии был только Оптимус Прайм, а так как новые официальные наборы Lego мы в России похоже увидим еще не скоро я решил посмотреть на модель от Xiaomi.
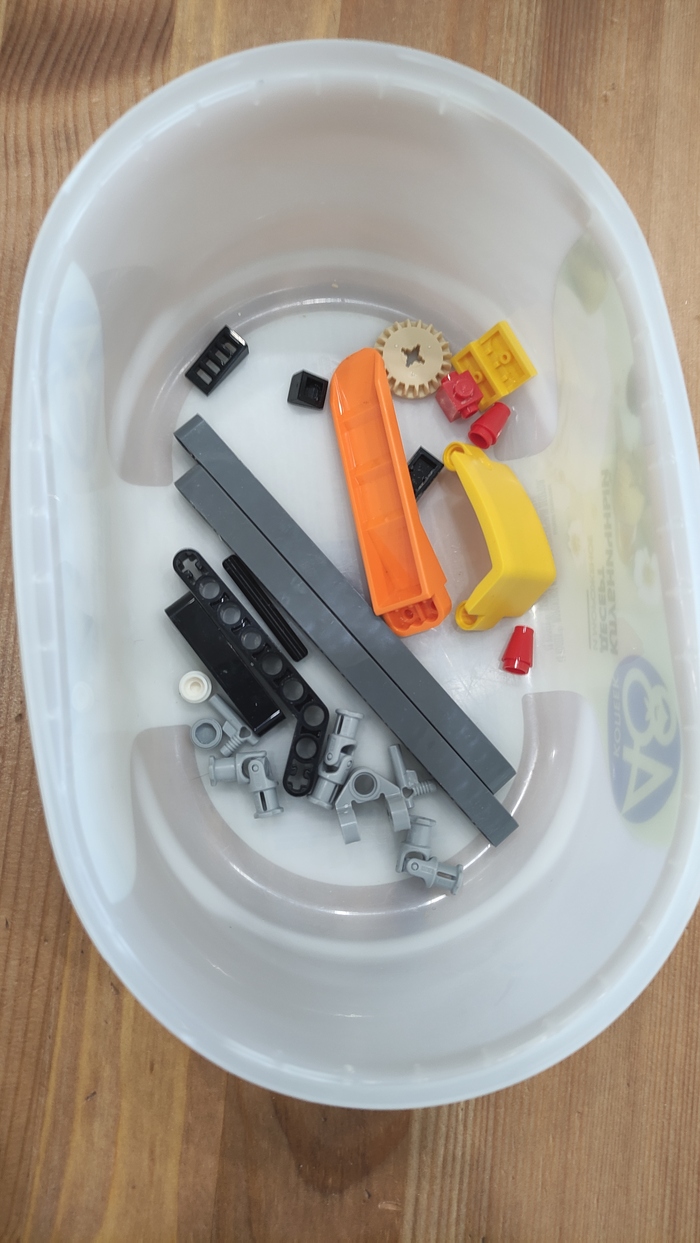
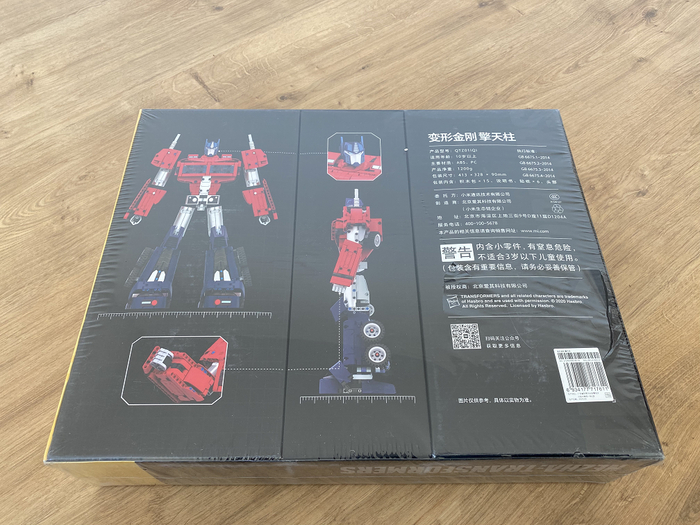
Коробка достаточно большая, сравнима с топовым наборами Lego, при этом никакого нездорового гигантизма присущего китайским наборам. Все свободное пространство забито деталями. Количество деталей – 1280 шт. Для сравнения – это уровень Lego Technic 42126 Ford F-150 Raptor, в котором всего на 100 деталей больше. При этом внутренняя компоновка больше походит на эксклюзивные наборы вроде Lego Technic 42115 Lamborghini Sian FKP 37. Плюс уже после сборки набора, я обнаружил, что внутренние отсеки коробки трансформируются (ха!) – их можно дополнительно разделить пополам для более удобной сортировки уже распакованных деталей. Определенно, в плане упаковки Lego есть чему учиться у Xiaomi.

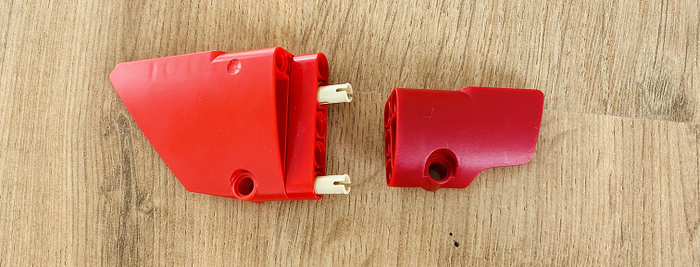
Два больших лотка с помощью лепестков в стенке разделятся на два лотка по меньше.
В основном это обычные техник-детали. Качество самих деталей нареканий не вызывает, разве что некоторые коннекторы слишком тугие. Светлое серые и черные детали совпадают со цветами Lego, а вот красный не такой как в Lego, он ближе к томатному (в прочем у Lego такой цвет иногда встречается в виде различных коннекторов, но по факту это считается браком колеровки, так как официально это тот же красный цвет), а темно синий, насколько я знаю, и вовсе отсутствует в палитре Lego.
Слева деталь Lego, справа - Xiaomi. Это не разница в освещении, они действительно отличаются по цвету.
Есть несколько деталей, которые у Lego я ни разу не встречал, не уверен, что они вообще в Lego существуют. Шарниры, как вилки, так и розетки, сделаны из какого-то другого пластика, не из такого как остальные детали, и не такого из которого делает Lego. Он как будто прорезинен. Шарниры достаточно тугие, для вставки требуется усилие, сколько они продержатся – покажет время.
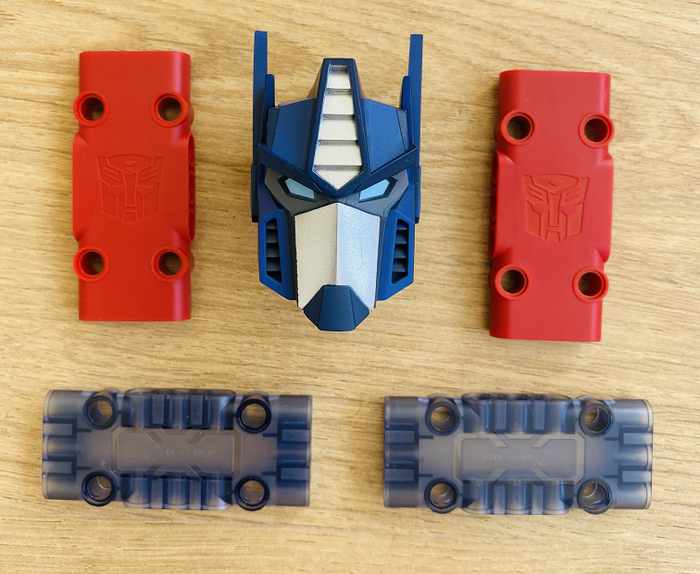
Также в наборе есть проприетарные детали. В первую очередь это конечно голова Оптимуса Прайма – это цельная неразборная деталь, которая крепится с помощью вилки большого шарнира. Есть пара панелей 3x7 цвета trans-blue (в Lego прозрачные панели на данный момент вообще не существуют, а жаль), а также пара обычных панелей 3x7 с выштамповкой (!) знака Автоботов. Честно говоря, я не ожидал, что Xiaomi настолько заморочатся, Lego бы просто сделали наклейки.
Кстати, о наклейках. В наборе они есть. В первую очередь это наклейки на серые детали, которые превращают их в серебристые (ну или в металлические). Клеить наклейки – это та еще задача. У Lego если наклейка клеится на всю деталь, то обычно сама наклейка чуть меньше по размерам чем деталь. Xiaomi вырезала наклейки четко по размерам – если не приклеить наклейку точно к краю, значит с другой стороны она будет выходить за пределы детали. И это с учетом того, что большинство деталей имеют форму отличную от прямоугольной, либо имеют различные закругления или выступы на плоскости. Кому и этого будет мало – есть задача со звездочкой – наклеить круглую наклейку с толщиной в пару миллиметров на круглый обод колеса той же толщины. Так же, уже после окончания сборки, часть наклеек предлагается наклеить сразу на несколько деталей, а часть наклеек вообще не встречается в инструкции. К цвету наклеек никаких претензий нет (камень в огород Lego, которые уже много лет не могут разобраться как печатать наклейки того же цвета, что и детали).
Кто там жаловался, что Lego делает круглые наклейки на круглые детали?
Несмотря на то, что детали расфасованы по примерно двадцати пакетам ни о каких этапах сборки речи не идет. Все пакеты нужно вскрывать сразу. Поэтому перед сборкой лучше заранее все рассортировать. Благо разные пакеты содержат разные детали, и даже парные (левая и правая) панели разложены по отдельным пакетам.
Бумажной инструкции в наборе нет, только QR-код со ссылкой на приложение, в котором можно эту инструкцию скачать.
Пару лет назад у меня уже был опыт сборки конструкторов от Xiaomi, и вот тогда для получения инструкции нужно было пройти целый квест. В тот момент у Xiaomi было два приложения – международное, в котором были инструкции на наборы, которые официально продавались в России, и китайское – в котором были инструкции на все наборы. Естественно, в нашем регионе скачать можно было только международное, в котором нужной мне инструкции не было. А китайское приложение надо было ставить на Android в виде скаченного со стороннего сайта apk. Если у вас было только устройство с iOS, то вы оставались без инструкции.
Поэтому я уже морально подготовился снова походить этот квест, но оказалось, что новое приложение доступно в российском App Store. Оно хоть и на китайском, но за счет картинок никаких проблем в использовании нет.
В прочем другой недостаток инструкций Xiaomi никуда не делся. Каждый шаг сборки занимает равно одну деталь, в редких случаях две. Поэтому количество шагов примерно равно количеству деталей. В данной инструкции их 1233. Естественно, каждый шаг занимает одну страницу, после чего ее нужно перелистнуть. Все это сильно замедляет сборку, по сравнению с наборами от Lego. Так что, если вы уже собирали Lego со схожим количеством деталей – можете смело умножать затраченное время на два. Зато все в 3D, и если вдруг что-то не понятно, то можно посмотреть с разных сторон. Опять же, в отдельных случаях есть дополнительные пояснения по правильному порядку сборки.

Позади примерно 5-6 часов сборки.
При самой сборке каких-то сложностей не возникло, разве что уже упомянутый момент с наклейками.
Собранная модель имеет подвижность во всех нужных местах – голова, плечи, локти, запястья, пояс, колени и голеностоп. За счет резиновых вставок на ступнях модель не скользит. Поэтому с устойчивостью никаких проблем нет. Но это все-таки больше полочная модель, чем игрушка.
Хоть это и трансформер – он ни во что не трансформируется. Для того, чтобы получился тягач – робота нужно разобрать и собрать грузовик уже по другой инструкции, которая так же есть в приложении.
Для оценки размера поставил рядом минифигурку.
Даже с учетом всех вышеописанных недостатков модель мне понравилась, думаю при возможности куплю и другие наборы из этой серии. Ну и будет интересно сравнить с моделью от Lego, там вроде как обещают возможность трансформации без пересборки.

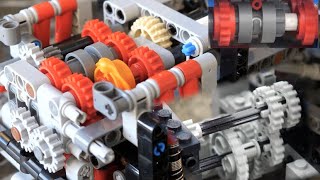
My first automatic gearbox, based on a design by Misha van Beek, but improved and simplified.
I always liked the idea of incorporating automatic gearboxes into large models, unfortunaltely such gearbox designs are unique and I only know two by Misha van Beek. While both are advanced and show great knowledge of the author, they are also large, complex and none changes gears smoothly. I thought that the new, small differential may give me a good opportunity to create a more useable design. I had three simple goals: to make a gearbox that is small, simple and above all capable of changing gears without jamming. The two first were easy, the third one took some time to work out, but eventually I got exactly what I wanted.
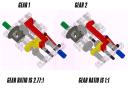
The basic idea of Misha’s design is to use a differential to transmit the drive in such a way, that if the resistance of the output grows, it will at certain point trigger the gearbox to switch to lower gear. Thus the motor will have a better chance to overcome the resistance, and once it’s done the gearbox will switch back to the higher gear. Whereas Misha has taken this idea further, and created gearboxes with more than just 2 speeds or with no fixed gear ratio at all, I considered two smoothly operating speeds a better option than three or more jamming ones. The lower gear has 2.77:1 gear ratio, and the higher one has 1:1 gear ratio. I have been experimenting with more different ratios, but as the difference increased so did the tendency to jam while changing gears. The 2.77:1 ratio difference should be sufficient in most cases, and it offers a reasonably smooth functioning of the gear change mechanism.
The construction of the gearbox is really simple. It fits into a 8×12 studs rectangle (plus the middle shaft protrudes out by 1 stud on higher gear), and axles of any length can be put into input and output without taking the gearbox apart. Moreover, the horizontal liftarm which servers as the gear change lever, provides a lot of space to adjust the tension of the rubber band accordingly to the weight the gearbox is supposed to handle (namely, the towballs it sits between can be put closer or further from each other).
You can see the smooth functioning of the gearbox in the video. I have also provided a parts list (just 45), an LDR model of the gearbox at lower gear and higher gear, plus an exact instruction which can be found below.
Photos:


Video:
Lego gearbox смотреть последние обновления за сегодня на .

Build & Test Lego Gearboxes: 2, 4, 6, 8, 12-speed

Lego Manual 5-Speed Gearbox
How Gearboxes Work in LEGO Technic

Simplest automatic LEGO transmission in the world? Really functional. Principle explained.
The video shows probably the simplest automatic transmission built from LEGO bricks. It is two speed transmission and uses a friction clutch. Shifting is smooth and the transmission is also used in the LEGO car, as shown in the video. It is therefore really applicable. A GoPro camera mounted directly on the car was also used for recording to see the change of gears while driving in slow motion video. I designed this type of transmission by myself and I have never seen any such simple solution. If any of you know or have seen a similar transmission please let me know. Extra simple LEGO gadgets are my hobby. I hope you enjoy the video.

Shift GEARS at HOME LEGO Engine and 6 Speed (REALISTIC)
Follow Replicamotorsport on Instagram for availability on the engine shown here plus more! Song: Lo-fi NCS

3 Lego Technic Gearbox Ideas

Making a GOOGOL:1 Reduction with Lego Gears
Building a long gear train using 186 Lego gears. Many different types of Lego gears are used. Enjoy! Inspired by Daniel de Bruin's "universe's biggest gear reduction": 🤍 The finished gear ratio: 10341796308487334800992832804222885104773611498499997696000000000000000000000000000000000000000000000:1 or 1.0342e100:1 or 1.034 GOOGOL:1 Rotation time for the last gear: 52433879932503535381614991275498187972589101825233846406570841889117043121149897330595482546 years or 5.2434e91 years Formula for the gear ratio: 24/8 * 40/8 * 40/8 * 40/8 * 60/1 * 12/1 * 168/1 * (140 / 8 + 1) * 141 * 20/12 * (40/8)^20 * 20/12 * (24/1)^20 * 56/16 * (36/1)^10 * (40/1)^18 * 15/9 * 56/1 List of gears used: 27x Gear 8 Tooth [3647] 1x Gear Expert Builder 9 Tooth [g9] 6x Gear 12 Tooth Bevel [6589] 2x Gear 12 Tooth Double Bevel [32270] 1x Gear Expert Builder 15 Tooth [g15] 1x Gear 16 Tooth [94925] 2x Gear 20 Tooth Bevel [32198] 23x Gear 24 Tooth [3648] 10x Gear 36 Tooth Double Bevel [32498] 49x Gear 40 Tooth [3649] 2x Turntable Large Type 2 [48452cx1] 1x Turntable Large Type 3 [18939 / 18938] 8x Gear Rack 11 x 11 Curved [24121] 1x Gear, Hailfire Droid Wheel [x784] 1x Gear Worm Screw, Short [27938] 51x Gear Worm Screw, Long [4716] For those wondering, the visual effect I used in the end montage is called Find Edges, comes with Adobe Premiere 14. Music (used with permission): Alpha Centauri B by Anders Enger Jensen 🤍
Читайте также: