
Lego virtual building tool
Обновлено: 04.05.2024
Моё детство примерно на 20% состояло из Dungeons & Dragons (D&D) и на 80% — из LEGO. Эти два занятия очень сильно пересекались. Мне, по разным причинам, не разрешали всё время играть в D&D. Но я, привлекая на помощь воображение, и достигнув в этом деле успехов, достойных плута 15 уровня, понял, что создание персонажей AD&D игрой не считается. Воссоздание вселенной DragonLance средствами LEGO очень хорошо помогало мне быть ближе к игре, которая мне очень нравилась.
Поэтому одним из моих любимых направлений в LEGO были замки. Я тратил многие часы, выдумывая подземелья для моих героев. Для того чтобы не терять свои находки, и из-за того, что я видел, как мои друзья в школе чертят карты подземелий, я составлял планы своих LEGO-моделей на миллиметровке. Кроме того, я пытался сохранить и сведения о том, как именно были устроены модели. Использование миллиметровки казалось логичным для изображения того, что, в основном, состояло из прямоугольных блоков. Но меня, в итоге, сгубило недостаточно хорошее понимание правил изометрической проекции.

Теперь, хоть я и стал старше, моя любовь к LEGO не угасла. И хотя я и не могу сказать, что очень уж горжусь своими моделями (их называют MOC-моделями), я почувствовал, что просто должен разобраться с тем, как мне документировать то, что создаю. Я никогда не умел очень уж хорошо рисовать. Поэтому я решил обратиться к компьютеру.
CAD для LEGO
Несколько лет я работал в сфере виртуального 3D-моделирования (а в сфере обычного 3D — и того больше). Я хорошо владею 3D-приложениями, но всё, чем я пользовался, заточено под анимированную графику и под производство фильмов. Все эти программы, как, собственно, и фильмы, рассчитаны на то, чтобы создать красивую картинку. Как именно что-то сделано, до тех пор, пока всё выглядит хорошо, не так уж и важно. Если, ради того, чтобы что-то выглядело бы очень хорошо, нужно «обмануть» законы физики, то это вполне приемлемо, так как это будет существовать только в виртуальном пространстве.
А вот системы автоматизированного проектирования (Computer-Aided Design, CAD), это уже нечто другое. CAD-приложения пришли на смену обычным чертежам. В них создают спецификации, иллюстрирующие то, как нечто может быть создано в реальном мире. От этих программ ждут точности и реализма.
Так как невероятно много людей увлечено LEGO, существует активное сообщество тех, кто создаёт LEGO-модели, используя CAD-программы. Преимущества такого подхода очевидны: можно задокументировать подробные сведения о модели, описать то, какие детали нужны для её создания, и то, как именно их нужно соединить друг с другом. Это, конечно, не замена реальному конструктору LEGO (ну, разве что для тех, кто любит CAD больше, чем LEGO), но это — отличное дополнение к хобби.
Для того чтобы построить виртуальную модель LEGO, нужны две вещи:
- Виртуальные детали LEGO.
- CAD-приложение.
Виртуальные детали LEGO
Для того чтобы раздобыть виртуальное представление практически любого из когда-либо созданных строительных блоков для LEGO-моделей, можете воспользоваться опенсорсным ресурсом LDraw. LDraw — это открытый стандарт для цифровых моделей LEGO, который включает в себя возможности по описанию размеров и ориентации элементов. В дополнение к работе по описанию деталей средствами LDraw, силами сообщества подготовлены 3D-модели для каждой детали. Это значит, что все желающие могут загрузить тысячи определений деталей, истратив на это не особенно много трафика.
Установка набора деталей
Виртуальные детали очень похожи на изображения, которые используются на сайтах, или на шрифты, применяемые на компьютере. Собственно говоря, соответствующие файлы можно хранить где угодно. Главное, чтобы приложение, в котором планируется работать с деталями, знало о том, где эти файлы находятся. В Linux LDraw-файлы обычно размещают в папке /usr/share/LDRAW . В Windows это обычно C:\Users\Public\Documents\LDraw .
LDraw даёт в наше распоряжение лишь спецификации для каждой детали. Вот, например, как выглядит код описания кубика 1x1:
Для того чтобы увидеть детали в более привычном облике, понадобится программа для их визуализации.
Приложение LDView для визуализации деталей
LDView — это среда для 3D-рендеринга, напоминающая POV-Ray или Cycles из Blender. Это приложение создано специально для рендеринга .ldr-файлов, то есть — CAD-файлов, содержащих данные в формате LDraw.
Если вы работаете на Linux, то, возможно, вы найдёте LDView в своём репозитории ПО. Если в репозитории этой программы не окажется — вы можете скачать установщик с сайта проекта. Если вы пользуетесь macOS или Windows, то вам, опять же, нужно будет воспользоваться сайтом LDView.
Просмотр отдельной детали
Легче всего начать цифровое конструирование моделей LEGO, попытавшись визуализировать отдельную деталь.
Сначала откройте ваш любимый текстовый редактор. Это может быть любая программа. Главное — чтобы она могла сохранять документы в виде обычного текста. Некоторые текстовые редакторы, в стремлении оказать пользователям добрую услугу, пытаются сохранять текстовые материалы в файлах, в которых, помимо текстов, есть ещё масса служебной информации (вроде .rtf и .doc). Существует множество хороших кросс-платформенных текстовых редакторов. Я, для наших дел, могу порекомендовать довольно-таки минималистичный редактор Geany.
Создадим новый файл с именем 1brick.ldr и введём в него следующий текст:
А теперь взглянем на наше скромное творение:
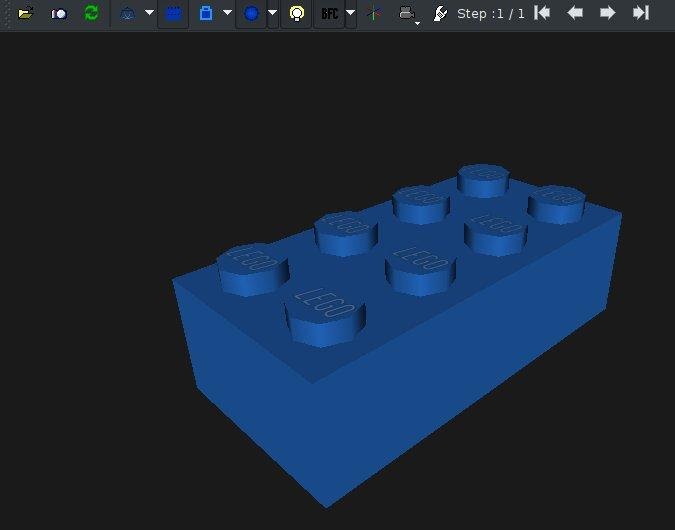
Только что вы создали простой CAD-файл, описывающий один кубик (а именно — модель номер 3001), цветовой индекс которого равняется 1 (это синий цвет), расположенный в позиции (0, 0, 0) по осям X, Y и Z. Поворот кубика регулируется с использованием средств матричного преобразования. Их применение, надо признать, не относится к простым математическим вычислениям. Правда, при конструировании LEGO-моделей произвольное вращение деталей требуется сравнительно редко, так как большинство деталей стыкуются друг с другом с использованием шипов.
Любая строка в файле, начинающаяся с 0, содержит либо комментарий, либо метаданные. Строка, начинающаяся с 1, содержит описание детали.
Вы можете попрактиковаться в перемещении и вращении деталей, внося изменения в свой CAD-файл. Обычный кубик имеет в высоту 24 LDU (LDraw Units). Это значит, что ставить детали друг на друга можно, меняя их координату Y с шагом в 24 единицы. Поворачивать детали можно, выполняя матричные преобразования.
Взгляните на этот код:
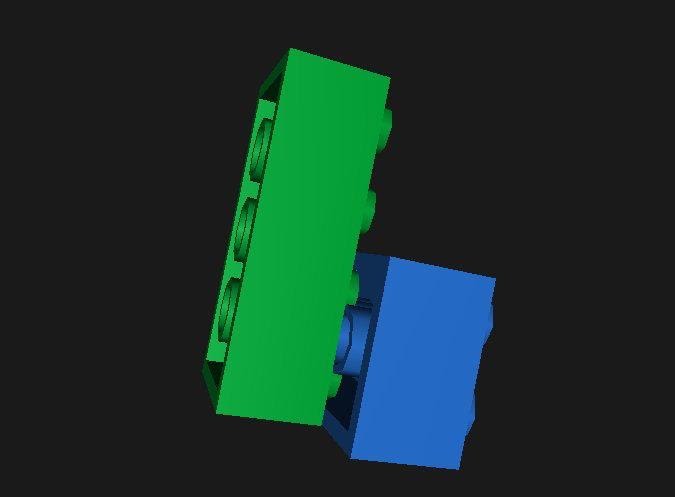
Вот результат его визуализации.
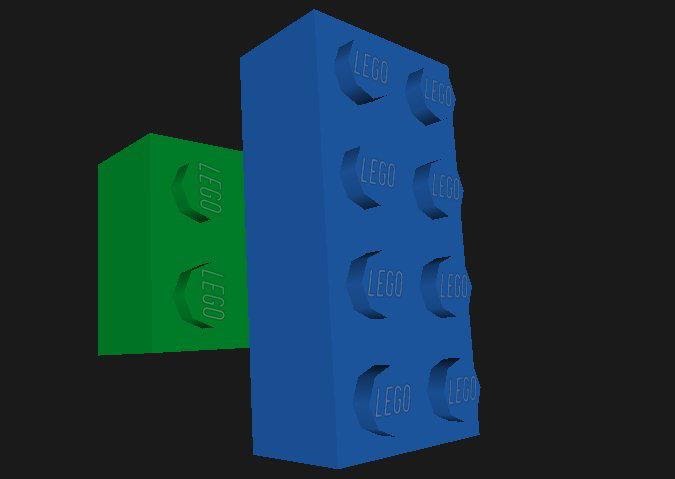
Конечно, перемещать детали можно вдоль любой из трёх осей. В спецификации LDraw сказано, что кубик 1x1 имеет 20 LDU в ширину и 20 LDU в длину. А это значит, что расставлять такие кубики вдоль оси X можно, меняя их позиции с шагом в 20 LDU.
Ещё два кубика
Порядок сборки модели
Чаще всего формат LDraw используется для того чтобы продемонстрировать порядок сборки модели. А это значит, что нужно описать последовательность шагов сборки. В LDraw это делается с использованием метакоманды STEP .
Для того чтобы испытать эту метакоманду, добавьте в свой файл, между описаниями деталей, следующее:
Готовый файл будет выглядеть так:
Теперь в вашем проекте описано два шага. На первом выводится первый кубик, на втором — второй. Можно пошагово просматривать .ldr-файлы, пользуясь клавишами-стрелками в верхней панели инструментов LDView, находящимися около подписи Steps .
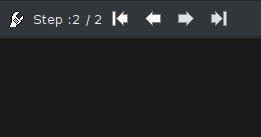
Панель инструментов для пошаговой визуализации моделей
На одном шаге необязательно должен выводиться лишь один кубик. Как и в случае с инструкциями к наборам LEGO, установку нескольких деталей можно объединить в один шаг. Главное, чтобы это не повредило понятности инструкции.
В LDraw есть и другие команды. Например — тут можно рисовать линии, поясняющие расположение деталей, и делать прочие подобные вещи. Соответствующие сведения можно найти в спецификации.
Выяснение кодов деталей
Я хранил свою коллекцию LEGO в ящиках для рыболовных принадлежностей. Поэтому я мог быстро найти любую деталь из любого набора. Правда, по мере того, как росла коллекция, мне было нужно всё больше и больше ящиков. А в результате у меня стало уходить больше времени на поиск нужной детали.
Если учесть то, что в LEGO имеется более 11000 уникальных деталей, искать цифровые детали так же сложно, как и обычные. У каждой официальной детали LEGO есть собственный код. Например, тот кубик 2x4, который мы использовали в примере, имеет код 3001. Если вам известен код детали, вы можете просто использовать его в CAD-файле, и соответствующая деталь появится в вашей модели.
В дистрибутиве LDraw имеется файл parts.lst , в котором, с помощью grep, можно найти нужную деталь. Но детали там не всегда описаны по одной и той же схеме. Работая с этим файлом не всегда легко предугадать то, какие именно ключевые слова соответствуют тем или иным деталям. Например — как понять, какое слово, «curved» «sloped» или «angled», лучше всего характеризует некую деталь сложной формы?
Хотя искать детали можно и в parts.lst , в этом деле нам могут помочь некоторые специальные интернет-ресурсы:
-
— это пользовательская группа, в которой есть база данных со сведениями о кодах деталей LEGO, построенная на основе сведений, взятых из LDraw. — хороший каталог деталей. — ещё один ресурс, на котором есть каталог деталей.
Другие средства для рендеринга моделей
После того, как вы создали свой шедевр, LDView может экспортировать вашу модель, что позволит вам отрендерить её в высоком качестве. Для этого можно воспользоваться POV-Ray — опенсорсной программой для фотореалистичного рендеринга трёхмерных моделей. В результате плоды ваших трудов можно будет представить в весьма привлекательном виде. Найти POV-Ray можно или в репозитории программ вашего дистрибутива Linux, или на сайте проекта.
Вот пример команды рендеринга:
Ниже показан результат визуализации.
Высококачественная визуализация модели
Если вам нужна программа для формирования инструкций по сборке моделей — попробуйте опенсорсную LPub3D. Эта программа выводит пошаговые инструкции и список деталей, необходимых на каждом шаге.

Исследование мира LEGO
Создание моделей из деталей LEGO — это интересно. Разработка собственных моделей — это воплощение той творческой энергии, которой фанаты LEGO заряжаются, занимаясь любимым делом. Теперь ваши LEGO-идеи больше не должны существовать лишь в форме бесплотных идей. Вы можете сохранить их в виде моделей и пошаговых инструкций.
Мир любителей LEGO — это приятное и креативное место, которое стоит посетить всем тем, кому нравится создавать цифровые модели, разрабатывать собственные детали, или делать с кубиками LEGO что-то такое, чего никто больше с ними не делает. Если вам нравится LEGO, то сегодня — самый лучший день для того чтобы стать частью LEGO-сообщества!
Users that need to compile their own binaries should get the source code for the latest release from the Download Page.
Typing the following will download the latest revision to a directory called “leocad” on your computer:
Note: You can receive notifications of source code changes by watching the project on the Github Page.
Required Libraries
LeoCAD requires Qt 5.4 or later to compile. You can download the Qt SDK for all platforms from the Qt Project Homepage.
Linux users may find it easier to use their package manager instead with the following command:
Although it is not required, it is recommended to also download and install a parts library, otherwise only a very small set of basic parts will be available.
Compiling
The easiest way to compile on any platform is to open “leocad.pro” in Qt Creator and build it from there.
Linux
If you are not using Qt Creator, or if you prefer to compile from the command line, you can generate a makefile by using “qmake”, then build and install the application with the following commands:
Here are two options that can be utilized by “qmake” to customize LeoCAD builds that will interest distribution maintainers:
- “DISABLE_UPDATE_CHECK=1”: disables update checks at startup and removes that option from the menu. This is recommended to be set for distributions that have their own way of updating applications to avoid confusing users.
- “LDRAW_LIBRARY_PATH=path”: adds an extra path to be searched at startup for the LDraw library. The path should be the root folder of the LDraw library. For example, “/usr/share/ldraw”.
Windows
Windows users also have the option to compile with Visual Studio, but you need to use “qmake” to generate the project files first with the following command:
This will generate a file called “leocad.vcxproj” that can be opened in Visual Studio.
If you are using the precompiled Qt binaries, make sure to install the libraries that correspond to your compiler and the Qt source code.
macOS
To compile for macOS, you will need to add a parts library to the folder where you downloaded the source code. You can download the Linux library and unzip it there with the following command:
You'll also need to include the POV-Ray executable in the package, you can download a pre-built one from here.
To compile for iOS, you will need to add a parts library to the folder where you downloaded the source code. You can download the Linux library and unzip it there with the following command:
Generate an Xcode project by using “qmake” for iOS with the following command:
Now open the project in Xcode and build it. An Apple Developer account (free) is required to install the app on a device.
SR 3D Builder is a Lego PC CAD software that allows building almost anything you can imagine virtually. It is a comprehensive solution that comes with almost all the leading tools and features. The interface of the software is user-friendly and offers a massive library that helps you create a stunning model without any effort.
SR 3D Builder offers six different sections to explore, including the menu bar section where you can contain file system and application options. The second section is the toolbox section that helps you find a shortcut to building models quickly. There is also has an information section that will give details about what you are doing and also allows you to watch tutorials.
The software introduces a connection solver feature that will help you see connections between two parts by displaying a pink pyramid when the mouse is over a suitable contact surface. SR 3D Builder other feature includes create a fully 3D environment, group management, modify and save unlimited models, automatic detections, and more.
MLCad is a virtual model building software that allows you to create unique models by using virtual blocks easily. The software comes as an alternative to Lego Digital Designer and offers all the key services with some new features. It comes to a comprehensive and customizable interface that consists of multiple sections, such as a toolbar, menu bar, and information bar, etc. Each section has its options and functions that you can use to create a model.
The software offers thousands of parts that you can freely use to make your model more enjoyable. You can view comments when you start building the models that teach you about all its features and tools. After finalizing your model, you can save it into its online library as well as share it with others via social media platforms.
MLCad comes with some advanced tools that convert your model into a stunning picture or transform it into an animated video. Its other prominent feature includes more than a hundred types of bricks, a massive toolbar, templates, editing tools, and more.
LPub3D is free to use a computer program that allows you to create Lego models by using virtual Lego blocks. It is a complete solution and offers all the key services, tools, and features to create a unique model. Installing this on your PC is quite tricky as it requires you to perform specific configurations. However, if your computer meets all its requirements, you only need to define the path to the LDraw engine and library.
The interface of the solution is easy to understand that helps you intuitively generate your model. One of the best facts about this Lego building software is that it allows you to create a Lego-style model on your computer with detailed instruction manuals. LPub3D is based on the LDraw engine and libraries that deliver an extremely functional 3D model viewer so that you can view your design several perspectives.
Aside from building the 3D model, LPub3D also allows you to create commercial projects by using your parts and tools. With this, you can also choose and customize any model from its library without any limit. LPub3D key feature includes allowing you to share your model with others, add own parts, editing tools, and more.
Stud.io is an online tool that can create, render, and build instructions in a 3D form that uses virtual Lego bricks. You can make your models, structures and save models in the .lfx file format on your computer. The tool gives Intuitive and smooth building of bricks clutch, clip to each other, and hinge with the help of snap-to functionality. It has a stability check feature that allows you to build more stable and efficient designs quickly.
One of the core features of Stud.io includes a photo-realistic renderer that exports exceptional quality images for your creations and breathtaking with few clicks, and it uses the license code of FFmpeg under LGPL. It has an integrated instruction maker that uses to create building instructions, and its latest version allows you to create custom instructions for your design as well. It supports direct integration with the BrickLinks marketplace, gallery, and catalog that offers you to check parts information, browse other designs, and order your design as well.
LEGO Digital Designer is a program that allows you to build anything virtually by using virtual LEGO blocks. The software is developed and published by Lego Group, and you can use it on both macOS and Windows platforms. It is an enjoyable solution and offers thousands of shapes to create your image, and then you can buy the real bricks to build creation.
One of the best facts about this solution is that it allows you to print out your design and add it to your inventory of bricks to take it any LEGOLAND Theme park. The software is available to use in multiple modes, including MindStorms mode. In this mode, you can access hundreds of virtual Ledo MINDSTORMS and Technic elements that help you design your next robot model from scratch.
LEGO Digital Designer also offers a massive variety of design templates that you can easily choose and customize. After finalizing your design, you can quickly share it with others via email and social media platforms. LEGO Digital Designer also includes core features such as easy to understand interface, multiple modes, NXT brick, and more.
LeoCAD is a modern-style computer program that allows you to create virtual models by using virtual Lego bricks. It offers a vast library of pieces used in toy designing. The interface of the solution is quite impressive that allows new users to start creating virtual models without having to spend too much time learning the solution.
As compared to others, LeoCAD is a feature-rich solution that allows experienced users to build a model by using advanced techniques. The software is fully compatible with the LDraw solution and related tools, which makes it more feature-rich. One of the most exciting parts is that it has a library with more than 10000 different parts that can easily use to create a design.
LeoCAD is an open-source solution so that anyone can contribute to features and fixes. It has a community where experts around the world share their modules and tips to teach beginners. Share modules, save images, easy to understand interface, and more.
LDraw is an enjoyable tool for modeling Lego creations virtually. You can use this to document models that you have physically build, create instruction like Lego, render photorealistic images of your virtual models, and even make complete animations. It is one of the best alternatives to Lego Digital Designer, but offer lots of new tools and features that make it better than others.
It comes with a massive library of more than fifty thousand parts that consists of multiple categories. Each category has its parts that you can easily choose and use. LDraw is a simple and easy to use software and offer complete tutorials to enhance your proficiency. There is also has several ready-to-use designs that you can use and customize without any limit.
The interface of the software is simple, and you can easily use its parts, create unlimited models, animations, and realistic images. After finalizing your design, you can easily content you can share it with others. LDraw core feature includes allowing you to upload your parts, directly share your content with others, tutorials, and community, etc.
LPub3D is free to use a computer program that allows you to create Lego models by using virtual Lego blocks. It is a complete solution and offers all the key services, tools, and features to create a unique model. Installing this on your PC is quite tricky as it requires you to perform specific configurations. However, if your computer meets all its requirements, you only need to define the path to the LDraw engine and library.
The interface of the solution is easy to understand that helps you intuitively generate your model. One of the best facts about this Lego building software is that it allows you to create a Lego-style model on your computer with detailed instruction manuals. LPub3D is based on the LDraw engine and libraries that deliver an extremely functional 3D model viewer so that you can view your design several perspectives.
Aside from building the 3D model, LPub3D also allows you to create commercial projects by using your parts and tools. With this, you can also choose and customize any model from its library without any limit. LPub3D key feature includes allowing you to share your model with others, add own parts, editing tools, and more.

Rendered in Mecabricks
There are a few software for designing digital models using LEGO bricks. Even though their purpose is the same, like all similar software, their features and interfaces are different. Today, we will take a look at some of them and try to decide which is the best LEGO design software.
3D modeling always fascinated me, and I even had a chance to work with software like Autodesk AutoCAD, Autodesk 3ds Max, and Autodesk Maya in and outside of school. For those of you who are not familiar with these, let me tell you they are among the modeling and animation industry’s finest and most complex software. They occupy quite a large amount of space on the harddisk, and won’t run smoothly unless your graphics card and RAM fulfill their minimum requirements.
Luckily, none of the programs we will look at today are quite as complex. As with all software, they have minimum requirements to run, but most computers, old and new, are capable of running them without any problems.
LDD – LEGO Digital Designer
Let’s start with the big fish, shall we? The one and only official LEGO design software, LEGO Digital Designer (LDD)!
LDD gives you three different options before you start: LEGO Digital Designer, LEGO Mindstorms and LEGO Digital Designer Extended. The first one only lets you use the physically available colors. The second one has limited parts, so I’m guessing it only uses the LEGO Mindstorms parts. And in the third, the sky is the limit. You can use any color with any part you like.
Being the official LEGO design software, LDD’s parts library is probably one of the most extensive ones. Even though the LEGO Group has announced they will not update the software anymore, some parts have been added to the library since. However, this extensive library is also one of LDD’s disadvantages, since it slows down the software. Once all the parts are loaded, its speed improves, but only until you open a new document. Then you have to go through the same process all over again.

LDD Interface with parts being loaded
The user interface is simple and easy to get used to. All of the commands available in the software are shown on-screen and in the pull-down menus – with one important exception: Pan view. Fortunately, there is a very informative help file which tells you how to do what if you ever get stuck.
The biggest disadvantage of the software is that the parts need to “click” as you build. For example, if you’re designing an interior space, and have a table with tile finishes, you can’t put anything on top of it, because there are no studs to click onto. While it may not seem that big, it creates certain limits.
All in all, LDD is a great software for beginners – and for those with patience.
LDraw
According to the LDraw website, the LEGO design software called LDraw is no longer featured. Apparently it was a DOS based program, and didn’t have a graphical user interface, which made it hard to use. However, it offers a vast library, over 7,400 LEGO parts, and can be integrated into other software.
The last parts update was in December 2018. It may feel 6 months is a long time, but considering LEGO does not release new parts (new moulds, that is) every other week, I think it’s pretty updated as it is. However, they mention on their site that modeling new parts is a hard process, and since they work with volunteers, it may take a while for a certain part to be released.
LeoCAD – LDCad – Bricksmith
Depending on your computer, you may choose to use the LDraw Parts Library with any of these programs. LDCad is Windows based, Bricksmith is Mac based, and LeoCAD can be used on both. LDCad and LeoCAD can also be used with Linux operating systems.
Considering they are 3D software, all of them run smoothly, even on an old computer like mine. Having used 3D software before, as well as a few virtual designers, I think this is really important. If you have a computer with the latest technology, you may not notice it, but if you have been using the same computer for the last few years, it makes a huge difference.
Even if you’re familiar with another LEGO design software, you need a little time to adjust to a new one. While some commands are similar and exist in all programs, such as zoom, pan and rotate the workspace, their shortcuts may differ from one to the other, as may the overall interface.
The User Interface and Overall Accessibility
The on-screen graphics look like the images from the instruction booklets. This makes all three programs run faster and more smoothly. As for the user interface, I found LeoCAD to be the best of all three. The interface of Bricksmith and LDCad takes a little time to adjust to.

LeoCAD Interface
These three have many things in common, starting with their part library. Each of them lets you choose the color you want to use with whichever part you’re using, regardless of the fact it exists in physical form or not. In my opinion, this is both good and bad. It’s good, because it unlimits your model even further. It’s bad, because if you want to turn your digital model into a physical one, you may realize some of the parts don’t exist in that particular color.

Bricksmith Interface
In Bricksmith, the parts library isn’t displayed as well as in LeoCAD and LDCad. You see the image of the part only after you click on its name, which makes it impossible to browse as quickly as the other software. LDCad, on the other hand, is probably the best of all three in this matter. The bricks are categorized, and once you click on a category, all the bricks under that category are displayed with images. Of course if you’re searching for a specific part, you can just write the name in the search bar and it will appear.

LDCad Interface with a sample model
All three programs let you view the steps one by one. LeoCAD also allows you to export each step as a separate image, as well as rendering the whole model.
If you want to create digital models, either small or big, all three provide a huge library and the chance to use most of the official LEGO colors – whether the physical form of that color exists in a specific part or not. If I had to pick one, though, I’d pick LeoCAD. The interface is easier to get used to, and so is browsing through the library.
Studio
Of all the LEGO design software I looked at today, Studio is the most extensive one in terms of features. The parts library would probably be head-to-head with LDD, though Studio is updated regularly.
Having a direct connection to Bricklink is a huge plus. It allows you upload to your Bricklink wanted list as well as showing you the price of a certain part within the program. The colors you can use in your builds are those that only exist in physical form, which, like I said before, can be both an advantage and a disadvantage.

Studio Interface
If you’re familiar with the Bricklink categories, you won’t have any trouble finding what you’re looking for, since Studio has the same categories for parts. Additionally, there is a “Shapes” option for browsing, with a different categorization. And like all the other above mentioned software, it has a search option.
There are three interesting features that I’d like to mention, which separates Studio from the others.
Build Together: This lets you work on the same project with others by either hosting or joining an already existing host.
Model Info: This provides a list of parts used on your model, along with quantity, unit price, and total price. It also provides physical information, like the dimensions of the model in studs, centimeters and inches, as well as its weight.
Part Designer: This is a separate software designed to create new parts or modify existing parts. You can create non-existing bricks and design your own minifigures from scratch. Then you can export what you created directly into Studio and use it in your model.
Part Designer Interface with a non-existing part
Now for the previous LEGO design software, I talked about how fast they run. Studio is somewhere in the middle. It’s not as fast as the programs that use the LDraw library, but it doesn’t have a long waiting time for the parts to load like LDD, either. Considering the features it has, I think it’s acceptable.
Another thing that surprised me in Studio was the rendering. I have to admit, I was expecting a simple image when I clicked render. What I got was a photo-realistic image.
Mecabricks
If you follow our blog regularly, you know that I’ve already talked about Mecabricks in some of my previous articles, and used it to create some custom characters. I won’t deny that I favor it, but I’ll try to be as objective as possible when comparing it with the other software.
There are two main reasons why Mecabricks is my all time favorite. One, it’s mobile. While the other programs are great, you need a computer to install them, along with certain hardware requirements, no matter how small. Mecabricks, on the other hand, can run anywhere that has a web browser, even on your phone. Ok, it is a bit harder to use on a mobile phone, but I have used it on my tablet and it runs as smoothly as it would on a computer.
If this doesn’t move it up the list, I don’t know what would 🙂
Mecabricks Interface
The second reason is its rendering capabilities. As an amateur photographer with not enough space to build my own LEGO city, the idea of doing it virtually and the ability to render it so it looks like a real photograph is more than appealing to me. If you have a history in rendering, you’ll find that Mecabricks offers pretty much everything the big-name programs offer. If not, don’t worry, because there are various presets which let you render in different light conditions.
The parts library in Mecabricks is really big, and includes some of the newest moulds LEGO has released. You can find many printed parts for minifigures, too, and scatter them around your builds. As for the user interface, it’s easy to get used to after a few tries.
My rendering skills are a bit rusty, so I borrowed an image from the developer’s Flickr page
Читайте также: