
Makecode lego education ev3
Обновлено: 30.04.2024
For most of the products MakeCode works with, all you need is a computer with an internet connection—there's nothing to download or install. MakeCode is free and works across all platforms and browsers.
Explore the different products
Pick the product you want to work with. If you're not sure, feel free to browse through a few to get an idea of what each of them can do—they all make learning computer science a lot of fun!
micro:bit
The micro:bit is a small programmable computer with an LED screen, two buttons, a light sensor, Bluetooth antenna, accelerometer, compass and more! From dancing robots to banana keyboards, your micro:bit has all the features you need to create amazing projects—the possibilities are endless!
1. Purchase a micro:bit
You can buy micro:bits for your classroom from the Micro:bit Education Foundation, a not-for-profit organization who has a global reseller network.
2. Use MakeCode online or as an app
If you have Windows 10 computers in your classroom, the MakeCode for micro:bit app makes downloading programs to the micro:bit easier, and includes support for serial data logging. If you don't have a Windows 10 computer, use MakeCode online.
3. Explore projects and curriculum
Browse the free Introduction to Computer Science curriculum, science experiments, or any of the micro:bit student projects to get ideas for using the micro:bit in your classroom.
Circuit Playground Express
The Circuit Playground Express provides a great introduction to electronics and programming. It has 10 multi-color NeoPixels, a motion sensor, temperature sensor, light sensor, and a microphone and speaker, plus much more! Create a siren alarm, a watch timer, or a magic wand with just a few blocks of code.
1. Purchase Circuit Playground Express
You can buy Circuit Playground Express kits with Educator discounts from Adafruit or any of the Adafruit worldwide resellers.
2. Use MakeCode online or as an app
If you have Windows 10 computers in your classroom, the MakeCode for Adafruit app makes downloading programs to the Circuit Playground Express easier and includes support for serial data logging. If you don't have a Windows 10 computer, use the MakeCode online editor.
3. Explore projects and curriculum
Browse through any of the MakeCode Circuit Playground Express projects or code samples to get inspiration for your classroom or makerspace.
Minecraft
Minecraft is a game about placing and breaking blocks, where the only limit is the player’s imagination. It’s also a creative platform for teaching and learning computer science—build a program to summon a storm of chickens or create your own mini-game for friends to play!
1. Purchase Minecraft
You can download and install Minecraft for Windows 10 from the Microsoft Store, or if you are a school you can purchase Minecraft: Education Edition for Windows 10 and macOS.
2. Install Code Connection
Download and install the free Code Connection app for Windows 10 or MacOS.
3. Connect MakeCode to Minecraft
Follow step-by-step instructions to connect MakeCode to Minecraft and start coding!
4. Explore curriculum and resources
Use the Introduction to Computer Science curriculum, or any of the MakeCode for Minecraft tutorials to introduce students to computational thinking with Minecraft.
MakeCode Arcade
Microsoft MakeCode Arcade is a retro 2D online game development environment. With a few blocks or lines of code, you can create your own custom games for others to play. Try creating a Maze game, a Treasure Hunt, or a Spaceship game – building your favorite Arcade games has never been so easy!
1. Use MakeCode online
Coding with MakeCode Arcade is done entirely in a web browser, so students and teachers can create games on any device or platform. No software to download or install!
2. Purchase handheld game consoles
Optionally you can download and play your MakeCode Arcade games on a handheld gaming device.
3. Get started with tutorials and curriculum
Browse through any of the MakeCode Arcade tutorials or game samples to learn how to build your own games, and use the free online Intro to CS Arcade curriculum in your classroom.
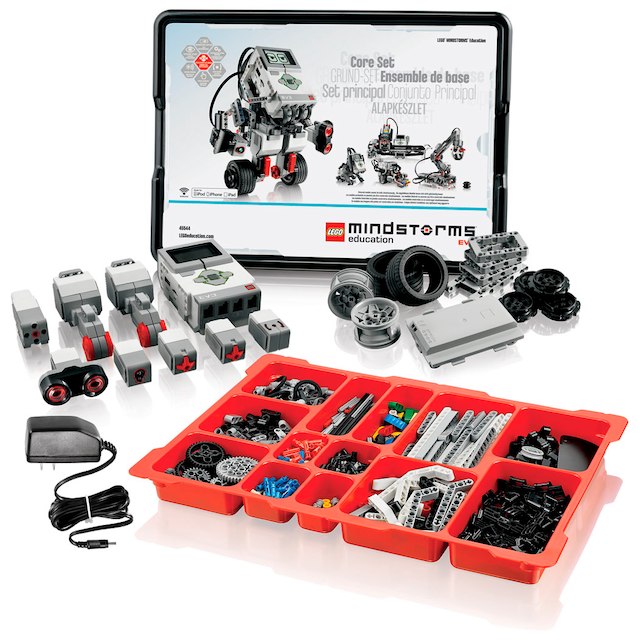
LEGO MINDSTORMS Education EV3
Technology and computer science come to life with LEGO MINDSTORMS Education EV3 which comes with different sensors and motors that can be programmed. Students can build robots that can navigate mazes, sort colors, or act as a musical instrument!
1. Get LEGO MINDSTORMS Education EV3
Purchase the MINDSTORMS Education EV3 kit online from LEGO Education, which contains everything you need to get started teaching STEM, robotics and computer science.
2. Update the EV3 firmware
Make sure you have the latest firmware installed for your LEGO MINDSTORMS EV3 brick through the EV3 device manager tool.
3. Use MakeCode online
Coding with MakeCode for MINDSTORMS Education EV3 is done entirely in a web browser, so students and teachers can create programs for their creations on any device or platform that has a USB port and an internet connection. No software to download or install!
4. Explore tutorials and projects
Check out tutorials, projects and code samples to get started using MakeCode for LEGO MINDSTORMS Education EV3. The tutorials provide step-by-step guidance on how to use each sensor or motor for the EV3, while the projects contain instructions on coding and building an end-to-end robotics solution.
Students can program their LEGO MINDSTORMS Education EV3 with the MakeCode platform which communicates with the EV3 Brick via USB cable and offers both block and text editors to support learners at different coding proficiency levels. With the included simulator, students can tinker with their code, get instant feedback on how their program is running and debug the code before applying it to the EV3 brick. Students new to coding can start with colored blocks that they can drag and drop onto their workspace to construct their programs and when ready, move into a full-featured JavaScript editor with code snippets, tooltips, and error detection to help them along the way.
Firmware Update

PLAY
Firmware Update Through EV3 Device Manager

PLAY
Getting Started

PLAY
Block-Based Coding and Simulation

PLAY
Text-Based Coding

PLAY
Tips and Tricks

PLAY
Students can program their LEGO MINDSTORMS Education EV3 with the MakeCode platform which communicates with the EV3 Brick via USB cable and offers both block and text editors to support learners at different coding proficiency levels. With the included simulator, students can tinker with their code, get instant feedback on how their program is running and debug the code before applying it to the EV3 brick. Students new to coding can start with colored blocks that they can drag and drop onto their workspace to construct their programs and when ready, move into a full-featured JavaScript editor with code snippets, tooltips, and error detection to help them along the way.
Firmware Update
PLAY
Firmware Update Through EV3 Device Manager
PLAY
Getting Started
PLAY
Block-Based Coding and Simulation
PLAY
Text-Based Coding
PLAY
Tips and Tricks
PLAY
Today we are incredibly happy to announce MakeCode for LEGO MINDSTORMS Education EV3! This is the culmination of months of engineering, design and user testing work we’ve been doing with our good partners over at LEGO Education.
LEGO MINDSTORMS Education EV3 brings technology and computer science to life with hands-on, project-based learning using the familiar LEGO bricks. And now with MakeCode support, students can use easy drag-and-drop block coding, or JavaScript text programming from a browser to make their creation escape from a maze, detect different colored objects, or turn into a musical instrument.
As well as being able to program the LEGO MINDSTORMS Education EV3 brick using the screen, sounds and buttons, the LEGO MINDSTORMS Education EV3 Core Set also comes with a variety of different sensors and motors that can be programmed, including a touch sensor, color sensor, ultrasonic sensor, infrared sensor, gyro sensor, and large and medium motors.
Here are a few of the cool features available in MakeCode for LEGO MINDSTORMS Education EV3:
1. No Install
Coding with MakeCode for LEGO MINDSTORMS Education EV3 is done entirely in a web browser, so students and teachers can create programs for their creations on any device or platform that has a USB port and an internet connection. No software to download or install!
2. Brick Screen Blocks
We created some fun blocks for programming the screen on the LEGO MINDSTORMS Education EV3 brick:
- Show Image – gives students a gallery of images to choose from that will display on the screen.
- Show Mood – will show an image, set the status lights, and play a sound. For example, the “Love” mood will show hearts on the screen, flash the lights green, and play a tinkling sound effect.
We also made it easy to show sensor and output values on the screen.

3. Easy to use drop-down menus
With all the choices available for LEGO MINDSTORMS Education EV3, it’s sometimes overwhelming when deciding what to pick from the menus. So we invested in making the drop-down menus be graphical, this makes them really easy to understand.
- Assign sensors and motors to the different ports

- Выберите, какой тип двигателя использовать (средний, большой, двойной)

- Select a sound effect (you can get a preview by hovering your mouse over a choice)
4. First class block Comments
We’ve implemented a brand new block commenting system! And we’re excited to hear your feedback. Adding meaningful comments your code is a key skill to learn in computer science. Especially with large robotics programs that may be built by a group of different students, we know it’s an important way to communicate what your program is doing.
- Workspace Comments – are like sticky notes on your workspace.
- Block Comments – are associated with a specific block of code, and only displayed when you click on them.

And of course, comments persist between Blocks and JavaScript views.
5. Interactive Simulator
Симулятор LEGO MINDSTORMS Education EV3 предоставляет мгновенную обратную связь для того, чтобы показать обучающимся, какие датчики и моторы подключены к каким портам на кирпиче. It’s also a great way to test and debug programs – students can change sensor input values, see how motors are behaving, and view information on the screen.
6. Блоки JavaScript
And of course, MakeCode brings our dual Blocks and JavaScript editors into the LEGO MINDSTORMS Education EV3 platform. More advanced students who are writing long, complicated robotics programs are now able to do so in JavaScript – one of the most popular programming languages in the world! Also, the industry standard MakeCode Scratch Blocks interface is already familiar to many students beginning to learn to code.
7. Tutorials & Examples
There are plenty of tutorials, projects and code samples to get people started using MakeCode for LEGO MINDSTORMS Education EV3. The Tutorials provide step-by-step guidance on how to use each sensor or motor, while the projects contain full-length instructions on coding and building an end-to-end robotics solution.

To get started with MakeCode for LEGO MINDSTORMS Education EV3, you’ll need:
We had a lot of fun building this code editor, and hope that you have fun creating amazing programs for your LEGO MINDSTORMS Education EV3 creations!
Have fun Making Code for LEGO MINDSTORMS Education EV3!
MakeCode Team
LEGO, the LEGO logo and MINDSTORMS are trademarks and/or copyrights of the LEGO Group. ©2018 The LEGO Group. All rights reserved.
Open source!
It is worth mentioning that this editor has been open source for a quite a while now. We thank all our users who have been reporting issues and submitting pull requests on the project!
First LEGO League
For teams planning to use MakeCode the FLL City Shaper challenge, read the FLL + MakeCode page. Good luck in competitions!
Offline app
Install the offline app to run the editor when you’re not connected, or you don’t always have access to the internet.
More tutorials and examples
We have been adding more content on the home screen to help you get started. Check it out!

Bug fixes
-
Sometimes, programs with tight loops would prevent the ESC button to work. Using multiple sensors would introduce a 6 second delay. Gyro reset is now immediate. We have added a new calibrate block that does a more extensive reset procedure. The tank block would… tank for some values. We have prepared a special program that lets you delete UF2 files from the brick. Download these PDF instructions and drop the PDF on the brick drive. This will present you with an menu for deleting files.
Modified blocks
калибровка гироскопа
Our users complained that resetting the gyro was very slow and unreliable. Логика калибровки для сброса гироскопа была перемещена в новый блок калибровка. The reset block now simply sends a reset command to the sensor.
установить время задержки после тормоза
Мотор, используемый для установки тормоза 200 мс, время приостановки после торможения, чтобы позволить роботу стабилизироваться. Время установки тормоза по умолчанию было сокращено до 10 мсек и добавлен новый блок, установить время задержки после тормоза было добавлено для настройки. (Thanks maximmasterr and THEb0nny)
New blocks
The ramp block under motors allows to schedule speed with a ramped acceleration and deceleration phase. This allows you to create smoother movement for your robots
set run phase
Этот блок позволяет настроить фазу ускорения и/или замедления для двигателя. It gets automatically applied once you use the run block on the motor.
battery property
The battery property block under brick lets you query the state of your battery: charge level, voltage and current. You can use it to detect low battery situation proactively. (Thanks to maximmasterr)
Сырые значения RGB
We also added the ability to read the raw color values and raw reflected light from the color sensor. (Thanks to THEb0nny)
хранилище (бета!)
Расширение storage позволяет записывать данные в файлы. The generated files will automatically be deleted once the brick is restarted. You can use this extension to collect and analyze data from your robot.
Support for I2C
We thank our user maximmasterr for submitting support for I2C sensor. It is now possible to write extensions for additional EV3 sensors, see example.
Читайте также: