
Машина для сборки кубика рубика из лего миндстормс
Обновлено: 01.05.2024
- Building instructions v1.0 (Home set 31313): download
- Building instructions v1.1 (Education sets 45544+45560): download
- EV3 Color Sensor RGB Block v1.00: see here
- EV3 Program: see here
1. Description
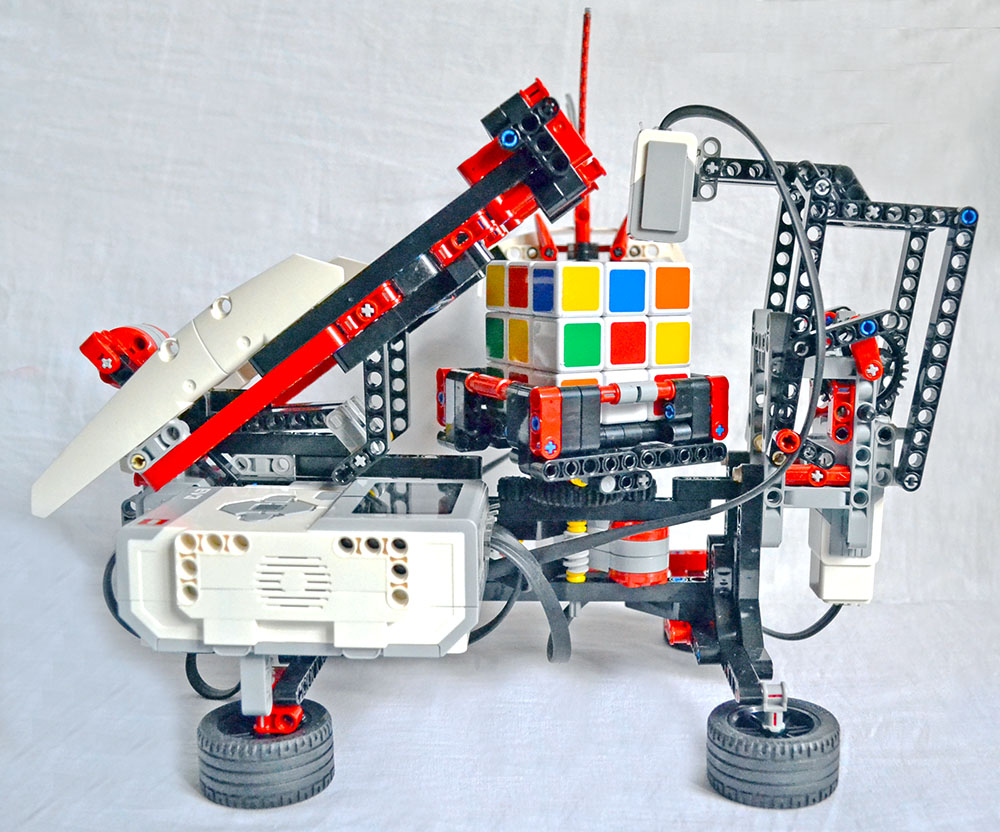
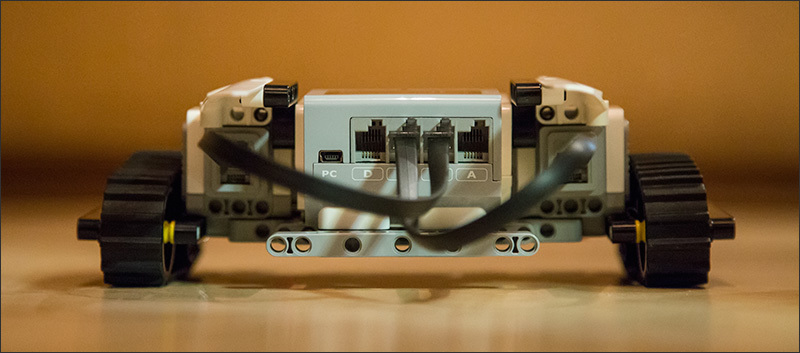
MindCub3r is a robot that can be built from a single LEGO MINDSTORMS EV3 home set (31313) or from EV3 Education Core and Expansion sets (45544+45560) to solve the well known Rubik's Cube puzzle.
All MindCub3r software releases should work with LEGO EV3 firmware versions from v1.06H (home) and v1.06E (Education) onwards. It is recommended that the EV3 firmware is always updated to the latest version released from LEGO.
Construct the robot by carefully following the build instructions (Home) or build instructions (Education) and then download and install the software described below.
a project file: MindCub3r-v2p2.ev3 or MindCub3r-Ed-v2p2.ev3, containing the motor and sensor control program created using the standard LEGO MINDSTORMS EV3 graphical programming environment
an executable program: mc3solver-v2p2.rtf, compiled from C++ that implements an efficient solving algorithm that can find much shorter solutions than the NXT MindCuber variants
an EV3 application: "MC3 Solver v2p2", that is used to launch the mc3solver-v2p2.rtf program
Note: release v2p2 uses the .rtf extension to enable the files to be downloaded using the standard LEGO MINDSTORMS EV3 software. The .rtf extension is intended to be used for files containing text so using if for the executable program is a work-around. Please do not try to open this file with a text editor.
MindCub3r uses the EV3 color sensor in RGB mode to enable it to measure colors that cannot be distingished by the standard color mode provided by the standard LEGO MINDSTORMS EV3 software. The Color Sensor RGB Block must be imported into the LEGO MINDSTORMS EV3 software to support this mode.
NOTE: LEGO MINDSTORMS EV3 software for Mac OS from version 1.4.0 no longer supports importing blocks such as the ColorSensorRGB block. In this case there is an alternative method to download the MindCub3r software to the EV3 using a micro-SD card.
2. Software
- On Windows - right click on the link
- On Mac - click on the link while holding the control(ctrl) key
- Save link as.
- Save Target As.
- Download Linked File As.
2.1 Install Color Sensor RGB Block
Extract the file from this archive.
On a computer running Windows, find the file in Windows Explorer, click with the right mouse button and select Extract all.
- the ColorSensorRGB-v1.00.ev3b file with the ColorSensorRGB block.
Start the LEGO MINDSTORMS EV3 software and create a new, empty project.
Select the Tools menu and then Block Import.
In the Block Import and Export dialog, select Browse.
Find the file ColorSensorRGB-v1.00.ev3b on your computer and Open it.
Select ColorSensorRGB-v1.00.ev3b from Select Blocks to Import and then select Import.
To complete the installation, close the dialogs and exit from LEGO MINDSTORMS EV3 software.
2.2 Download MindCub3r Program
- download MindCub3r-v2p2.zip (Home set 31313)
- download MindCub3r-Ed-v2p2.zip (Education sets 45544+45560)
Note: previous versions are still available here
Extract all the files from this archive.
On a computer running Windows, find the file in Windows Explorer, click with the right mouse button and select Extract all.
- the MindCub3r-v2p2.ev3 or MindCub3r-Ed-v2p2.ev3 project file with the main program
- the mc3solver-v2p2.rtf executable program
- InstallMC3-v2p2.rbf to install an application to launch mc3solver-v2p2.rtf
Start the LEGO MINDSTORMS EV3 software and select the File menu then Open Project.
Find the MindCub3r-v2p2.ev3 or MindCub3r-Ed-v2p2.ev3 project file and Open it.
Download the MindCub3r program to the EV3 (but do not run it yet).
Select the Tools menu and then Memory Browser.
Select Brick (or SD Card if there is a micro-SD card in the EV3) and find and select MindCub3r-v2p2 or MindCub3r-Ed-v2p2 in the Projects folder and then select Download.
Find the folder on the computer where the files were extracted from MindCub3r-v2p2.zip or MindCub3r-Ed-v2p2.zip. Select mc3solver-v2p2.rtf and Open to download this program to the EV3.
Select Download again from the Memory Browser dialog.
Find the folder on the computer where the files were extracted from MindCub3r-v2p2.zip or MindCub3r-Ed-v2p2.zip. Select InstallMC3-v2p2.rbf and Open to download this file to the EV3.
Close the Memory Browser dialog.
2.3 Install the MC3 Solver Application
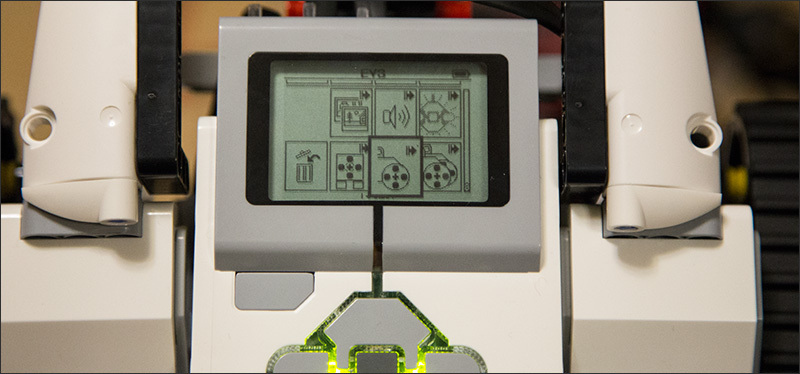
Go to the Run Recent screen on the EV3.
Press the right button on the EV3 to move to the File Navigation screen. Select the MindCub3r-v2p2 or MindCub3r-Ed-v2p2 folder and press the center button to open it. If there is a micro-SD card in the EV3, select and open the SD_Card folder first.
Use the down button to Select InstallMC3-v2p2 and press the center button to run it. The EV3 will make a short beep.

This installs "MC3 Solver v2p2" application on the Brick Apps screen.
Turn off the EV3 brick to ensure all the files are saved to the flash memory and then turn it on again.
MindCub3r is now ready to use!
3. Operation
Run the "MC3 Solver v2p2" application on the EV3 from the Brick Apps screen to start the mc3solver-v2p2.rtf executable program.

This is only necessary once each time the EV3 is turned on as the program will continue to run in the background until the EV3 is turned off.
Run the MindCub3r program on the EV3 from the Run Recent screen or from the File Navigation screen if it is the first time it has been run.


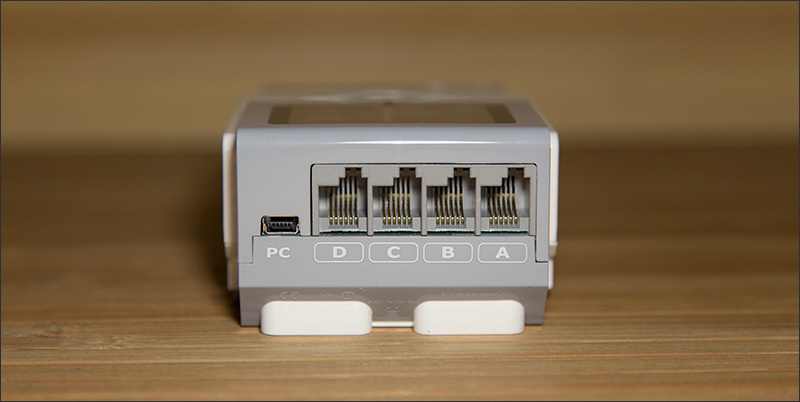
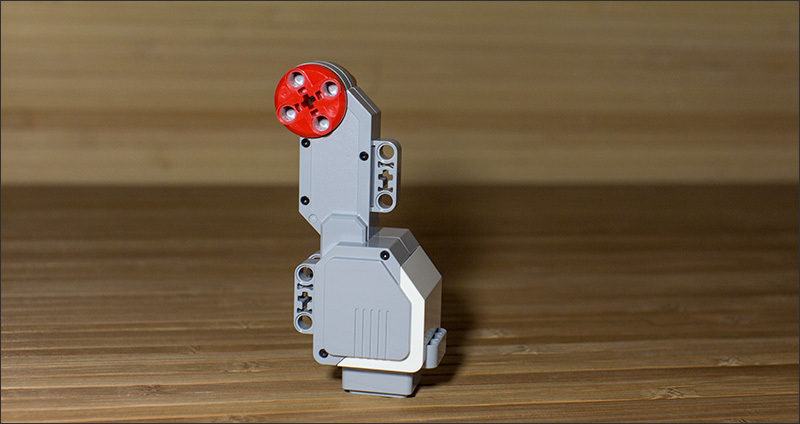
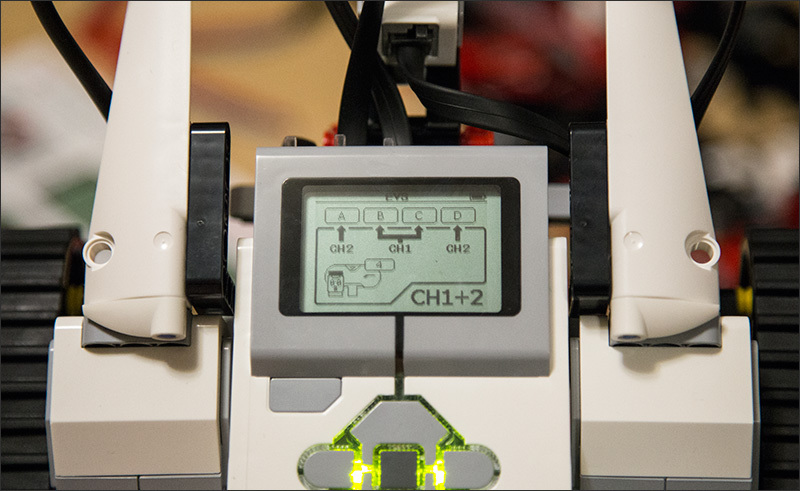
The program first resets the position of the scan arm (holding the color sensor) and then the tilt arm. If the turntable starts to rotate or the two arms do not move in this order, please carefully check that cables have been connected to the correct ports on the EV3 as shown by the color coding in the build instructions. During this period, the EV3 buttons flashes red.
The program then connects to the mc3solver-v2p2.rtf program that was downloaded to the EV3. If the program is found, the EV3 makes a short beep and continues. If the solver program is not running, the buttons continues to flash red and the message "Find solver" is displayed on the EV3 screen. If this happens, please check that the "mc3solver-v2p2.rtf" program has been downloaded to the MindCub3r-v2p2 or MindCub3r-Ed-v2p2 project folder on the EV3 and that the "MC3 Solver v2p2" application has been installed and run once.
When MindCub3r is ready to start, the EV3 buttons turn orange and the message "Insert cube. " is displayed on the screen.
Gently turn the turntable in each direction with your finger so that it moves slightly because of "play" in the gears connecting it to the motor. If necessary, adjust the position of the motor so that there is an equal mount of play in each direction. Use the left and right buttons on the EV3 to do this. A short press nudges the motor by a small angle. Holding the button for longer moves it by larger angles more quickly.
Insert a scrambled Rubik's Cube into the turntable tray and MindCub3r will start to scan and solve the cube.
MindCub3r may scan the cube up to three times if it is unable to determine the colors at first. If the scanned colors do not result in a valid pattern, MindCub3r will stop after the third attempt and display the message "Scan error" on the EV3 display. If this happens, there may be a number of possible causes. See the troubleshooting section.
MindCub3r can solve the cube directly into patterns or scramble it. Before inserting the cube, use the up and down buttons on the EV3 to select a specific pattern, "All" to create each pattern in turn or "Random" to cause MindCub3r to solve normally and occasionally generate a random pattern. Selecting "Scramble" will make MindCub3r scramble the cube without scanning it.
If there is a cube present before MindCub3r is ready, the buttons will stay red and the message "Remove cube. " is displayed for you to remove the cube. If this happens even when no cube is present or if MindCub3r does not start to scan the cube when it is inserted, please check that the cables to the infra red or ultrasonic and color sensors are connected to the correct ports on the EV3 as shown in by the color coding in the build instructions.
4. Troubleshooting Tips
4.1 General
NOTE: LEGO MINDSTORMS EV3 software for Mac OS from version 1.4.0 no longer supports importing blocks such as the ColorSensorRGB block. In this case there is an alternative method to download the MindCub3r software to the EV3 using a micro-SD card.
The video of the home variant of MindCub3r shows a prototype. The scan arm support was improved before the build instructions were published so do not worry if your MindCub3r does not look quite like the video. There are many other videos of MindCub3r built by other people in this playlist
If MindCub3r stops with the message "Reset scan" and no motors are turning the following tips may help:
Check that the scan arm mechanism is built exactly as shown in the build instructions. If not, it may cause the motor to jam during the reset.
Check that the cable connecting the medium motor under the scan arm to the EV3 is plugged in firmly at both ends. If not, the EV3 may not be able to sense the position of the motor correctly during the reset.
If none of the above help then try connecting the medium motor to port D in the EV3 instead of port C (which is the port shown in the build instructions). Then re-run the program. The MindCub3r program from v2p2 onwards will detect whether a motor is connected to either port C or port D and use whichever it detects for the scan arm. Some people have found that there can be a problem with port C not being able to sense the motor position. If the software gets past the "Reset scan" message with the motor connected to port B then it is highly recommended to contact LEGO Customer Services as this may indicate there is a fault with port C of the EV3.
If this does not help, please upload a video showing how how the mechanism moves when the program is started and post a link on the MindCuber Facebook page for further help.
4.2 Tilting
If MindCub3r fails to tilt the cube correctly the following tip may help:
Check that the tilt arm has been built exactly as shown in the build instructions. In particular, carefully check the position of the grey connectors and pegs that connect the tilt arm to the levers from the tilt motor.
4.3 Scanning
If MindCub3r attempts to scan the cube 3 times and displays the message "Scan error" the following tips may help.
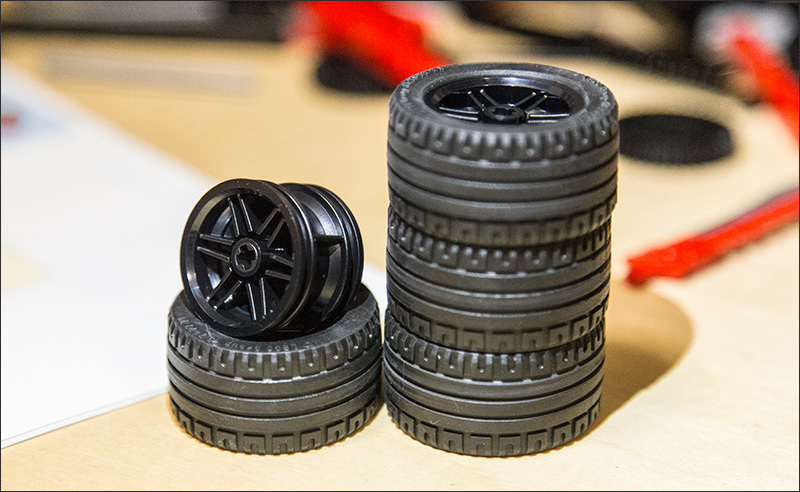
MindCub3r is designed to work with an official Rubik's Cube branded by Rubik's. However, it should work with most cubes provided one set of stickers is white and the others are distinct colors. It is optimized to work with white, yellow, red, orange, green and blue stickers.
NOTE: cubes with very bright, vivid, "fluorescent" stickers may not scan reliably because the LEGO color sensor can return similar values for colors that look different to us. If none of the other tips help and you think this may be an issue, please consider replacing the stickers with more conventional colors or try an alternative cube.
Cubes with a white plastic body may scan less reliably that those with a black body but may work reasonably well if there are no other issues.
A standard cube is about 57mm along each edge. MindCub3r will work most reliably with a cube this size although cubes that are only slightly larger or smaller may work. It has been known to solve some cubes as small as 55mm but not all.
Make sure latest version of the EV3 firmware from LEGO is installed on the EV3.
Make sure latest release of the MindCub3r software is installed.
Check that the scan arm has been built exactly as shown in the build instructions. Small differences such as how the black 5-hole beams on either side of the scan arm are connected can alter the position of the color sensor during the scan or even jam the scan arm so it stops during the scan. In particular, if the color sensor looks as though it is over the edge of the cube or too close to the middle while scanning the corner or edge, please check the build instructions again.
Even if the cube appears to tilt each time during the scan, it may be that the cube is being pushed too far across the turntable affecting its position under the color sensor. Check that the tilt arm has been built exactly as shown in the build instructions. In particular, carefully check the position of the grey connectors and pegs that connect the tilt arm to the levers from the tilt motor.
If the EV3 is positioned one hole too far towards the turntable, the corner of the turntable may catch on the edge of the screen causing it to "jump" a little as the turntable rotates. Check that the EV3 is positioned exactly as shown in the build instructions.
Make sure that the turntable is carefully aligned before inserting the cube as described here. This is required to ensure that the cube is positioned correcetly under the color sensor during the scan.
Use new or well charged batteries as the reset position of the scan arm can be affected by low battery levels.
Try the scan in dim lighting conditions as the color sensor can become saturated in bright lights.
Try to bend the cable connecting the color sensor to the EV3 in its most natural direction (swap the two ends if necessary) and through the clip at the bottom of the scan arm to minimize any force that the cable applies to the position of the color sensor during the scan.
If this does not help, please upload a video showing a failing scan with close up views of the scan arm from different angles and the position of the color sensor over the cube as the scan arm moves and post a link on the MindCuber Facebook page for further help.
Like MindCuber on Facebook to share your experiences and help each other with troubleshooting.
Copyright © 2013-2020 David Gilday
LEGO and MINDSTORMS are trademarks of the LEGO Group
Rubik's Cube is a trademark of Rubiks Brand Limited

- Building instructions v1p0 (set 51515): download
- MINDSTORMS Robot Inventor Program: see here
1. Description
MindCuber-RI is a robot that can be built from a single LEGO MINDSTORMS Robot Inventor set (51515) to solve the well known Rubik's Cube puzzle.
MindCuber-RI software version v1p0 should work with any version of the LEGO MINDSTORMS Robot Inventor software. However, it is recommended that the MINDSTORMS Robot Inventor software is always updated to the latest version released by LEGO.
Construct the robot by carefully following the build instructions and then follow the instructions in the next section to download and install the software described below.
- python classes for discriminating colors: mcricolors_v1p0.py
- python classes for mapping pieces on a Rubik's Cube: mcrimaps_v1p0.py
- python classes for solving a Rubik's Cube: mcrisolver_v1p0.py
- small lookup tables used by mcrisolver_v1p0: mcrimtab1_v1p0.bin
With these components, MindCuber-RI will solve the Rubik's Cube in an average of about 42 moves.
An optional python project, MCRIMTab4-v1p0, that contains a large data file:
- large lookup tables for mcrisolver_v1p0: mcrimtab4_v1p0.bin
With this large lookup table installed, MindCuber-RI will solve the Rubik's Cube more quickly in an average of about 31 moves.
NOTE: This program takes a long time (around 30 minutes) to download and install on the Robot Inventor hub so it may be desirable to just use the small tables initially to get MindCuber-RI working.
A python project, MCRIInstall-v1p0, that installs any MindCuber-RI files, from the MCRISolver-v1p0 and MCRIMTab4-v1p0 projects, that have been downladed to other slots on the Robot Inventor hub.
The main python program, MindCuber-RI-v1p0, that uses the modules and data files installed by the previos projects to control the MindCuber-RI mechanism and solve the Rubik's Cube.
2. Software
- On Windows - right click on the link
- On Mac - click on the link while holding the control(ctrl) key
- Save link as.
- Save Target As.
- Download Linked File As.
2.1 Download MindCuber-RI Program
Download the file to your computer:
Extract the files from this archive.
On a computer running Windows, find the file in Windows Explorer, click with the right mouse button and select Extract all.
On a Mac computer, locate the file in the Finder and double-click on it to extract the contents.
- MCRISolver-v1p0.lms
- MCRIMTab4-v1p0.lms
- MCRIInstall-v1p0.lms
- MindCuber-RI-v1p0.lms
Start the LEGO MINDSTORMS Robot Inventor software and select the File menu then Open. .
Find the MCRISolver-v1p0.lms project file and Open it.
Connect to the Robot Inventor hub using either a USB cable or via bluetooth.
Expand the Console to see progress information about the software installation during the next step.
Download and Run the MCRISolver-v1p0 program in an unused slot, e.g. 19, on the Robot Inventor hub.

NOTE: This program may take up to a minute to download so please be patient. The LEGO MINDSTORMS Robot Inventor software stops showing progress after a few seconds even though the download continues.
NOTE: Owing to limitations of the current version of the LEGO MINDSTORMS Robot Inventor software, running this program will result in a python SyntaxError. This is deliberate and should be ignored.

Once downloaded, the MCRISolver-v1p0 program should be left on the hub until the installation has been completed in the following steps.
Select the File menu then Open. as step 3. Then find the MCRIInstall-v1p0.lms project file and Open it.
Expand the Console to see progress information about the software installation during the next step.
Download and Run the MCRIInstall-v1p0 program in an unused slot on the Robot Inventor hub. Do not overwrite MCRISolver-v1p0 in slot 19 (or MCRIMTab4-v1p0 in slot 18).

The hub LED display shows progress:
And the console shows download information:

This installs mcricolors_v1p0.py, mcrimaps_v1p0.py, mcrisolver_v1p0.py and mcrimtab1_v1p0.bin on the hub for use by the main program.
The hub will restart when the installation has finished. If the hub was not connected via a USB cable, it may turn off and be necessary to turn it back on manually. If the hub was connected via Bluetooth it may be necessary to re-connect.
NOTE: The LEGO MINDSTORMS Robot Inventor software may indicate that "The hub OS needs to be updated" when it is not necessary. If this happens, do not press the UPDATE button as this will delete the programs that have just been installed. Instead, power off the hub and if the hub is connected via a USB cable, disconnect the cable.
MCRISolver-v1p0 (optionally MCRIMTab4-v1p0) and MCRIInstall-v1p0 may now be removed from the hub to free the space and slots for other programs.
Open the connection to the Robot Inventor hub.

Then open Programs the view all the programs on the hub.

If necessary, scroll down to see all slots. Then delete the programs used in previous steps.
Select the File menu then Open. as step 3. Then find the MindCuber-RI-v1p0.lms project file and Open it.
Download and Run the MindCuber-RI-v1p0 program in an unused slot on the Robot Inventor hub.
MindCuber-RI is now ready to solve a Rubik's Cube!
3. Operation
Run the MindCuber-RI program, if it is not already running, using the buttons on the MINDSTORMS Robot Inventor hub. Press the right button to select the slot number to which the program was downloaded. Then press the center button to run the program.
Gently use your finger to rotate the turntable in each direction to determine if it is aligned. It moves slightly because of "play" in the gears connecting it to the motor. There should be an equal amount of movement in each direction. If necessary, use the left and right buttons on the hub to adjust the position of the motor position. Each press nudges the motor by a small angle.
Insert a scrambled Rubik's Cube into the turntable tray and MindCuber-RI will start to scan and solve the cube.
MindCuber-RI may scan the cube up to three times if it is unable to determine the colors at first. If the scanned colors do not result in a valid pattern, MindCuber-RI will stop after the third attempt with the middle buttont colored orange. If this happens, there may be a number of possible causes. See the troubleshooting section.
4. Faster Solution
The method used to calculate a solution for the cube is based on some pre-calculated lookup tables containintg sequences of moves that solve groups of pieces in stages. The default, small tables included in the MCRISolver-v1p0 download result in solutions averaging about 42 moves. By using a larger set of lookup tables with more entries, shorter solutions can be caltulated with an average only about 31 moves. With fewer moves, the overall time to solve the cube is reduced. These large tables are contained in the MCRIMTab4-v1p0.lms project and can be downloaded in the same way as those in MCRISolver-v1p0.
Select the File menu then Open. as before. Then find the MCRIMTab4-v1p0.lms project file and Open it.
Expand the Console to see progress information about the software installation during the next step.
Download and Run the MCRIMTab4-v1p0 program in an unused slot, e.g. 18, on the Robot Inventor hub.

NOTE: This large program will take a long time (around 30 minutes) to download so please be patient. The LEGO MINDSTORMS Robot Inventor software stops showing progress after a few seconds even though the download continues.
If the connection to the hub is via Bluetooth then please attach the hub to a USB charger to ensure it does not time out and shutdown during the download.
A message will appear in the Console when the download is complete.
NOTE: Owing to limitations of the current version of the LEGO MINDSTORMS Robot Inventor software, running this program will result in a python SyntaxError. This is deliberate and should be ignored.

Once downloaded, the MCRIMTab4-v1p0 program should be left on the hub until the installation has been completed.
Continue, or repeat from 2.1 Download MindCuber-RI Program, step 9 to complete the installation.
5. Troubleshooting Tips
5.1 General
Under development.
Please post a comment or message on the MindCuber Facebook page for help.
5.2 Tilting
Under development.
5.3 Scanning
Under development.
Like MindCuber on Facebook to share your experiences and help each other with troubleshooting.
Copyright © 2013-2021 Mike Dobson and David Gilday
LEGO and MINDSTORMS are trademarks of the LEGO Group
Rubik's Cube is a trademark of Rubiks Brand Limited
The MindCuber family is a group of robots, designed using LEGO MINDSTORMS and LEGO Education SPIKE Prime, that can solve the well known Rubik's Cube puzzle.
There is one variant of MindCuber-RI that can be built from MINDSTORMS Robot Inventor, one variant of PrimeCuber that can be built from SPIKE Prime, two variants of MindCub3r that can be built from MINDSTORMS EV3 and two variants of MindCuber for MINDSTORMS NXT. Each variant uses a different selection of pieces. Please select which creation to build according to your Robot Inventor, SPIKE Prime, EV3 or NXT set.
LEGO MINDSTORMS Robot Inventor
LEGO have produced at one MINDSTORMS Robot Inventor set:
Select MindCuber-RI for your MINDSTORMS Robot Inventor set:
LEGO Education SPIKE Prime
LEGO have produced at least one SPIKE Prime set:
Select PrimeCuber for your SPIKE Prime set:
LEGO MINDSTORMS EV3
LEGO have produced at least two different MINDSTORMS EV3 sets:
MindCub3r for MINDSTORMS EV3 is available both for set 31313, home edition and for the Education sets 45544+45560
Select MindCub3r for your EV3 set:
LEGO MINDSTORMS NXT
LEGO have produced at least three different MINDSTORMS NXT sets:
-
(item 8547) (item 8527) - the original set in an "Orange box" (item 9797)
Each of these sets contains a progammable NXT "Intelligent brick", three motors, a number of sensors and a collection of bricks, gears and other pieces. There is some variation between the sensors and pieces in each of these sets.
MindCuber uses a color sensor to detect the colors of the scrambled Rubik's Cube. A color sensor is included in the MINDSTORMS NXT 2.0 set. However, both the NXT 8527 (Orange box) set and the Education Base set include a simple light sensor that can measure brightness but not color. If you are planning to use either the '8527 or Education sets you will need to obtain an additional LEGO color sensor (item 9694). You may also need a few additional pieces if you are using the Education Base set
Select MindCuber for your NXT set:
Click here for MindCuber for NXT troubleshooting tips.
Click here for MindCuber for NXT program source code.
Like MindCuber on Facebook to share your experiences and help each other with troubleshooting.
Follow MindCuber's creator on Twitter @DavidGilday to be kept informed of updates.
Copyright © 2013-2021 David Gilday
LEGO and MINDSTORMS are trademarks of the LEGO Group
Rubik's Cube is a trademark of Rubiks Brand Limited
Не так давно обзавелся набором LEGO MINDSTORMS EV3 (31313) и с удивлением обнаружил, что в русскоязычном сегменте интернета довольно мало интересных материалов и инструкций по сборке и настройке роботов из этого набора. Решил, что нужно это дело исправлять.
Эта инструкция представляет собой вольный перевод материалов с официального сайта проекта MindCub3r и дополнена опытом самостоятельной сборки этого робота, способного собрать кубик Рубика меньше чем за 2 минуты.
Подробнее о LEGO MINDSTORMS EV3 можно почитать на этом сайте.
Вот, что у нас должно получится в итоге:
MindCub3r можно построить из одного комплекта Lego Mindstorms EV3 (31313, Home Edition).
Также вам понадобится инструкция по сборке и программное обеспечение, разработанное авторами проекта.
Буквально позавчера автор проекта объявил в своем ФБ, что подправил программное обеспечение для своего робота, и теперь оно работает со «штатной» прошивкой «кирпича» 1.06Н. На главной странице проекта эта информация также уже появилась, архив MindCub3r-v1p1a.zip, содержащий, среди прочего, и обновленную версию программы, уже доступен для загрузки. Загрузка и установка блока для датчика цвета по-прежнему необходима.
Дальнейший текст статьи исправлен с учетом последних изменений на сайте проекта!
Инструкцию по сборке MindCub3r смотрим или скачиваем здесь.
Прошивку (на момент написания статьи EV3-Firmware-V1.06H.bin) для кирпича скачиваем с официального сайта LEGO MINDSTORMS здесь.
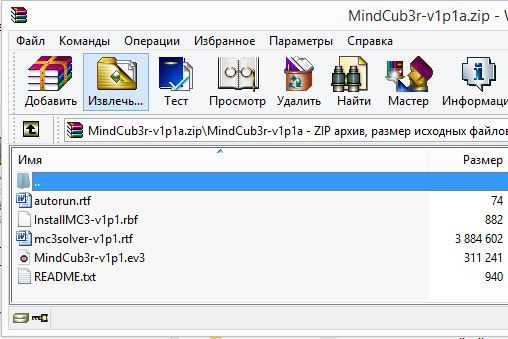
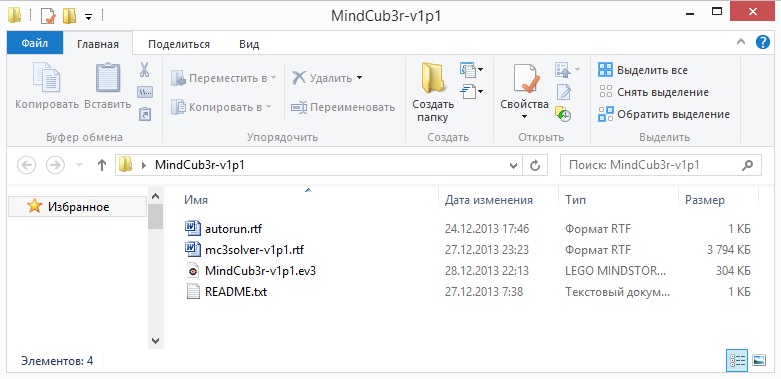
Архив MindCub3r-v1p1a.zip с файлами проекта (MindCuber-v1p1.ev3, autorun.rtf и mc3solver-v1p1.rtf) качаем тут.
Еще нам понадобится прошивка для датчика цвета, которую берем здесь. Все дело в том, что стандартные настройки этого датчика не корректно определяют цвета в режиме RGB.
После того, как вы соберете робота и скачаете себе на компьютер все необходимое, можно приступать к настройке.
Если вы еще не обновили прошивку «кирпича» первым делом устанавливаем новую версию ПО для главного блока Mindstorms EV3:
1. Запускаем программное обеспечение LEGO MINDSTORMS EV3;
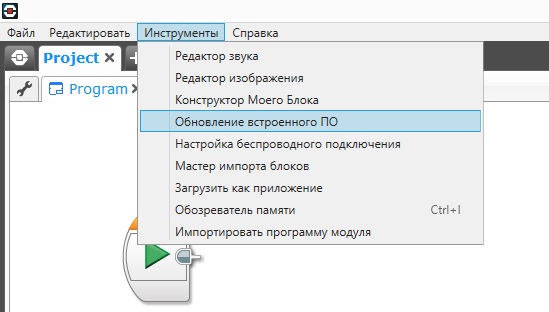
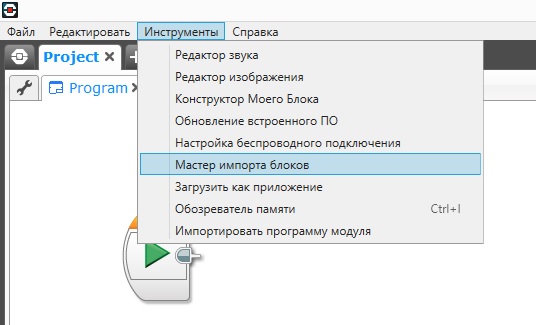
2. Выбираем Инструменты — Обновление встроенного ПО;
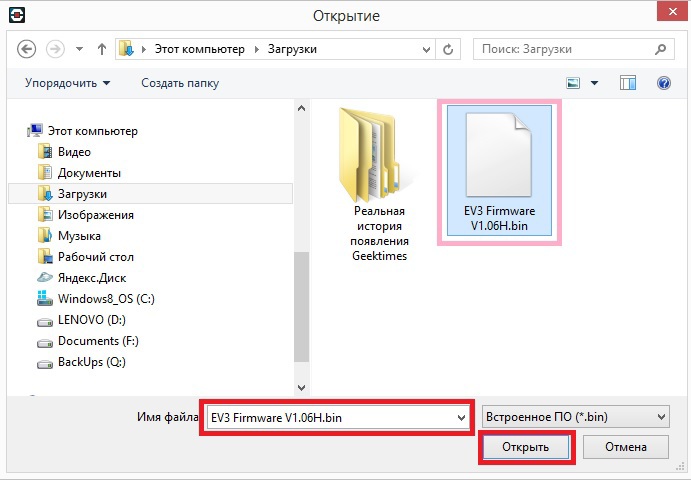
3. В появившемся диалоговом окне нажимаем «Просмотреть», находим предварительно закаченный файл EV3-Firmware-V1.06H.bin и жмем «Открыть»;
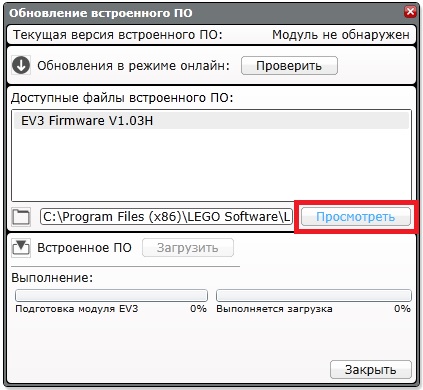
4. В диалоговом окне в таблице «Доступные файлы встроенного ПО» выбираем EV3-Firmware-V1.06H и жмем «Загрузить». Ждем окончания загрузки;

5. Перезагружаем главный блок (выключаем и снова включаем).
Далее устанавливаем прошивку для датчика цвета:
1. В ПО LEGO MINDSTORMS EV3 открываем новый пустой проект;
2. Выбираем Инструменты — Мастер импорта блоков;
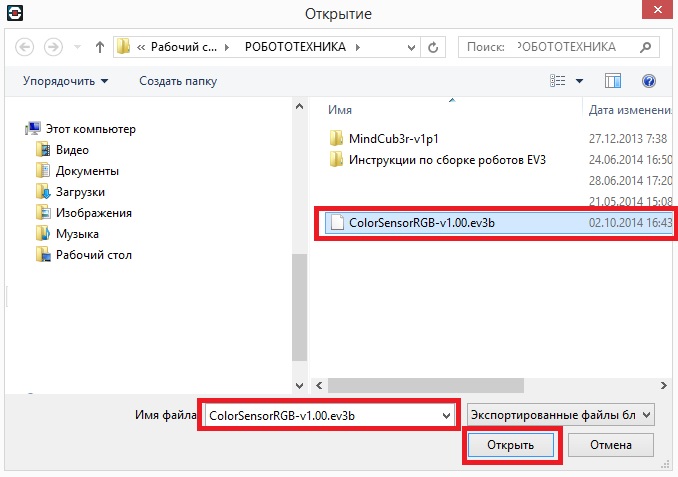
3. В появившемся диалоговом окне нажимаем «Просмотреть», находим предварительно загруженный файл ColorSensorRGB-v1.00.ev3b и жмем «Открыть»;

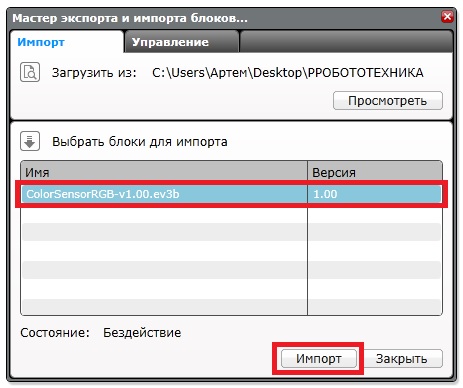
4. В диалоговом окне в таблице «Выбрать блоки для импорта» выбираем ColorSensorRGB-v1.00.ev3b и жмем «Импорт».
5. Для завершения установки закройте диалоговое окно и выйдите из программного обеспечения LEGO MINDSTORMS EV3.
Теперь самый ответственный момент — загрузка программы робота в кирпич:
1. Распаковываем предварительно загруженный архив MindCub3r-v1p1a.zip;
2. Запускаем ПО LEGO MINDSTORMS EV3;
3. Выбираем Файл — Открыть проект, ищем файл MindCub3r-v1p1.ev3, распакованный из архива MindCub3r-v1p1.zip и жмем «Открыть»;
4. После открытия проекта загружаем его в «кирпич». Загружаем, но НЕ ЗАПУСКАЕМ.

5. Идем в Инструменты — Обозреватель памяти (Ctrl+I);

6. Выбираем (выделяем) во вкладке «Модуль» или «SD-карта» папку проекта «MindCub3r-v1p1»;
7. Нажимаем «Загрузить»;
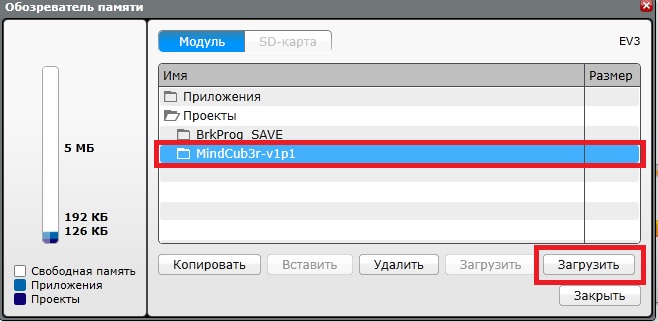
8. Находим файл mc3solver-v1p1.rtf, распакованный из архива MindCub3r-v1p1a.zip и нажимаем «Открыть»;
9. Еще раз нажимаем «Загрузить», предварительно убедившись, что папка проекта «MindCub3r-v1p1» все еще выделена;
10. Находим файл InstallMC3-v1p1.rbf, распакованный из архива MindCub3r-v1p1a.zip и нажимаем «Открыть»;
Примечание: файл mc3solver-v1p1.rtf имеет текстовое расширение .rtf. Пожалуйста, не пытайтесь открыть этот файл с помощью текстового редактора.
11. Закройте диалоговое окно, выйдите из программы и перезагрузите модуль.
Последний этап — устанавливаем приложение MC3 Solver на главном модуле:
1. Включаем блок:
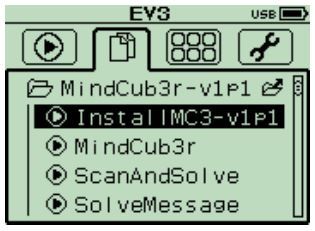
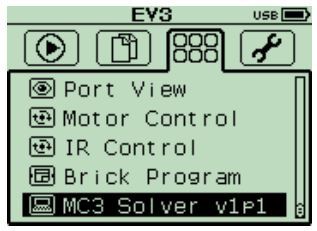
2. Находим во второй вкладке папку проекта MindCub3r-v1p1 (в памяти блока или на SD-карте):

3. Выбираем файл InstallMC3-v1p1 и нажимаем на центральную кнопку модуля для установки:
4. В третьей вкладке проверяем наличие установленного приложения MC3 Solver v1p1:
5. Перезагружаем блок.
6. В третьей вкладке блока запускаем приложение «MC3 Solver v1p1» для начала работы программы mc3solver-v1p1.rtf:
Всё! MindCub3r готов к использованию!
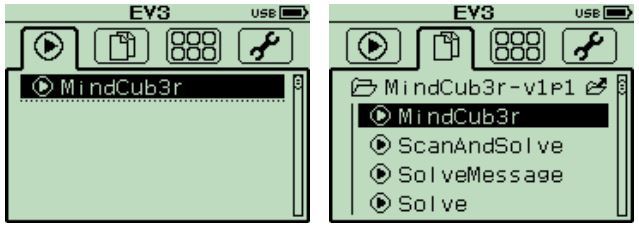
7. Запускаем программу в первой или во второй вкладке блока:
После запуска программы робот попросит вложить кубик («Insert cube») и начнет его сканировать датчиком цвета.
После сканирования робот ненадолго задумается и начнет сборку.
Удачное решение задачи ознаменуется радостным вращением кубика.
Вот, собственно, процесс работы робота:
Выше описан идеальный сценарий, на практике же все немного хуже — датчик может не правильно определить цвета — всего робот может провести 3 (три) цикла сканирования до того, как выдаст ошибку (Scan error). После этого нужно изъять кубик и снова вложить в робота. Причиной этому может быть или низкий заряд батареи модуля или «неправильный» кубик.
У меня иногда проходило по 3-5 повторов (3 цикла сканирования и одно изъятие) прежде чем робот принимался за сборку, но результат того однозначно стоит.
Если у вас остались вопросы, задавайте их в комментариях к статье, с удовольствием на них отвечу.
Несмешной и баянистый анекдот, но нельзя просто так взять и начать эту публикацию не с него – он в лучшем виде отображает суть того, о чём пойдёт речь далее. Впрочем, из заголовка вы и так поняли, о чём речь.

Осторожно! Публикация может вызвать непреодолимое желание завести сына.
Урок истории
Компания LEGO (название произошло от датской фразы «leg godt», «Играй с удовольствием») не нуждается в представлении – она была основана в далёком 1932 году, хотя первые знакомые всем пластиковые кубики появились значительно позже, в 1947. Примечательно, что кубики LEGO, выпускаемые в те годы, полностью совместимы с теми, что выпускаются сейчас.
История создания компании, выпущенная компанией Pixar к 80-летнему юбилею LEGO:
Сейчас компания производит около 20 миллиардов деталек в год, то есть более 630 штук в секунду. В текущем модельном ряду более 600 различных конструкторов и так уж получилось, что серия Mindstorms является своего рода вершиной технической мысли, самым-самым навороченным конструктором. Если вкратце, то она позволяет делать вполне себе полноценных роботов.
Как гласит википедия, серия LEGO Mindstorms была впервые представлена в 1998 году. Через 8 лет (в 2006) на свет появился набор LEGO Mindstorms NXT 1.0, а уже в 2009 — набор LEGO Mindstorms NXT 2.0. Сегодня речь пойдёт о LEGO Mindstorms EV3 – последнем (третьем) поколении терминатора конструктора, который был представлен почти год назад, 4 января 2013 года (в продаже появился только спустя полгода).
Отличия EV3 от NXT 2.0
В принципе, главная идея осталась прежней – серия предназначена для сборки программируемых роботов. Поэтому первым встаёт вопрос, а что же поменялось с момента выхода предыдущего конструктора и стоит ли покупать новый? Основное отличие заключается в обновленных датчиках/моторах и, самое главное, в интеллектуальном блоке EV3 (EV означает EVolution):
| EV3 | NXT | |
| Дисплей | Монохромный LCD, 178x128 | Монохромный LCD, 100x64 |
| Процессор | 300 МГц Texas Instruments Sitara AM1808 (ARM9) | 48 МГц Atmel AT91SAM7S256 (ARM7TDMI) |
| Память | 64 Мб RAM 16 Мб Flash Слот microSDHC (до 32 Гб) | 64 Кб RAM 256 Кб Flash |
| USB-хост | Есть | Нет |
| Wi-Fi | Опционально, через USB-донгл | Нет |
| Bluetooth | Есть | Есть |
| Поддержка Apple-устройств | Есть | Нет |
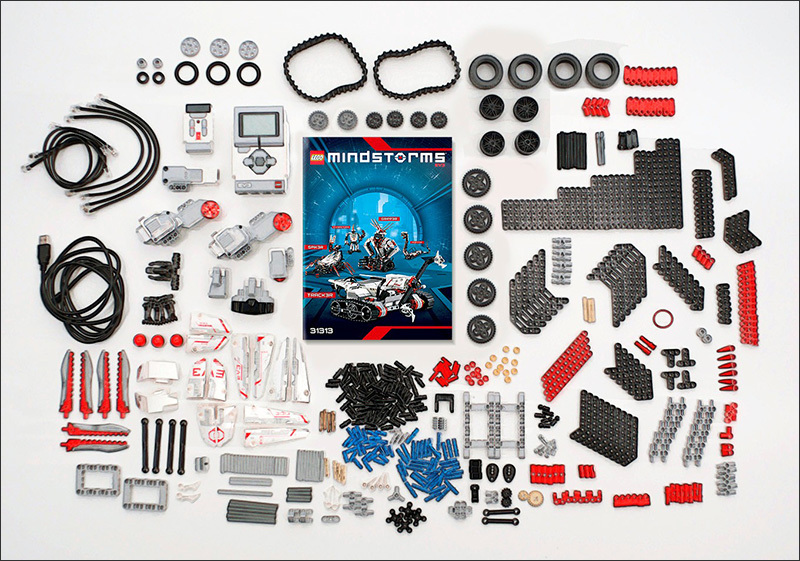
Ещё одно отличие заключается в том, что серия NXT продавалась в нескольких версиях (в разные годы) и представляла собой разные наборы, базовые и ресурсные. У нового EV3 с этим попроще – пока он продаётся в основном варианте – 31313 (601 деталь), из которого можно наделать кучу всего. Но при желании можно докупить базовый набор 45544 (541 деталь) с дополнительными сенсорами и детальками (использовать детали от обычных конструкторов также никто не мешает). Кстати, обратите внимание на пятизначные артикулы – на такую нумерацию компания перешла в 2013 году.
Что касается совместимости, то тут было проделано всё возможное. Все NXT-сенсоры и моторы совместимы с EV3 и распознаются как NXT. EV3-сенсоры не работают с NXT, но EV3-моторы вроде как совместимы. NXT-кирпичик может быть запрограммирован софтом от EV3, но некоторые функции могут быть недоступны, а вот запрограммировать EV3-кирпичик NXT-софтом без сторонних решений не получится.
Внутри коробки
Ещё когда я сам был маленький и ездил с родителями в центральный Детский Мир (когда он ещё был), на Лубянку – уже тогда я не мог оторвать глаз от коробок с LEGO. Тогда не было ни Гиктаймс, ни даже Хабра, но с тех пор коробки остались всё такими же яркими и сочными, даже во взрослом возрасте активируют процесс слюновыделения ) В этом плане другим производителям есть чему поучиться.

Часть коробки, на самом деле, представляет собой (если её разрезать) трассу с различными цветовыми зонами, которую можно использовать для роботов с сенсорами цвета.
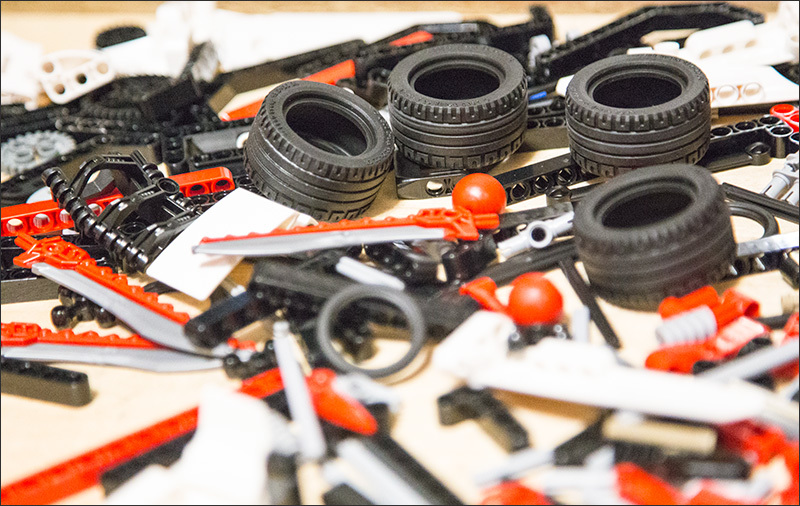
Все детальки аккуратно разложены по пакетикам, в комплекте – инструкция и набор наклеек. Давайте вкратце пройдёмся по тому, что положили в комплект.

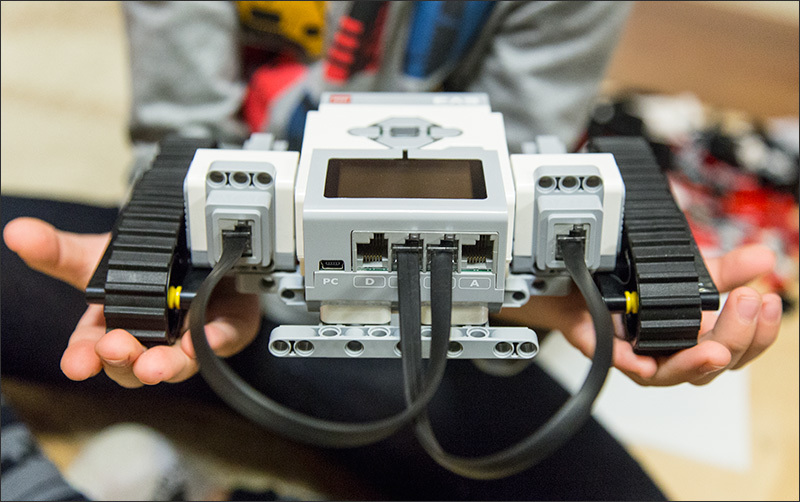
Сам EV3, он же интеллектуальный блок, он же сердце системы, он же «кирпичик» или «кубик». Служит центром управления и энергетической станцией для вашего робота и имеет следующие функциональные элементы:
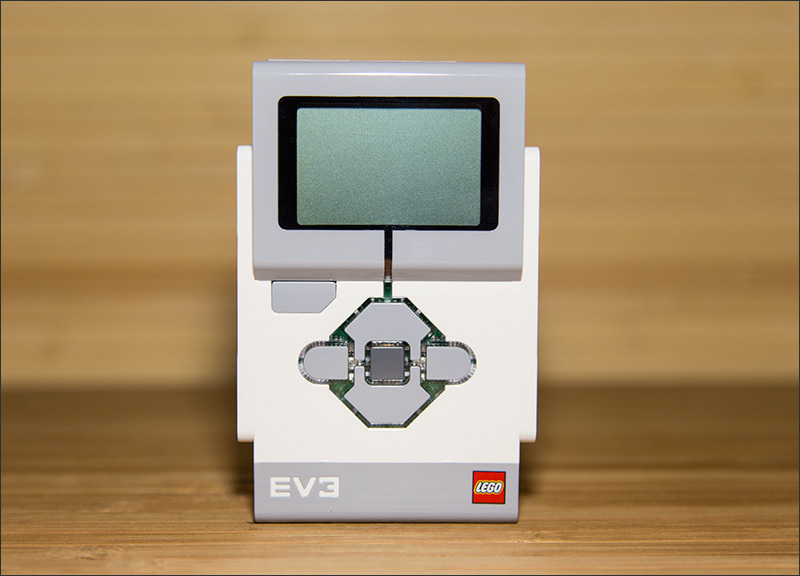
– Многофункциональный монохромный дисплей с разрешением 178х128
– Шестикнопочный интерфейс управления с функцией изменения подсветки (3 цвета) для индикации режима работы
– 4 порта ввода (1, 2, 3, 4) для подключения датчиков
– 4 порта вывода (A, B, C, D) для выполнения команд
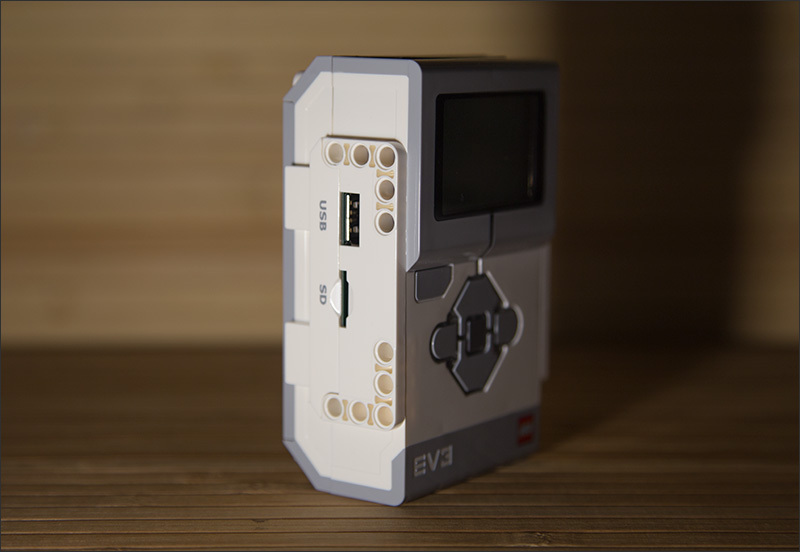
– 1 разъём miniUSB для подключения EV3 к компьютеру
– 1 порт USB–хост (для соединения нескольких EV3 в одну цепь, например)
– 1 слот для карт памяти формата microSD (до 32Гб) – для увеличения объёма доступной памяти EV3
– Встроенный динамик

Кубик EV3 также поддерживает Bluetooth, WiFi (через USB-адаптер NETGEAR WNA1100 Wireless-N 150), для связи с компьютерами имеет программный интерфейс, позволяющий создавать программы и настраивать регистрации данных непосредственно на микрокомпьютере EV3.
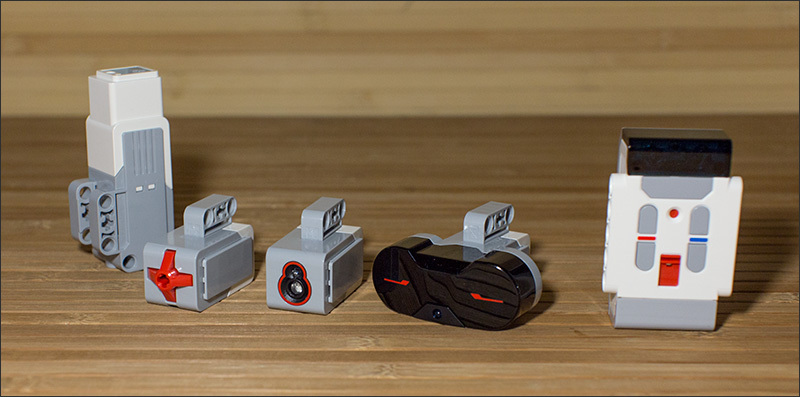
» Большой EV3-сервомотор (2 штуки). Cоздан для работы с микрокомпьютером EV3 и имеет встроенный датчик вращения с точностью измерений до 1 градуса. Используя этот датчик, мотор может соединяться другими моторами, позволяя роботу двигаться с постоянной скоростью. Кроме того, датчик вращения может использоваться и при проведении различных экспериментов для точного считывания данных о расстоянии и скорости.
– Встроенный датчик вращения с точностью измерений до 1 град
– Максимальные обороты до 160-170 об/мин
– Максимальный крутящий момент в 40 Нсм
– Автоматическая идентификация программным обеспечением EV3
» Средний EV3-сервомотор. Идеален для задач, когда скорость и быстрота отклика, а также размер робота важнее его грузоподъёмности.

– Встроенный датчик вращения с точностью измерений до 1 градуса
– Максимальные обороты до 240-250 об/мин
– Максимальный крутящий момент в 12 Нсм
– Автоматическая идентификация программным обеспечением EV3
» Датчик цвета (EV3). Способен определить 8 различных цветов, хотя также может использоваться как датчик освещённости.

– Измеряет отраженный красный свет и внешнее рассеянное освещение, от полной темноты до яркого солнечного света
– Фиксирует и определяет 8 цветов
– Частота опроса до 1 кГц
– Автоматическая идентификация программным обеспечением EV3
» Датчик касания (EV3). Позволяет роботу реагировать на касания, распознает три ситуации: прикосновение, щелчок и освобождение. Также способен определить количество нажатий, как одиночных, так и множественных.
» Цифровой ИК-датчик (EV3). Для определения приближения робота. Также способен улавливать ИК-сигналы от ИК-маяка, позволяя создавать дистанционно управляемых роботов, навигационные системы для преодоления препятствий.

– Измерения приближения/удаления в радиусе 50-70 см
– Радиус улавливания ИК-сигналов до 2 метров
– До 4 индивидуальных каналов приёма сигнала
– Получение удаленных ИК-команд управления
– Автоматическая идентификация программным обеспечением EV3
» Удалённый инфракрасный маяк. Разработан для использования с ИК-датчиком EV3. Маяк излучает ИК-сигнал, улавливаемый датчиком – может использоваться в качестве пульта дистанционного управления микрокомпьютера EV3, передавая сигналы на ИК-датчик.
– До 4 индивидуальных каналов передачи сигнала (переключатель прямо на корпусе)
– Имеет кнопку и тумблер для включения/выключения
– При работе ИК-маяка горит зелёный светодиод
– Автоматическое отключение при простое более 1 часа
– Радиус действия до 2 метров
В отдельном пакетике смотаны провода для подключения датчиков и моторов к кубику, а также USB-шнур для подключения кубика к компьютеру.
Стоит отметить два важных момента. Во-первых, существуют другие датчики Lego, такие как:
» Гироскопический датчик (EV3). Цифровой гироскопический датчик EV3 позволяет измерять движение вращения робота, а также улавливать изменения в его движении и положении. Режим измерения углов с точностью до ± 3 градуса; встроенный гироскоп улавливает вращения с моментом до 440 град/с; частота опроса до 1 кГц.
» Ультразвуковой датчик (EV3). Генерирует звуковые волны и фиксируюет их отражения от объектов, тем самым измеряя расстояние до объектов. Также может использоваться в режиме сонара, испуская одиночные волны. Может улавливать звуковые волны, которые будут являться триггерами для запуска программ. Измеряет расстояния в пределах от 1 до 250 см, а точность измерений составляет ± 1 см.
А во-вторых, поддерживаются сенсоры и прочие аксессуары от сторонних производителей, таких как HiTechnic и Mindsensors – они предлагают всевозможные джойстики, инфракрасные датчики расстояний, магнитные датчики, компасы, гироскопы, акселерометры, таймеры, мультиплексоры, шаровые опоры, и т.д. Так что, если задаться вопросом, можно найти много всего интересного.
В общем, как вы уже поняли, LEGO – это для реальных пацанов!
Первая модель
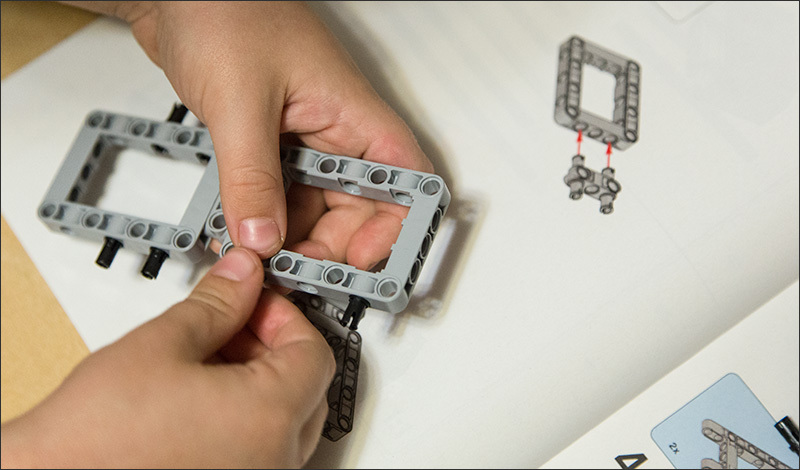
В комплекте с конструктором идёт бумажная инструкция, по которой можно собрать одну-единственную модель – некое подобие гусеничной самоходной машины.
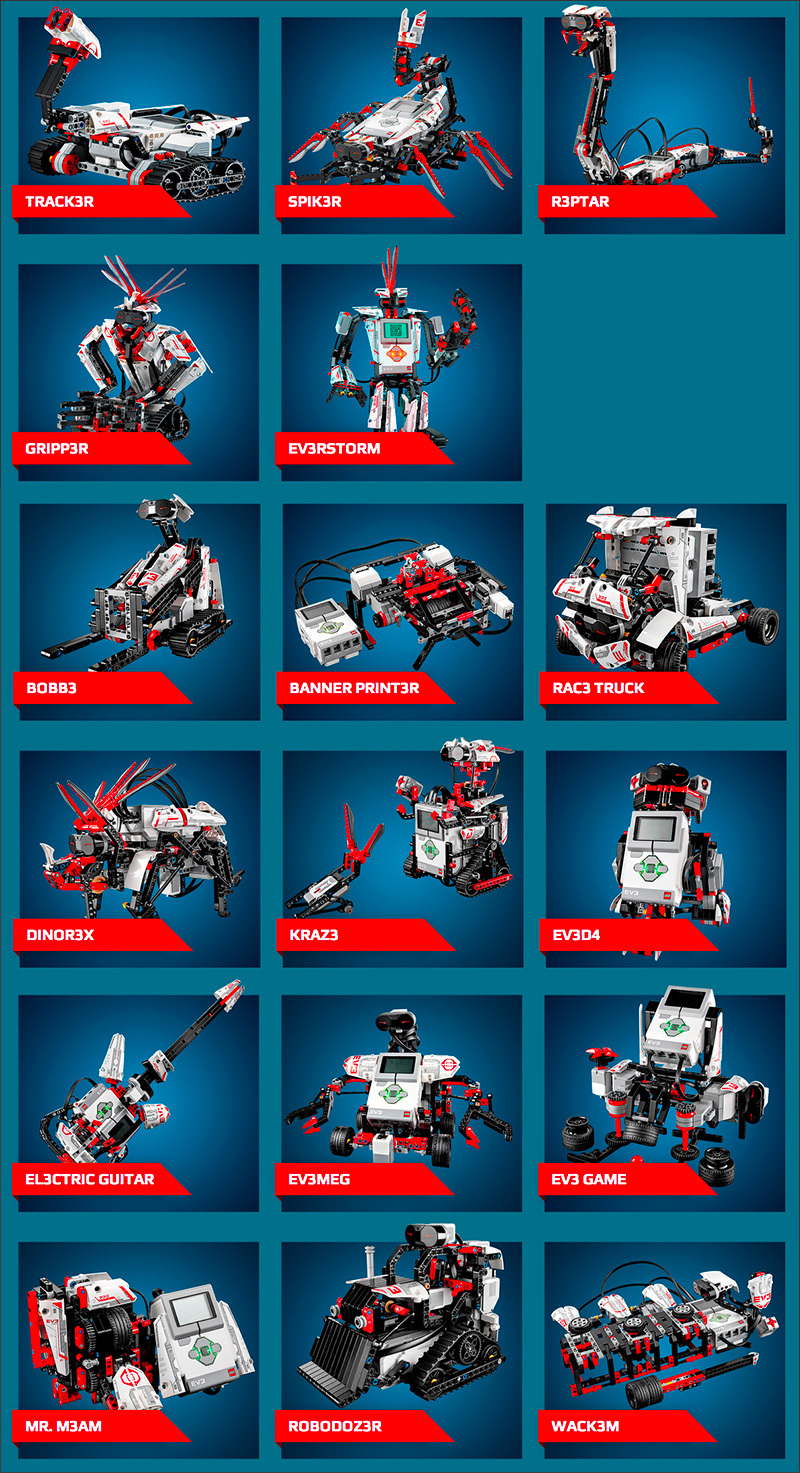
Сначала я удивился, ведь даже в самых простых наборах (серии типа LEGO Creator) всегда идёт несколько инструкций, а тут вдруг бумаги пожалели или места в коробке не нашли. Оказалось… что только на официальном сайте из набора деталей предлагается собрать 17 разных роботов! Поэтому 17 инструкций в коробке были бы действительно лишними (и для логистики, и для лесов природы). Вот названия роботов: EV3RSTORM, GRIPP3R, R3PTAR, SPIK3R, and TRACK3R. ROBODOZ3R, BANNER PRINT3R, EV3MEG, BOBB3, MR-B3AM, RAC3 TRUCK, KRAZ3, EV3D4, EL3CTRIC GUITAR, DINOR3X, WACK3M, и EV3GAME – инструкции для них придётся качать из инета, равно как и софт для подключения EV3 к компьютеру.
Инструкция наиподробнейшая, накосячить сложно. Сын сказал , что детали в пакетиках расфасованы не очень удачно – на первой же странице может потребоваться вскрыть 3 разных пакета, но это тоже мелочи.
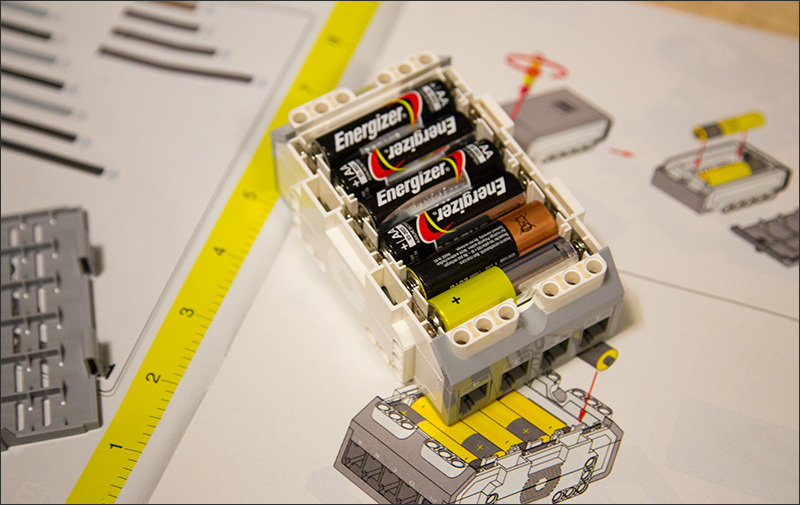
Кубик EV3 необходимо запитать, для чего можно использовать аккумулятор (нет в комплекте) или 6 пальчиковых батареек. Забегая вперёд – ещё 2 батарейки (но уже мизинчиковых) понадобятся для питания ИК-маяка (он же пульт ДУ).
Первую модель ребёнок (7 лет) собрал примерно минут за 30.
Процесс оказался не таким увлекательным, как, например, сборка моделей LEGO Technics – в инструкции предлагается собрать далеко не самого интересного робота: в нём лишь крупные детали, среди которых были практически все датчики и двигатели – видимо, чтобы продемонстрировать работу каждого из них.
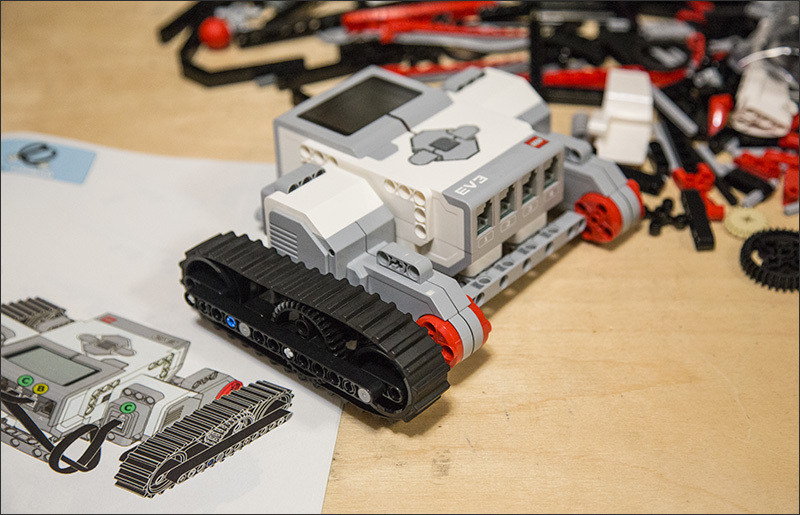
Но вот результат превзошёл все детские ожидания – впервые он собрал модель, которая могла двигаться сама: вперёд-назад, поворот, разворот на месте, крутила щупальцами…

Запуск осуществляется с кубика EV3, для чего следует нажать пару кнопок на лицевой панели. Некоторые действия можно запрограммировать прямо на кубике: выбрать количество итераций, настроить подачу звукового сигнала и так далее – в одной статье всего не рассказать, курите мануалы.
Программировать через компьютер собранную выше модель не пришлось. Тем не менее, возможность такая есть, при этом на разных уровнях хардкорности.
Ребёнку проще всего будет начать с предлагаемого производителем софта, который есть как под Windows, так и под OS X. Во втором случае дистрибутив весит 666 Мб, а установленное приложение займёт гигабайт. Оно называется LEGO Mindstorms EV3 Home Edition и разработано совместно с небезызвестной компанией LabView. На сайте LEGO довольно много обучающих программированию материалов.
Сразу после запуска перед нами возникает интерактивный «гараж» из роботов, которых можно собрать из набора:
Выбираем понравившегося и начинаем собирать: перед нами появится интерактивная инструкция по сборке, видеоролики, а также подборка различных миссий, которые можно выполнить с собранным роботом. Вот почему дистрибутив весил так много.
Не вижу смысла описывать всё в деталях: вы быстрее скачаете приложение сами и увидите, что там есть и на каком уровне. Разве что упомяну один из недостатков, который мне больше всего запомнился: не самый дружелюбный (особенно для детей) интерфейс – от приложения попахивает каким–то банк-клиентом.
Нельзя ещё раз не отметить, что кубиком EV3 можно управлять со смартфона на операционных системах Android или iOS, для чего есть отдельные приложения.
Если всего этого оказалось мало, можете повысить градус хардкора. Для кубика EV3 существуют различные прошивки, которые позволяют расширить его возможности, скорость работы и т.д. Вот, например, альтернативная прошивка leJOS EV3 – прошивка с jvm, позволяющая программировать EV3 на языке Java. Хотите на другом языке? Окей, гугл – в вашем распоряжении почти 60 вариантов на выбор: ASM/C/C++/Perl/Python/Ruby/VB/Haskell/Lisp/Matlab/LabVIEW и многое-многое другое.
Более подробно об этом я рассказывать не буду по нескольким причинам: во-первых, программист из меня полный false (все надежды на сына), во-вторых, пока мы успели собрать только одну модель (и на выходных возьмёмся за вторую), а в-третьих – вы уже и так оформили заказ на этот конструктор и скоро сами всё узнаете ;) Ну а если серьёзно, то статья и так уже огромная – вот лучше две ссылочки изучите: раз и два.
Ну и ещё большой плюс – это LEGO-сообщества, которых полно по всему миру. Можете быть уверены, что на любом из этапов экспериментов с роботами вы всегда сможете найти единомышленников и тех, кто сможет помочь с решением проблемы. Помимо дружелюбных сообществ, на просторах сети выложено огромное множество различных инструкций, моделей, исходников, видеороликов и обучающих материалов. Всё это означает одно: с Mindstorms вы не соскучитесь.
Читайте также: