
Как сделать катапульту из лего ев3
Обновлено: 12.05.2024
В данном методическом пособии представлена пошаговая инструкция по сборке модели Катапульты. Модель собирается из конструктора Лего «Первые механизмы».
Все дети время от времени устраивают имитированные сражения. А как обойтись без специальной военной техники при взятии крепости? Мы предлагаем вашему вниманию подробную инструкцию по сборке удивительной модели катапульты из деталей Лего. Сконструировать данную игрушку можно из набора Первые механизмы, заявленный уровень сложности - тяжелый. Но стоит потратить время для того, чтобы получить в итоге эту замечательную модель. Она способна запускать детали на расстояние до 1.5 метров! Игра ориентирована на детей 6-7 лет, но благодаря своей увлекательной функции настоящей катапульты, заинтересует ребенка и постарше.
| Количество шагов при сборке | 58 |
| Нужен ли ресурсный набор? | Нет |
Название модели: Катапульта Возраст 7 - 10 лет Набор: Lego Wedo В данном методическом пособии представлена пошаговая инструкция по сборке модели Катапульты. Модель собирается из конструктора Лего Wedo. Полуавтоматическая модель Катапульты от Lego Wedo специально разработана для детей от 7 до 10 лет. Сама катапульта имеет специальный рычаг, который запускает орудие в действие, а с помощью действующей балки, детали могут достигать расстояние на 30 – 40 сантиметров, а для конструктора Lego Wedo, это достаточно много. Стоит также отметить, что данная модель относиться к среднему уровню сложности сборки, но благодаря понятному, пошаговому методическому пособию, малыш сможет собственноручно собрать катапульту и приблизительно.
Название модели: Катапульта Возраст 7 - 10 лет Набор: Lego Wedo 2.0 В данном методическом пособии представлена пошаговая инструкция по сборке модели Катапульты. Модель собирается из конструктора Лего Wedo 2.0. Эта модель стреляет деталями лего. К сожалению, из - за питания от батареек, она стреляет не так далеко, как Катапульта из Lego Wedo 1.
We just had some enormous amount of fun with building and using a catapult/trebuchet. Yes they are quite different, but the result achieved in the lesson is something in the middle. Learn how to fire elements using the LEGO Mindstorms EV3 or NXT robotics set. Challange yourself, your team or your students to build it and fire elements as far and as accurate as possible.
This video lesson is the first of the catapult series. We briefly show what the end result would be and we build the initial construction for the robot. Firing parts requires no additional force since the force of gravity is used. Loading the catapult can be done by hand or automatically with a motor and an NXT-G program for the robot. At the end of the series we would have build a completely automated catapult the loads and fires automatically.
The construction from this first video lesson is divided on the following modules:
Simple and not very large. If you want to improve the stability of the robot you should make the base larger.
Frame
You can always make the frame taller, but keep in mind that the taller the robot frame, the more unstable it becomes.
Lever
The lever should not be longer than the frame and should have a proper construction at the end that would hold the parts until they are fired.
Using angle LEGO beams we build a nest for holding a weight. The haviest part in the set is the brick and we use it as a weight.
All episodes from the series:
Building instructions for Catapult Robot from LEGO Mindstorms kit
Building instruction for both EV3 and NXT. The whole catapult is build in exactly 78 steps.

Rotation frame constructed from EV3 set
The rotation frame requiers an NXT large double gear wheel that is not available at the EV3 set. You can use the instructions below to construct a similar mechanism from Mindstorms EV3 set

English
This video is the first of a number of videos in which we will show you how you can construct your own catapult. We will provide you with constructions for both EV3 and NXT versions of the robot. And you can use this very funny construction to fire different small Lego parts to about 1 meter - 1.5 meter. It's completely automatic. You can load it and reload it completely automatically. We'll be happy to get your feedback and if you try to construct this robot at home or in your classroom.
First, I'll start with the base of our catapult. It's a very simple construction - it has just a frame and four beams attached to each other. The larger the base is, the more stable the catapult will be when it fires different small parts. Now, I won't be constructing the robot every step on the way. So, I will show you how you can attach the basic modules and what's the idea behind them. We use two of the these modules to build the vertical frame of our catapult and it looks something like this.
A problem with this frame is that it's not very stable. As you can see, it's kind of fragile. So, we can solve this by adding two additional beams that will attach the frame to the base at a certain angle.
Just a moment here.
Here it is. And it's much more stable than the other frame.
And we do this on the other side as well. The second step of building our catapult is to build a lever that will fire the small Lego parts. We'll use something like one of these. And now we must find a way to fire them. I have built a lever here. It works in the following way. We attach it to the frame - like this.
And now it moves freely up and down. If we find a way to add some parts at the end of this lever that will hold this small Lego part, we'll be able to fire it. Like this. And again, I've come up with a solution to this. We'll use these red angle beams. They might not be red, of course. We attach them at the end of the lever.
Now we can actually fire our part. If I move the lever very fast, it will fire the part. Like this. The last step of building our catapult is to find something heavy that we can attach to this end of the lever. And when we press probably a button or something it will lift the lever and fire the part. A simple solution is to use the brick from your set. The brick is probably the heaviest part. Here I am showing the NXT brick but you also have instructions for building the robot using the EV3 version of Mindstorms. To actually hold the brick and use its weight at one of the ends of the lever, I've built this, let's call it, a nest. And we can add the brick to the nest. It's constructed mainly from angle beams and a frame and some pins that attach all the parts together. Now we should find a way to attach the nest to the lever so that we use the gravity force. And when the brick moves down, the lever moves up and we fire parts. For this we can use the following mechanism.
We can attach one beam here.
Then attach the nest to one of the sides of the lever.
Here it is. I'll make it more stable. We add a bush here and here.
And it works in the following way. When you release the lever and the brick goes down, the lever goes up and we can fire a part. Like this.
Again, this is how the whole construction works. Due to the gravity force, when the brick goes down, the lever goes up. If we have a part here, we can fire this part. I will just leave it more loose. What you can see is that the lever moves from one side of the robot to the other. But that's not how the catapult is supposed to work. So, we should add some kind of a stopper right here. On the upper side of the frame. And if we add this stopper (let me just attach it),
we can see that we fire the parts but the lever stops.
We can experiment with different positions of the lever depending on the force we would like to use for firing and when the lever should stop.
For example, right here and then the second one.
We add it like this. And we attach a bush on one side and then on the other. Now, again.
One more improvement we should add is a small axle - at the lower part of the catapult. Right here.
We'll need this axle in the next episode. It also helps the lever not to reach the ground.
And we have a working catapult.
One more bush missing on this side.
Here it is. Let us fire something.
OK. I'll be happy to get your comments. In the next videos, we'll attach a motor and a sensor to the construction so that we can make it completely automatic.
Courses and lessons with this Tutorial
This Tutorial is used in the following courses and lessons

A robot a "day" keeps the questions awake. Version 1
"How to use the LEGO robots to facilitate the learning of robotics by my student at home" or simply put - "what to build now?"
After enrolling in this course we will send you a few (1-2-3) emails each month with a title "A robot a 'day'". Each email contains a robot building instructions and/or video tutorials and/or tasks that should be accomplished. After a task is accomplished we might sometimes ask for a video or picture.
This process gives a structure of the learning process where you can learn from the content. The student participates in a course, but from home and on the schedule that you decide.

Have fun throwing objects with a Catapult. Robot 9
If you've come this far in the course you deserve a big award. Presenting to you the Catapult (that, by the way, has a clutch).
First, you could see the end construction of this section and then we could enter into details. And we would even use a Clutch.
Part four of the Catapult series is again about loading the catapult automatically but this time using EV3 brick, motor and sensor. We use a gear system with a medium complexity along with a "standard clutch" available in the LEGO Mindstorms EV3 kits. As a result, at the end of the video, the Catapult loads and fires automatically.
Automatic Loading
In this video lesson of the Catapult series a motor for loading the catapult is added. Firing is achieved using gravity force while loading is achieved with a motor. The power from the motor is transferred to the lever by a system of gears located on different axles. In this way the orientation of the gears is changed twice and transmitted four times.
Touch Sensor
The touch sensors used in the robot are very important. We should have a way to find out if the Catapult is already loaded and when we should stop loading. Configuring the motor to use rotations or degrees is a very bad practice and we should try to avoid it. Always try to use sensors.
Additional video lessons
You could find more explanations about changing gear orientation in the following video lessons:
All episodes from the series:
Robotics Set
The current video lesson shows the robot built from LEGO Mindstorms EV3 parts.
Catapult Frame - LEGO Mindstorms construction for a frame of a catapult
This frame holds the motor and ev3 brick used in the catapult. The frame is placed on top of the rotating base and thus could be easily rotated. The brick could be both NXT and EV3

Catapult Rotating Base - LEGO Mindstorms construction for a base for a catapult
This is the initial construction of a catapult. The base on which we will place the rest of the robot. The goal of this construction is to give the catapult the ability to rotate.

EV3-G Program for the Motor and Touch Sensor of the LEGO Catapult
This is an LEGO Mindstorms EV3-G program for the motor and touch sensor that we use for the LEGO Catapult
LEGO Catapult EV3-G program
Mindstorms EV3-G program for running the LEGO catapult robot
English
In the fourth episode of the series on how you can build your own catapult we'll use an EV3 Mindstorm set and the motor and touch sensor from the set. In the previous episode we did the same thing with the NXT construction so, check it out. And at the end of the lesson we will have a completely automatic catapult that can fire like this. Fire, load; fire again, load.
The starting point is again the manual catapult that we have - we load manually, we fire manually. We load manually, we fire manually. We can also turn the catapult in each direction. The first thing that I'd like to do is to remove the NXT brick and add an EV3 brick in its place. So, it's quite straightforward. Just remove one brick and add the other one. They are compatible.
Like this. And, again, it is firing manually. As in the previous video, we should somehow attach a motor on one side and a touch sensor on the other side of the construction. The first thing will be to add this large gear wheel to the axle of the lever. In this way, when we turn the gear wheel, we'll load the catapult. When we release it, we'll fire. And we can do it even from this side. How do we transfer power from an EV3 motor to this gear wheel? In the previous episode we developed a clutch on our own but in the EV3 version of the robot we have the clutch already there. It's this small red part here. And the purpose of this part is to make this grey gear wheel turn. When the clutch is on, we attach the gear to the motor and when the clutch is off, the gear can move freely. As you can see, now the clutch is off and we can move the gear. But when the clutch is on, we can't move the gear, as it requires a move by the robot. You can find detailed instructions on how to build this module below the video, so check them out. But the basic principle is that you need a clutch and in some situations the clutch is on and in others the clutch is off. The other interesting thing about this module is that we have a change in the orientation of gears. We have gears that are, let's say, horizontal here and vertical here.
Now we attach the module to the robot.
Like this. Then the next step is to add the touch sensor. The purpose of the touch sensor is to make sure that the motor stops moving when the catapult is loaded. So, we are loading the catapult and when the catapult is loaded, we must stop moving. We are not loading the catapult based on rotations; based on degrees, but we are loading the catapult until the touch sensor is pressed. So, we add this touch sensor here
Now the clutch is off. We are loading. The clutch is on. And the catapult is already loaded. If we release the lever, we fire. The last thing that we'll do is to improve this lever. We'll need the clutch to be on after firing so that we can again load it automatically. To do this, we'll just add a small modification to the lever.
Now, the clutch is off, we are loading; the clutch is on and if we fire the catapult, it will automatically bring the clutch back into the ON position and we'll reload the catapult.
Let's now connect the cables.
The motor should be connected to port C
and the touch sensor - to port 2. Now let's write the program. The program is pretty straightforward. We take a medium motor. We'd like to move the motor endlessly
with a power of, let's say, minus 100 because we're moving in the other direction and we are moving the robot until the touch sensor is pressed, so we are waiting. And we are waiting for the touch sensor to compare its state. The state of the sensor should be "pressed". We are waiting for a pressed sensor, as you can see, State 1. After the sensor is pressed, we stop the motor
and then we wait till the sensor is released. This is the moment when we push the lever up; we release the sensor and we fire a part.
The state for "release" is Zero and again we wait for about a second for the firing to complete and we put all this in a loop. You can find the program below the video. Feel free to download it. Let's see how it performs. We start the program from the EV3 brick. Press "Start". The catapult is loaded - like this. Let's turn it to the camera. Now we release the lever. We fire, then we load again. We release the lever; we fire. Let's see what happens on the side of the touch sensor. We release the lever; we load until the touch sensor is pressed; we again release; we load. That's for our catapult. Try to improve it. Try to make it fire parts even further. This one fires part to about 1m, 1.5 m. We'll welcome any comments, improvements, modifications that you've done to this robot.
В конструкторе "Fun Block" производитель предлагает ограниченное число инструкций по сборке различных конструкций (около 20), что недостаточно для работы в течение учебного года 36 занятий по 2 часа (72 часа), поэтому возникла необходимость в создании собственных конструкций. Я предлагаю вашему вниманию методическую разработку из конструктора «Fun Block» для учащихся 1-4 классов»
| Вложение | Размер |
|---|---|
| sverhdalnoboynaya_katapulta.pdf | 928.57 КБ |
Предварительный просмотр:
По теме: методические разработки, презентации и конспекты

Рабочая программа внеурочной деятельности «Моделирование с конструкторами LEGO»
Рабочая программа «Моделирование с конструкторами LEGO» описывает курс работы с конструктором Перворобот LEGO WeDo. Этот курс предназначен для учащихся 3 - 4 классов, увлекающихся конструирование.

Использование конструктора LEGO WeDo, как инструмента для обучения учащихся конструированию,моделированию и основам изобретательской деятельности
Описание опыта работы с конструктором LEGO WEDO, перечисление УУД, которые можно развить с помощью этого конструктора.
Презентация "Использование конструктора LEGO WEDO"
Презентация об использовании конструктора LEGO WEDO во 2 классе.
Мастер- класс: «Использование конструкторов LEGO Education «Построй свою историю» на уроках в начальной школе как одно из средств реализации ФГОС».
Данный мастер-класс показывает как можно эффективно использовать конструкторы LEGO Education «Построй свою историю» на уроках литературы. Кроме того, как можно внедрить в урок активные методы обучения.
Конспект занятия на тему: Знакомство с интерфейсом программы LEGO Mindstorms
Конспект занятияСоставитель: педагог дополнительного образования ГБУ ДО ЦДЮТТ «Охта» Коляскин Александр Александрович Название дополнительной общеобразовательной (общеразвивающ.

Робот LEGO Mindstorms EV3
Программа о созданных роботах , которые созданы с помощью Лего Майндсторм ЕВ3.

МЕТОДИЧЕСКАЯ РАЗРАБОТКА КАТАПУЛЬТА ДЛЯ СТРЕЛЬБЫ ШАРИКАМИ ДЛЯ ПИНГ-ПОНГА ИЗ КОНСТРУКТОРА «FUN BLOCK»
В конструкторе "Fun Block" производитель предлагает ограниченное число инструкций по сборке различных конструкций (около 20), что недостаточно для работы в течение учебного года 36 зан.
Всё на русском языке о роботах LEGO MINDSTORMS EV3 и NXT: различные инструкции к конструкторам разных версий, информация о версиях, скриншоты готовых моделей, фото и видео занятий по робототехнике. Также мы выкладываем пошаговые инструкции по созданию и программированию разных видов роботов лего из конструктора версии 8547. У нас можно скачать поурочное планирование факультатива робототехники для учеников 6-8 классов. Планируем добавить всю необходимую для роботехника-любителя информацию. Всё будет доступно всегда и бесплатно!

Новый робот Fujitsu возит грузы в своём туловище
Робот-космонавт
Lemur был изначально задуман для обслуживания космический кораблей и станций будущего. Его вес всего 12 килограмм и он достаточно мал.
Рубрика: Робот LEGO MINDSTORMS EV3 и NXT инструкции
На первой странице мы с Вами познакомимся с внешним видом конструкторов lego mindstoms ev3 и инструкциями (інструкциї lego) на русском языке для них.
Сейчас доступны к скачиванию статьи с готовыми пошаговыми инструкциями по сборке различных моделей роботов из конструктора лего ев3 версии 313313 и 45544 (робот lego mindstorms ev3).
Руководство пользователя (EV3 Home) для домашней версии, артикул 31313 - инструкция на русском языке для lego mindstorms ev3.
Элементная база (из каких деталей состоит набор), как выглядит содержимое коробки лего 31313.
Базовый набор LEGO MINDSTORMS Education EV3 (артикул 45544).
Версия набора - образовательная (для школ).
Элементная база набора.
Инструкция lego mindstorms ev3:
руководство пользователя (EV3 education) для учебной версии, артикул 45544.
лего EVO 3 презентация pptx с описанием и возможностями набора.
Имеются две модификации: HOME и EDUCATIONS (Домашняя и образовательные версии). Каждая версия имеет свои особенности. Но в каждой можно собрать отличные модели роботов из лего! Домашняя попроще и подешевле, а образовательная версия с лицензионным ПО LABVIEW для рабочей группы от NATIONAL INSTRUMENS, естественно, подороже.
Купить набор в Зеленогорске (Красноярский край) можно в компании "Компас". Скачивайте, ознакамливайтесь с ПО, внешним видом и способом соединения, настройки и программирования новой модели от лего!
Робота можно использовать для соревнования "Шорт трек" категории "Hello, robot!". Инструкция (презентация) содержится 45 слайдов, многие слайды являются повторами с разных углов обзора.
Возраст обучающихся: 4 – 8 классы. УМК любой. Презентация выполнена при помощи ПО Lego Digital Designer ver.4.3.:
полная инструкция по сборке в pptx
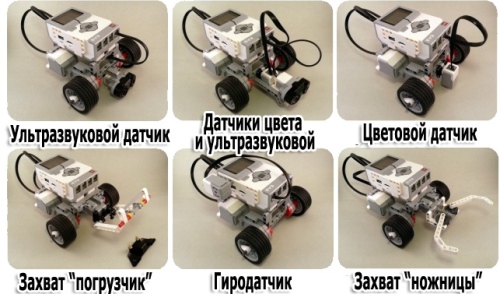
Бонусные модели 6 роботов EV3 на одной платформе (6 роботов в 1):
Читайте также: