
Lego mindstorms ev3 гиробой программа
Обновлено: 30.04.2024
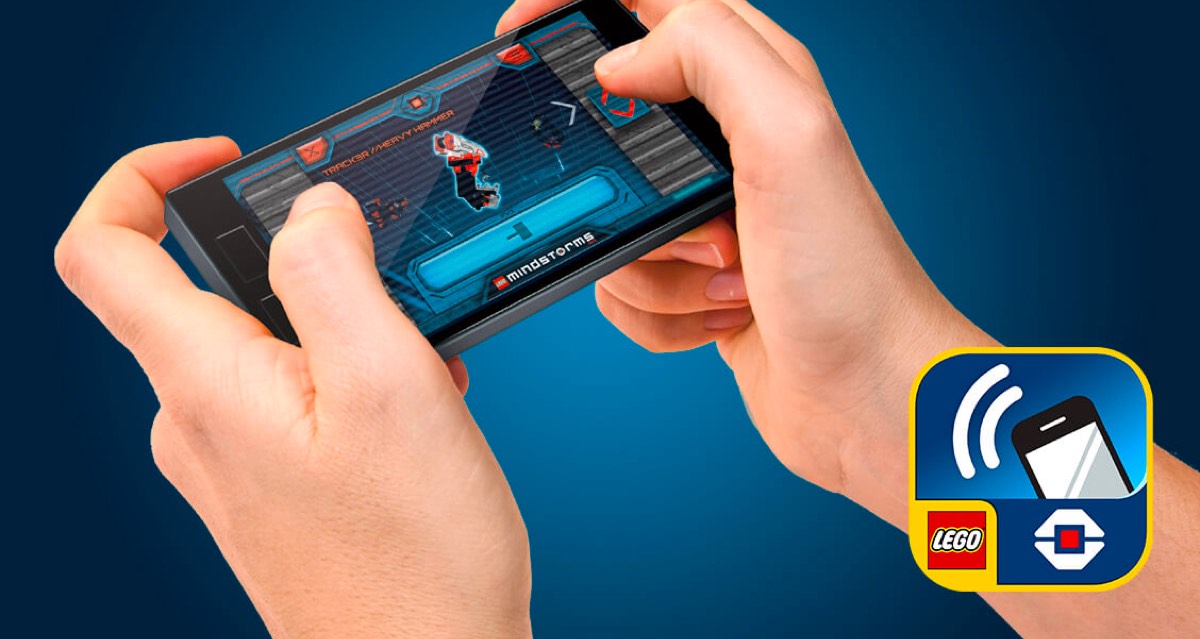
Robot Commander представляет собой управляющее приложение для LEGO® MINDSTORMS®. БЕСПЛАТНАЯ загрузка для большинства смартфонов и планшетов; Robot Commander подключается к модулю EV3 по Bluetooth®. Это простое в использовании приложение позволяет взаимодействовать с вашими уникальными роботами EV3, даже не подключаясь к компьютеру! Это означает, что вы можете мгновенно начать игру с вашими собственными роботами!
Приложения для компьютеров и планшетов
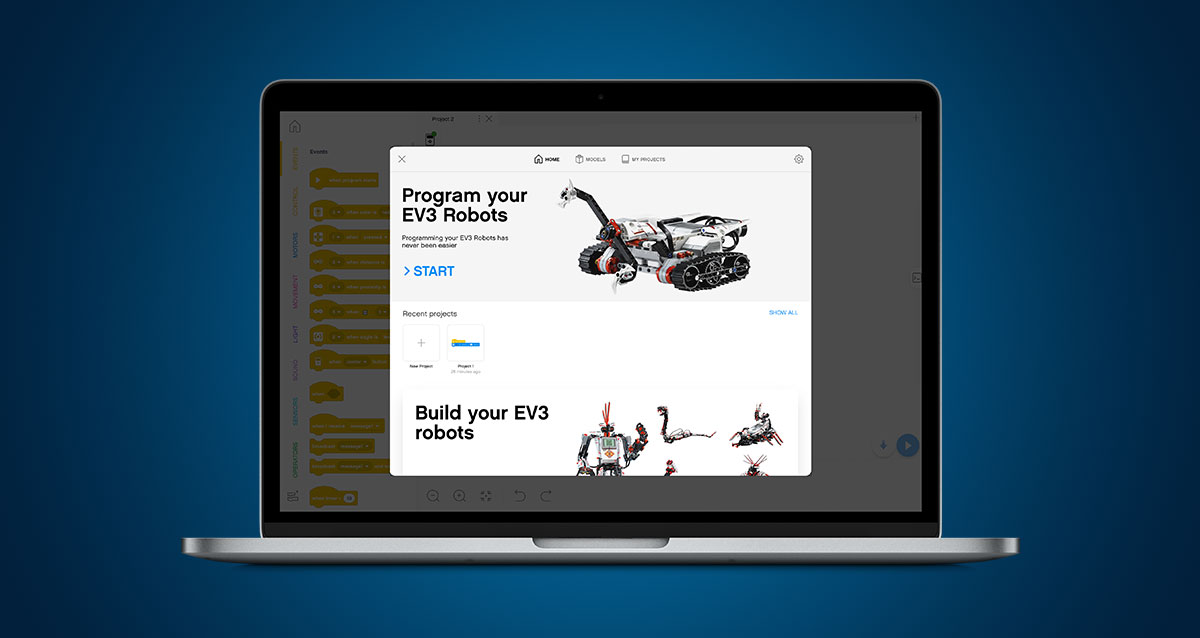
Приложения LEGO® MINDSTORMS® EV3 Home для macOS, Windows 10 и планшетов на iOS и Android
Загрузите, установите, подключите и выполняйте задания по программированию. Для пяти основных роботов есть до пяти задач по программированию. Благодаря более продвинутому, но хорошо знакомому интерфейсу программирования и пяти сложным заданиям для вас и ваших роботов-героев, приложение EV3 Home для PC, Mac и планшетов сможет поднять ваши навыки робототехники на новый уровень!
Важная информация относительно программного обеспечения и приложений LEGO® MINDSTORMS® EV3!
Мы рады сообщить, что пользователям LEGO MINDSTORMS EV3 теперь будут доступны новые возможности при сборке и программировании их творений.
Новое приложение LEGO MINDSTORMS EV3 Home с языком программирования на основе Scratch заменит используемое в настоящее время ПО LEGO MINDSTORMS EV3 Home Edition (Labview) для Windows 10 и macOS, а также приложение LEGO MINDSTORMS EV3 Programmer для планшетов на iOS/Android.
Приложение LEGO MINDSTORMS EV3 Programmer будет удалено из магазинов приложений в конце июня 2021 года.
Выведенное из эксплуатации ПО LEGO MINDSTORMS EV3 Home Edition (Labview) для Mac и PC можно найти ниже. Обратите внимание, что это ПО больше не поддерживается LEGO Group.
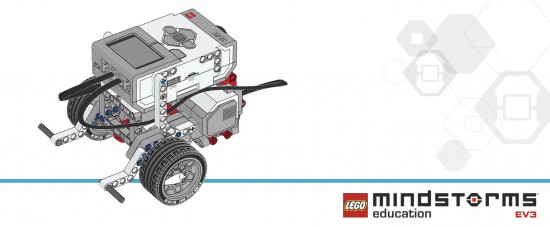
Educator Vehicle (with attachments)
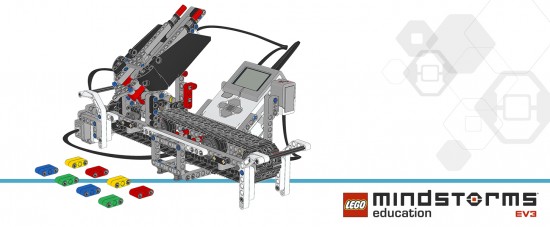
Sorter
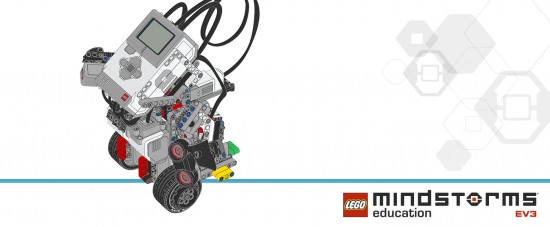
Gyro Boy
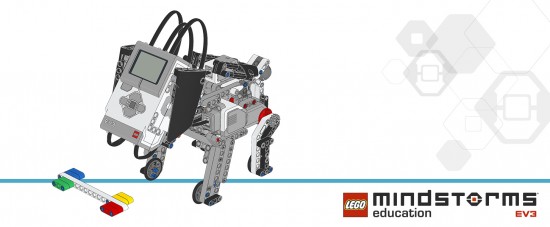
Puppy
Robot Arm H25

Where to find programs and project files:
You can find the programs for these robots within the LEGO MINDSTORMS EV3 Education software, which you can download for free via this LINK.
Thanks for creating these PDF’s. Saves me some work 😉
Are you doing the expansion models as well?
I need this one,thank you
tell me about it.
this does gio 4enogh
I have one already
Are you still here?
P.s i got new glasses and still couldnt find who asked
Advantage of the edu-set models is that they have space for the battery. Not all home-set models have that. Thanks LEGO, Laurens and Xander of course.
Thanks Lego for releasing these and Laurens for the PDFs. Is there any news on whether the we’ll be able to download the .ev3 files for these projects?
Yes, thank you. Several of the models look like great fun to build.
And I see some ideas to incorporate into some MOCs.
Thanks! I’ve been bugging Lego Education to release these. These are a Huge Help!
I would love to build Gyroboy, but I only have the standard EV3 set. Would the additional gyro sensor do the trick, or is the edu-pack too different?
there is one called balanc3r on this website with a program
you can build it with the 45544 core set, thats no problem, but im a little bit unsure if you can use the 31313 set for it.
Hi
I am also wanting to know if LEGO will make the Education Core and Expansion .ev3 files available to download.
Regards Glen
I too am interested in the project files for these robots. We have just introduced EV3 with our 8th graders and they are very interested in creating these robots.
Hi, it is great that these are on here, my son and I have managed to build the sorter with the EV3 kit and bits of his digger but as useful as the instructions are, doing something with it is only useful if the program is obtainable, which it isn’t.
I had camp last week and I had a challenge to build this sorter. I built it and downloaded the mindstorms programmer to my computer. It comes with all the programs to all of the listed builds. If may be a little confusin but it is manageable.
Does anyone know where to find the programming instructions for the Robots of the education pack? My team is looking for them all over the place and can’t find them. We can only build them with these instructions. Thanks in advance for any help.
Are there parts list available for these projects. The robotic arm requires a few parts that did not come in the basic set.
My name’s Joel to
That wasn’t the question,Joel Park
Nobody asked,dumb dumb
hehehe thats funey
can you please put up the directions for programming the puppy?
Thank you SO much for posting these!
Perhaps you can explain to these people that u need the lego education software to write the code for these projects? or where can we find the program code? please help us out 🙂
Well, that’s not true. The LEGO Education software has the ready-made programs. Sure, that’s easy, but you can also create your own programs for these robots using the Home Edition software, which is free.
The most complicated robot here is GyroBoy. I’ve created my own program for it, so I should be able to share it here soon. I don’t currently have time to build all of the other robots and create my own programs for them, though.
Hey Laurens! Can you upload the program for H25? If you dont have the program, can u pls give me the opportunity to create a post, cuz i have the H25 program, i programmed it with the program turtorial from the education site. Im ten years old, almost eleven 🙂
stop being a jerk to the person
hey im yum check out my youtube chanel
Hey Laurens, Where exactly in the Education software can I find the already made programs?
Thanks fjor making these builds avalilable for my lego students.
Hi,
Thanks for the PDFs. Indeed, my pupils want to build the four Robot models of the EV3 core set.
Does anybody know if there is some documentation / explanation about the Programs of these models? (Not the building instructions, but for the LabView programs, which are quite complex).
THANKS !
The EV3 project files for the education models are unfortunately only available with the education version of the Mindstorms EV3 software, and so they are not available unless you buy that software for US$100. Apparently, the reason for this is to do with intellectual property, but I don’t really understand this argument: if someone has gone out and bought either the EV3 retail set (plus the additional parts to turn it into the EV3 education set), or they’ve bought the EV3 education set itself, then surely it should be no skin off Lego’s teeth to provide the EV3 project files for the education robots as they will have already gotten their money’s worth out of that customer when they bought the EV3 set.
They already provide the building instructions for free, so why not the EV3 project files to go with them? Yes, people can develop the robot programs themselves, of course, but not everyone wants to do that. Sometimes, building a robot and downloading an existing program to it is all people want to do.
Come on Lego — don’t just tease us with the PDF building instructions… give us the EV3 project files for the education robots… pretty please…?
Hi,
Can anyone direct me to the programs that come with these projects (SORTER, ROBOT ARM) ?
Anticipated thanks
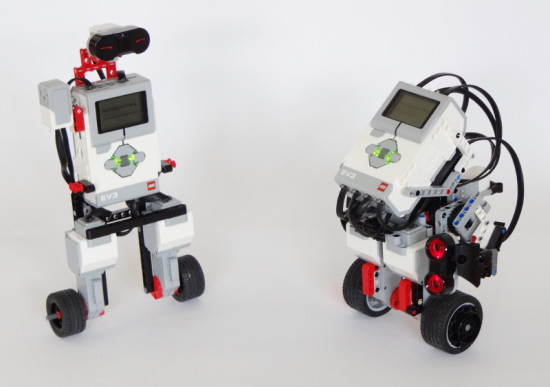
BALANC3R (left) and Gyro Boy (right)
This tutorial will show you how to build and program a self-balancing LEGO MINDSTORMS EV3 robot that can drive around a room. You can build and program BALANC3R (left) or Gyro Boy (right). Once your robot is up and running, you’ll be challenged to customize the construction and program to invent your own self-balancing robot.
Step 1: Building a robot
To begin, choose the robot you want to build, and follow the respective step-by-step building instructions.
Requirements for BALANC3R:
Requirements for Gyro Boy:
Step 2: Installing the EV3 Gyro Sensor block
If you’re using the LEGO MINDSTORMS EV3 Home Edition Software, you’ll need to install the EV3 Gyro Sensor block before you can program your robot.
Step 3: Download the balancing robot project
- Right-click this link, click “Save Link As,” and save the project file to your computer.
- Launch the EV3 programming software, and open the downloaded project file.
Before you run the programs, let’s briefly examine how they work. The project includes four example programs, two for each robot:
- BALANC3R-Basics: Balance in place, turn right, and turn left
- BALANC3R-RemoteControl: Control the robot with the infrared remote
- GyroBoy-Basics: Balance in place, turn right, and turn left
- GyroBoy-AvoidObstacles: Drive around while avoiding obstacles
Each program consists of two configuration blocks, a balance loop, and a drive control loop, as shown in the figure below.
- The configuration blocks let you specify what the robot looks like, so that the robot knows how to balance. For example, the second setting of the first setting specifies the diameter of the robot’s wheels. The example programs come preconfigured with the correct settings for BALANC3R and Gyro Boy if you use the LEGO EV3 Gyro Sensor. If you use the NXT HiTechnic Gyro, change the Choose Sensor setting on the Initialize My Block to 1.
- The balance loop keeps the robot balanced. It measures and calculates the position and speed of the motors, and it determines the robot’s angular velocity (how fast it’s falling), as well as the robot’s angle relative to the ground. In turn, it uses this sensor information to calculate how to drive the motors in order to keep the robot up right. You won’t need to change any setting of the blocks in this loop.
- The drive control loop controls the speed and steering of the robot as it drives around a room using a simplified move block. This is the part of the program that you can easily customize to create your own program.
Step 4: Running the basic example program
You are now ready to download the example program to your robot.
- If you’ve built BALANC3R, begin with BALANC3R-Basics.
- If you’ve built Gyro Boy, begin with GyroBoy-Basics.
To start the program:
- Hold the robot upright with its wheels on the ground. Do not hold it tightly, but hold it loosely so that it’s just between falling forward and falling backward.
- Select the program and start it with the center button on the EV3 brick.
- You’ll first hear one beep. Keep holding the robot in place.
- You’ll then hear a double beep. Now release the robot and let it balance.
Your robot should now repeatedly balance in place for 7 seconds, turn right for 7 seconds, and turn left for 7 seconds.
Follow these steps if the robot doesn’t balance:
- If it doesn’t work on the first try, repeat the steps above a few times. After a while, you’ll know which is the correct “upright” starting position.
- Do not try to “help” the robot balance. Of course you should catch the robot before it falls, but trying to keep it upright with your hands is counter-effective.
- Verify that the cables have been plugged correctly according to the building instructions:
- The two Large motors should be connected to ports A and D. (If you’ve accidentally interchanged them, that’s fine. The robot will confuse left and right turns, but balancing is unaffected.)
- The Gyro Sensor should be connected to input port 2, regardless of which sensor you use.
Step 5: Running the second example program
If you’ve successfully programmed your robot in the previous step, it’s easy to try out the other example program for your robot. The robot balances in exactly the same way, but the robot’s movements are a little more interesting:
- BALANC3R-RemoteControl lets you control BALANC3R with the infrared remote, as shown in the video above. Just press the buttons on the remote to make the robot drive forward, backward, and turn. (You’ll figure out the controls quickly.) If you don’t press any buttons, the robot just balances in the same place.
- GyroBoy-AvoidObstacles makes Gyro Boy drive around a room while backing up from obstacles, as shown in the video above. Before you run the program, make sure that the white beams of both the robot’s arms point downward. The program relies on this starting position to make sure the Ultrasonic Sensor doesn’t detect the floor as an ‘obstacle’ when the robot’s left arm points downward.
Step 6: Customizing the program
As you’ve learned earlier, the balance loop keeps the robot balanced while the drive control loop controls the robot’s speed and steering. The two loops run simultaneously, or at the same time. In the drive control loop, you use the Move My Block to specify the robot’s speed and steering, as shown below.
![movemyblock-ref]()
The Move block makes the robot drive and steer. In this configuration, the robot drives forward (30) while turning to the left (-15).
The robot keeps driving or turning at the specified rate until you run the block again with different values for speed and steering. The figure below shows the Move My Block in action in the basic example program you ran in step 4. The first Move block sets both steering and speed to 0, which makes the robot balance in place without turning. Next, a Wait block pauses the loop for 7 seconds, keeping the robot in the same place. Then, a second Move block sets the steering value to 20, making the robot turn to the right. After another 7 second wait, the robot starts tuning left by setting the steering value to -20.
![Controlling the robot with Move My Blocks in the drive control loop.]()
Controlling the robot with Move My Blocks in the drive control loop
Now that you’ve learned how to control the robot, it’s time to put your skills to the test with programming challenges. To solve these challenges, you can use the techniques from the LEGO MINDSTORMS EV3 Discovery Book, presented throughout chapters 1-9. Instead of using Move Steering blocks in On mode as in the example programs, you use Move My Blocks as shown above.
Challenges for BALANC3R:
- Make your robot drive around a room while avoiding obstacles with the Infrared Sensor in Proximity mode.
- Make your robot follow the Infrared Beacon. As you move the beacon around, the robot should follow you.
- Attach the Color Sensor in front of the robot’s wheels, and make the robot follow a line. You can print line following tracks for your robot from here.
Challenges for Gyro Boy:
- Make your robot drive in different directions based on the color it detects with the Color Sensor. To accomplish this, make the robot wait for the sensor to see either a yellow, red, green, or blue object. Then, make it drive in a certain direction for 3 seconds based on the detected color, before waiting for a new color signal.
- Make your robot show different types of faces/eyes on the screen as you interact with its sensors. Show an angry face if you press the Touch Sensor, show a happy face when you trigger the Color Sensor, and so on.
Step 7: Making your own balancing robot
In the previous steps, you’ve made BALANC3R or Gyro Boy balance on two wheels, and you learned to control it with the Move My Block. Now that you’ve got the essential components working, you’re ready to customize both your robot and your program. For example, you can turn BALANC3R into a life-like humanoid with arms, and make it talk to you. Or, go crazy and make any EV3 vehicle balance on its rear wheels. What about a self-balancing F1 style race car? Whatever you make, let others know in the comments below. Happy building!
Step 8: Further reading
In order to make this tutorial accessible for everyone with an EV3 set, I didn’t cover the details of the balancing algorithm. Rather, the design of this program makes it possible to control the robot even if you don’t know exactly how the balancing mechanism works.
However, many papers have been written about self-balancing robots, and I encourage you to read more on the subject as you explore the details of the EV3 program provided on this page. The balancing algorithm in this program is based on a Bachelor thesis written by Steven Witzand, which provides a good overview of the subject, along with Java source code that implements the balancing algorithm. In turn, this paper relies on the design and algorithm used in the NXTway-GS by Yorihisa Yamamoto, which you can study for further detail.
Программирование EV3 происходит сразу после того как вы создали своего робота. Нужно научить робота EV3 выполнять различные команды.
![EV3 программирование]()
лего программирование
Запрограммировать робота с микрокомпьютером EV3 можно несколькими различными способами:
- Первый и самый простой способ – это при помощи интерфейса микроконтроллера EV3;
- Среда программирования EV3 позволяет при помощи визуального программирования создавать достаточно сложные программы:
- При помощи других языков программирования.
Программирование на микроконтроллере EV3
Самым простым является программирование при помощи самого интерфейса микрокомпьютера EV3.
Микропроцессор EV3 поставляется с уже установленным на нем программным обеспечением.
После включения модуля EV3 можно увидеть экран с четырьмя основными закладками.
Для программирования модуля требуется перейти в третью закладку при помощи кнопок управления. Затем открыть окно приложения Brick Program. Сразу отображаются два блока – это блок «Начало» и блок «Цикл».
![EV3 программирование модуля]()
программирование блока лего
В этом окне можно создавать простые программы при помощи двух типов блоков. Всего в палитре существует одиннадцать блоков ожидания и шесть блоков действия.
Среда программирования EV3
![Среда программирования EV3]()
редактор EV3
Также в ПО существуют задания по программированию, которые позволяют быстро научиться программировать роботов EV3. Программное обеспечение является пиктографическим. Оно обеспечивает простое и интуитивно понятное визуальное программирование.
Существенным недостатком является то, что при написании сложных и разветвленных программ, это ПО достаточно сильно грузит систему. При этом слабые компьютеры сильно тормозят. Поэтому желательно иметь компьютеры с хорошими характеристиками. На сайте опубликованы минимально допустимые характеристики компьютеров.
![Системные требования]()
требования к оборудованию
EV3 является целой платформой, которую можно использовать в игровых и образовательных целях. При помощи платформы Lego Mindstorms EV3 можно обучать основам робототехники, программирования, изучать различные алгоритмы. При этом не нужно иметь знаний схемотехники и различных протоколов.
Программирование EV3 Basic
![Microsoft Small Basic]()
Small Basic
Основными достоинствами EV3 Basic являются:
- Простота установки;
- EV3 Basic является свободным программным обеспечением
- Microsoft Small Basic специально разрабатывался для того, чтобы обучать программированию;
- Не нужно перепрошивать микрокомпьютер EV3;
- Поддерживает русский язык;
- Имеет встроенную справку;
- Имеет понятный интерфейс;
- Есть множество примеров;
- Поддерживает все возможности среды программирования Lego EV3.
Программирование EV3 на RobotC
Среда программирования RobotC специально разработана для образовательной робототехники. Этот язык может использоваться и новичками, и опытными программистами и является кросс-платформенным. Есть базовый и расширенный режим программирования.
![RobotC для EV3]()
RobotC
В среде программирования присутствует C-подобный язык и язык RobotC. Язык RobotC – это переходный язык от визуального программирования к текстовым блокам. Для использования RobotC требуется перепрошивка микроконтроллера EV3. Использовать RobotC можно со многими робототехническими платформами. Это такие платформы как :
- VEX IQ;
- VEX CORTEX (EDR);
- VEX PIC (Legacy Support);
- LEGO MINDSTORMS EV3;
- LEGO MINDSTORMS NXT;
- TETRIX;
- RCX (поддержка прежних версий);
- UNO Arduino / MEGA 1280, MEGA 2560;
Среда программирования RobotC похожа на среду программирования Visual Studio и имеет интерфейс на английском языке. RobotC является платным с десятидневным бесплатным периодом.
После окончания бесплатного периода нужно приобретать лицензию. Стоимость годовой лицензии:
- На один компьютер 49 долларов;
- На шесть рабочих мест 149 долларов;
- На тридцать рабочих мест 299 долларов.
- Кроме этого предлагаются бессрочные лицензии.
Операционная система для RobotC должна быть из семейства Microsoft Windows. При помощи среды программирования RobotC можно создавать эффективные программы с использованием сложных математических выражений.
Программирование EV3 на Python
Одним из наиболее популярных языков программирования в мире является Python. Он имеет небольшое синтаксическое ядро и объемную стандартную библиотеку функций. В операционной системе Linuх язык программирования Python установлен. При желании можно установить нужный вам текстовый редактор.
На микрокомпьютере EV3 установлена операционная система Linux. Для того, чтобы программировать EV3 на Python нужно установить Linux ev3dev на модуль EV3.
![ev3dev]()
ev3dev
Затем нужно установить образ на карту памяти microCD. Желательно, чтобы класс карты был не менее десяти. Объем карты памяти от двух до тридцати двух гигабайт. Можно также использовать карту памяти microSDHC.
После этого карту с образом можно вставлять в микрокомпьютер EV3 и включать его. Подсветка кнопок будет мигать оранжевым цветом. Это означает что происходит загрузка операционной системы. После загрузки на экране блока EV3 будет видно меню программы.
Затем нужно настроить соединение с компьютером и можно приступать к работе. Настройки соединения с компьютером нужно описывать отдельно так как они достаточно сложные. Для написания программ нужен еще редактор кода.
В качестве одного из вариантов можно установить редактор кода PyCharm Edu. Есть бесплатная версия с наличием подсказок, проверкой кода и подсвечиванием синтаксиса. Созданный в программе файл можно передать в блок EV3 при помощи программы PuTTY. Эта программа помогает установить SSH соединение операционной системы Windows с микроконтроллером EV3.
![PuTTY]()
PuTTY
Программирование EV3 при помощи Scratch
Scratch является графической средой программирования. Программировать EV3 при помощи Scratch можно если установить нужное программное обеспечение и настроить его. Программное обеспечение можно установить на любые операционные системы. Для примера выберем операционную систему Windows.
![Scratch_2_0]()
Scratch_2_0
Как и в случае с программированием на Python, потребуется карта памяти с такими же параметрами. Карту памяти нужно отформатировать в файловой системе FAT32. На компьютер надо установить виртуальную Java-машину под названием leJOS.
Затем устанавливаем виртуальную машину на компьютер со всеми компонентами.
После этого устанавливаем образ на карту памяти. В дальнейшем при включении микрокомпьютера EV3 с картой памяти будет загружаться leJOS EV3. Без карты памяти будет происходить загрузка стандартного программного обеспечения Lego EV3.
Также на компьютере должна быть установлена свежая версия Adobe AIR. Затем можно установить редактор Scratch.
Установка редактора не занимает много времени.
Следующим шагом является установка ev3-scratch-helper-app. Это приложение служит для связи редактора Scratch и микроконтроллера EV3. Также в редакторе можно в настойках установить русский язык и нужно добавить блоки EV3 в редактор Scratch. После добавления блоков можно приступать к написанию программ.
В статье приведены не все возможные варианты программирования EV3, а только наиболее простые и не требующие каких-либо специальных знаний. Каждый вариант имеет свои достоинства и недостатки. Остается только выбрать что больше всего подходит в каждом конкретном случае.
EV3 программирование лучше всего начинать с детального изучения среды программирования EV3. Создав любым способом новую программу, мы попадаем в окно программы. Сейчас создан новый проект, в котором кроме блока «Начало», ничего нет.
![Программирование Lego Mindstorms EV3]()
программирование Lego
Слева от программы находится вкладка с изображением гаечного ключа. Это страница «Свойства проекта». В ней содержится обзор проекта и есть возможность управлять файлами проекта. Рассмотрим эту страницу подробнее.
Свойства проекта
Для того, чтобы было нагляднее можно открыть в основном окне «Лобби» любой проект и посмотреть его структуру. Я открою для примера проект «Гиробой», сделанный на основе базового набора Lego EV3.
![Проект Гиробой]()
проект «Гиробой»
В окне «Свойства проекта» можно редактировать, добавлять или удалять файлы рабочего проекта. В верхней части окна расположены:
В средней части окна можно увидеть надпись подключение шлейфом.
Если поставить галочку, то можно связать вместе несколько модулей Lego EV3. При этом они будут работать вместе и это позволяет значительно расширить возможности создаваемых роботов.
Появляется возможность управлять большим количеством моторов и опрашивать больше датчиков. При этом EV3 программирование становиться немного сложнее.
![Окно с вкладками]()
вкладки
В нижней части «Свойства проекта» расположено окно с вкладками:
- Программы
- Изображения
- Звуки
- Мои блоки
- Переменные
- Экспортируемые элементы
Файлы проекта можно вставить или экспортировать. Переменные можно добавить или удалить.
Инструменты области программирования EV3
Перейдем опять в область программирования окна проекта. В правом верхнем углу расположена панель инструментов области программирования Lego EV3.
![Панель инструментов]()
панель инструментов
Панель инструментов состоит из:
1. Список программ и экспериментов. Если нажать на эту иконку, то можно увидеть список открытых проектов. В нем отображены все открытые программы проекта.
2. Иконка сдвиг и выбор. Сдвиг выглядит как ладонь и позволяет передвигать содержимое области программирования. Выбор дает возможность выбрать один блок или выделить несколько блоков и редактировать выбранные элементы.
3. Иконка комментарии служит для добавления комментариев в область программирования. Это помогает дать пояснения к программе.
4. Иконка сохранения проекта. При нажатии на эту иконку сохраняется проект и все программы, которые входят в проект и связаны с ним.
5. Иконка отменить действие, вернуть действие. Иконка «Отменить» отменяет последнее действие, иконка «Вернуть» возвращает.
6. Иконка масштабирования. Лупа со знаком минус уменьшает масштаб. Лупа со знаком плюс увеличивает масштаб. Иконка 1:1 сбрасывает масштаб.
7. Последняя иконка — это редактор контента. При нажатии на эту иконку открывается окно редактирования, где можно редактировать текст, видео, изображения, звуки, производить запись с веб-камеры.
Редактор контента бывает полезен, когда вы хотите оформить свой проект. Он дает возможность создавать различные страницы с инструкциями по сборке, видеозаписями, фотографиями, различными описаниями.
Программные блоки
Слева внизу под областью программирования находятся программные блоки. EV3 программирование является визуальным.
![Программные блоки]()
блоки программирования
Окно программных блоков содержит шесть вкладок с различными категориями блоков:
- Блоки действий
- Блоки управления операторами
- Блоки датчиков
- Блоки операций с данными
- Блоки дополнений
- Мои блоки
Каждый из этих блоков лучше всего изучать отдельно и с использованием примеров программирования. Это отдельная большая тема, без изучения которой нельзя научиться EV3 программированию роботов в среде программирования Lego EV3.
Справа под областью программирования расположена панель управления и мониторинга Lego EV3. Про работу с этой панелью я расскажу в следующих статьях.
Читайте также:


