Lego mindstorms ev3 gyroboy программа
Обновлено: 05.05.2024
Перевод на русский язык с изменениями и дополнениями:
Проектирование и конструирование
Программирование
Имитационное моделирование (симуляция)
Анализ
- MINDSTORMS EV3 / NXT — Ультразвуковой датчик
- MINDSTORMS EV3 / NXT — датчик касания
- MINDSTORMS EV3 — ИК-датчик
1. Введение
- Возможно, наиболее очевидным преимуществом является то , что при использовании моделируемого робота мы можем писать программы для работы с роботом, даже если он физически не доступен. Например, ваш клуб робототехники может иметь только один комплект для сборки MINDSTORMS ® робота, но вся команда может работать и программировать на цифровую версию такого же комплекта MINDSTORMS ® робота в классе или дома.
- Когда речь заходит о средах (реальных и виртуальных), моделирование предлагает гораздо большее разнообразие решений, чем это будет возможно физически. Это может быть даже слишком дорогим , чтобы протестировать наш робот в ближайшем невесомом космическом пространстве, в нашем случае мы могли бы легко имитировать его.
- С помощью виртуальных робототехники, вы никогда не потеряете детали LEGO ® MINDSTORMS ® , и их всегда легко найти, а кроме того у Вас будет своя библиотека деталей, узлов и готовых роботов и программ к ним.
- Работая в полностью цифровом пространстве, мы можем построить Вашу модель один раз, а затем сохранить её навсегда. Что дает нам возможность гораздо легче конкурировать и делиться своим роботами с другими пользователями по всему миру.
2. Установка и настройка
2.1 Минимальные системные требования к компьютеру
- Intel Core Duo или лучше
- 2 Гб оперативной памяти
- 1,3 Гб свободного пространства на жестком диске
- Windows 7 или выше
2.2 Рекомендуемые системные требования к компьютеру
- Intel ISeries, i3 или лучше
- 4 Гб оперативной памяти
- 1,3 Гб свободного пространства на жестком диске
- Dedicated видеокарта
- Windows 7 или выше
2.3 Поддерживаемые платформы Robotics
2.3.2 LEGO ® MINDSTORMS ® EV3 ™ — (3 — е поколение роботов)
На рисунке (Figure 2.2) приведен список датчиков EV3, которые поддерживаются в тренажере.
2.3.1 LEGO ® MINDSTORMS ® NXT ™ — (2 — е поколение роботов)
На рисунке (Figure 2.1) приведен список датчиков NXT, которые поддерживаются в тренажере.
2.4 Дополнительные ресурсы
2.4.1 LEGO ® среда программирования как дополнительный инструмент для работы в Virtual Robotics Toolkit ™

Рисунок 2.3 Пример кода программы робота в среде программирования ev3.
2.4.2 Среда моделирования LEGO ® Digital Designer ™ как дополнительный инструмент для работы в Virtual Robotics Toolkit ™
LEGO ® Digital Designer ™ (или LDD, так он обычно называется) является свободно доступным CAD инструментом. Если у Вас есть серьезный интерес в разработке собственных цифровых роботов, то Вам будет полезным рассмотреть вопрос о более близком ознакомлении с этим инструментом проектирования.

LDraw
В дополнение к LEGO Digital Designer, вы можете также рассмотреть вопрос установки LDraw «все-в-одном» библиотеки деталей LEGO ® . LDraw поддерживает многие форматы файлов, поддерживаемых LEGO Digital Designer, и, вероятно, самый популярный формат файлов для создания и совместного использования 3D моделей LEGO между программами САПР.
Virtual Robotics Toolkit содержит мастер импорта, который может быть использован, чтобы импортировать LDraw файлы в тренажер. Правда, нет необходимости устанавливать эту библиотеку, но она предоставит намного больше возможностей для различных типов LEGO ® деталей, которые могут быть приведены в тренажере.

После установки LDraw «все-в-одном» библиотеки, вы также можете, обновить LEGO Digital Designer , так что вы можете экспортировать свои модели на SIM — карте. Для этого достаточно в меню Virtual Robotics Toolkit нажать на Help и выбрать пункт Patch LEGO Digital Designer .

Рисунок 2.5: Применение заплатки для LEGO Digital Designer
2.4.3 Дополнительные Интернет ресурсы
3. Экран приветствия
В этой главе рассмотрим проекты по умолчанию, которые включены в базовую установку Virtual Robotics Toolkit, и будем рекомендовать курс обучения. Мы завершим эту главу, продемонстрировав, как интерфейс Тренажера может быть настроен, чтобы наилучшим образом удовлетворить ваши потребности.
3.1 Установка Virtual Robotics Toolkit

Рисунок 3.1.1 При первом запуске Virtual Robotics Toolkit введите лицензионный ключ если Вы приобрели лицензию или выберите радиокнопку Continue with trial period. (14 days remaining) — продолжить 14 дневную пробную версию — > нажать OK
Далее, через 30-40 секунд появиться экран приветствия с открытой вкладкой Sim Basics — Базовые Симуляции:

Рисунок 3.1.2 Вкладка Sim Basics — Базовые Симуляции.
3.1 Проекты
3.1.1 ПомощьСправка Virtual Robotics Toolkit

Рисунок 3.2: Вкладка SimBasics (Базовые симуляторы). Прокрутите справа движок окна вниз и вы увидите 8 проектов виртуальных миров (сред обитания роботов) из них 4 мира спроектированы для LEGO ® EV3
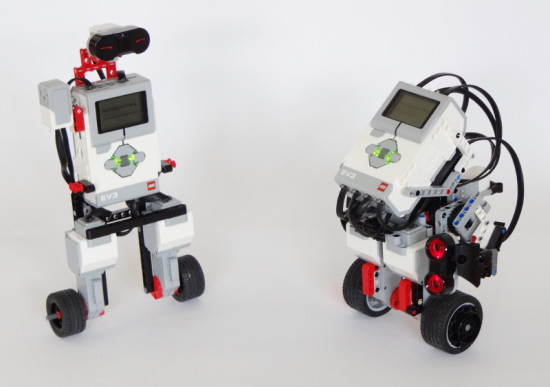
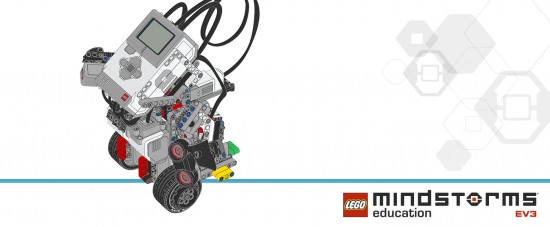
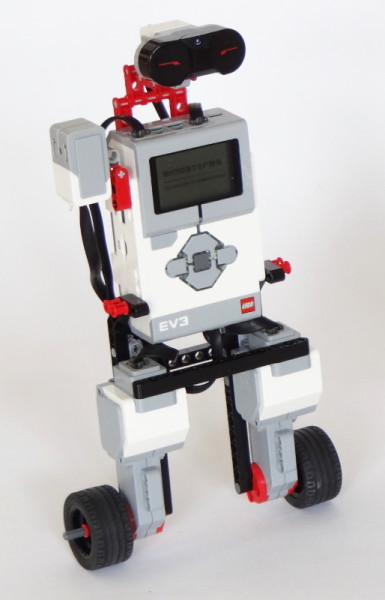
BALANC3R (left) and Gyro Boy (right)
This tutorial will show you how to build and program a self-balancing LEGO MINDSTORMS EV3 robot that can drive around a room. You can build and program BALANC3R (left) or Gyro Boy (right). Once your robot is up and running, you’ll be challenged to customize the construction and program to invent your own self-balancing robot.
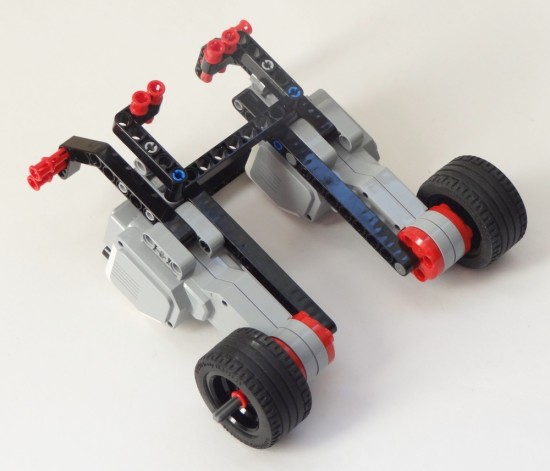
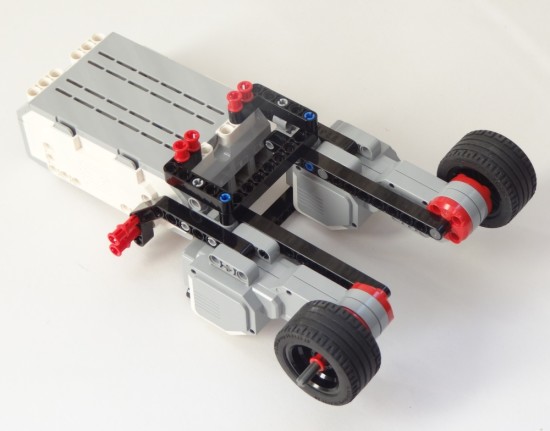
Step 1: Building a robot
To begin, choose the robot you want to build, and follow the respective step-by-step building instructions.
Requirements for BALANC3R:
Requirements for Gyro Boy:
Step 2: Installing the EV3 Gyro Sensor block
If you’re using the LEGO MINDSTORMS EV3 Home Edition Software, you’ll need to install the EV3 Gyro Sensor block before you can program your robot.
Step 3: Download the balancing robot project
- Right-click this link, click “Save Link As,” and save the project file to your computer.
- Launch the EV3 programming software, and open the downloaded project file.
Before you run the programs, let’s briefly examine how they work. The project includes four example programs, two for each robot:
- BALANC3R-Basics: Balance in place, turn right, and turn left
- BALANC3R-RemoteControl: Control the robot with the infrared remote
- GyroBoy-Basics: Balance in place, turn right, and turn left
- GyroBoy-AvoidObstacles: Drive around while avoiding obstacles
Each program consists of two configuration blocks, a balance loop, and a drive control loop, as shown in the figure below.
- The configuration blocks let you specify what the robot looks like, so that the robot knows how to balance. For example, the second setting of the first setting specifies the diameter of the robot’s wheels. The example programs come preconfigured with the correct settings for BALANC3R and Gyro Boy if you use the LEGO EV3 Gyro Sensor. If you use the NXT HiTechnic Gyro, change the Choose Sensor setting on the Initialize My Block to 1.
- The balance loop keeps the robot balanced. It measures and calculates the position and speed of the motors, and it determines the robot’s angular velocity (how fast it’s falling), as well as the robot’s angle relative to the ground. In turn, it uses this sensor information to calculate how to drive the motors in order to keep the robot up right. You won’t need to change any setting of the blocks in this loop.
- The drive control loop controls the speed and steering of the robot as it drives around a room using a simplified move block. This is the part of the program that you can easily customize to create your own program.
Step 4: Running the basic example program
You are now ready to download the example program to your robot.
- If you’ve built BALANC3R, begin with BALANC3R-Basics.
- If you’ve built Gyro Boy, begin with GyroBoy-Basics.
To start the program:
- Hold the robot upright with its wheels on the ground. Do not hold it tightly, but hold it loosely so that it’s just between falling forward and falling backward.
- Select the program and start it with the center button on the EV3 brick.
- You’ll first hear one beep. Keep holding the robot in place.
- You’ll then hear a double beep. Now release the robot and let it balance.
Your robot should now repeatedly balance in place for 7 seconds, turn right for 7 seconds, and turn left for 7 seconds.
Follow these steps if the robot doesn’t balance:
- If it doesn’t work on the first try, repeat the steps above a few times. After a while, you’ll know which is the correct “upright” starting position.
- Do not try to “help” the robot balance. Of course you should catch the robot before it falls, but trying to keep it upright with your hands is counter-effective.
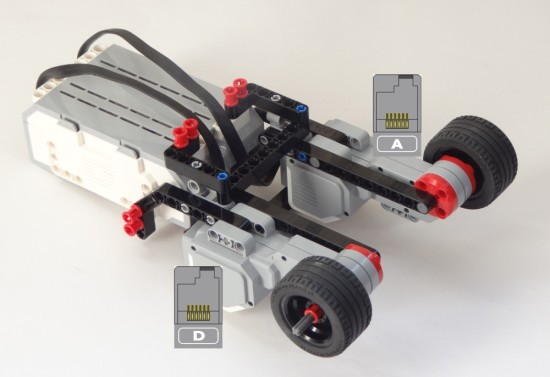
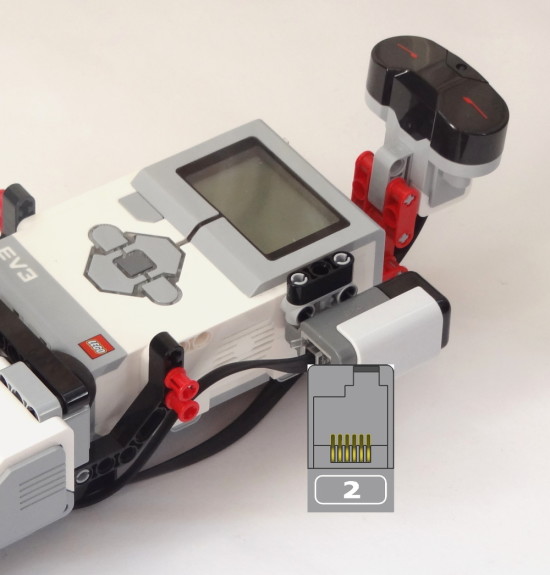
- Verify that the cables have been plugged correctly according to the building instructions:
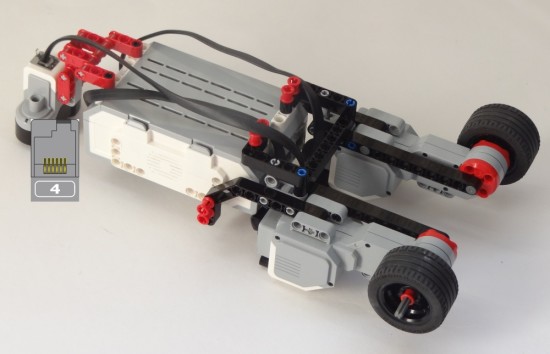
- The two Large motors should be connected to ports A and D. (If you’ve accidentally interchanged them, that’s fine. The robot will confuse left and right turns, but balancing is unaffected.)
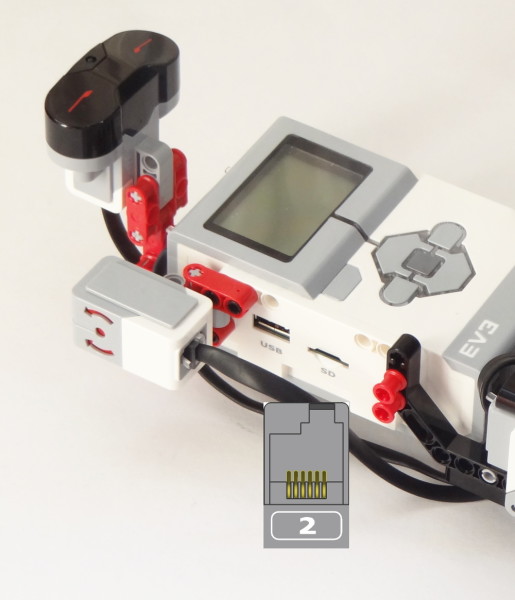
- The Gyro Sensor should be connected to input port 2, regardless of which sensor you use.
Step 5: Running the second example program
If you’ve successfully programmed your robot in the previous step, it’s easy to try out the other example program for your robot. The robot balances in exactly the same way, but the robot’s movements are a little more interesting:
- BALANC3R-RemoteControl lets you control BALANC3R with the infrared remote, as shown in the video above. Just press the buttons on the remote to make the robot drive forward, backward, and turn. (You’ll figure out the controls quickly.) If you don’t press any buttons, the robot just balances in the same place.
- GyroBoy-AvoidObstacles makes Gyro Boy drive around a room while backing up from obstacles, as shown in the video above. Before you run the program, make sure that the white beams of both the robot’s arms point downward. The program relies on this starting position to make sure the Ultrasonic Sensor doesn’t detect the floor as an ‘obstacle’ when the robot’s left arm points downward.
Step 6: Customizing the program
As you’ve learned earlier, the balance loop keeps the robot balanced while the drive control loop controls the robot’s speed and steering. The two loops run simultaneously, or at the same time. In the drive control loop, you use the Move My Block to specify the robot’s speed and steering, as shown below.
![movemyblock-ref]()
The Move block makes the robot drive and steer. In this configuration, the robot drives forward (30) while turning to the left (-15).
The robot keeps driving or turning at the specified rate until you run the block again with different values for speed and steering. The figure below shows the Move My Block in action in the basic example program you ran in step 4. The first Move block sets both steering and speed to 0, which makes the robot balance in place without turning. Next, a Wait block pauses the loop for 7 seconds, keeping the robot in the same place. Then, a second Move block sets the steering value to 20, making the robot turn to the right. After another 7 second wait, the robot starts tuning left by setting the steering value to -20.
![Controlling the robot with Move My Blocks in the drive control loop.]()
Controlling the robot with Move My Blocks in the drive control loop
Now that you’ve learned how to control the robot, it’s time to put your skills to the test with programming challenges. To solve these challenges, you can use the techniques from the LEGO MINDSTORMS EV3 Discovery Book, presented throughout chapters 1-9. Instead of using Move Steering blocks in On mode as in the example programs, you use Move My Blocks as shown above.
Challenges for BALANC3R:
- Make your robot drive around a room while avoiding obstacles with the Infrared Sensor in Proximity mode.
- Make your robot follow the Infrared Beacon. As you move the beacon around, the robot should follow you.
- Attach the Color Sensor in front of the robot’s wheels, and make the robot follow a line. You can print line following tracks for your robot from here.
Challenges for Gyro Boy:
- Make your robot drive in different directions based on the color it detects with the Color Sensor. To accomplish this, make the robot wait for the sensor to see either a yellow, red, green, or blue object. Then, make it drive in a certain direction for 3 seconds based on the detected color, before waiting for a new color signal.
- Make your robot show different types of faces/eyes on the screen as you interact with its sensors. Show an angry face if you press the Touch Sensor, show a happy face when you trigger the Color Sensor, and so on.
Step 7: Making your own balancing robot
In the previous steps, you’ve made BALANC3R or Gyro Boy balance on two wheels, and you learned to control it with the Move My Block. Now that you’ve got the essential components working, you’re ready to customize both your robot and your program. For example, you can turn BALANC3R into a life-like humanoid with arms, and make it talk to you. Or, go crazy and make any EV3 vehicle balance on its rear wheels. What about a self-balancing F1 style race car? Whatever you make, let others know in the comments below. Happy building!
Step 8: Further reading
In order to make this tutorial accessible for everyone with an EV3 set, I didn’t cover the details of the balancing algorithm. Rather, the design of this program makes it possible to control the robot even if you don’t know exactly how the balancing mechanism works.
However, many papers have been written about self-balancing robots, and I encourage you to read more on the subject as you explore the details of the EV3 program provided on this page. The balancing algorithm in this program is based on a Bachelor thesis written by Steven Witzand, which provides a good overview of the subject, along with Java source code that implements the balancing algorithm. In turn, this paper relies on the design and algorithm used in the NXTway-GS by Yorihisa Yamamoto, which you can study for further detail.
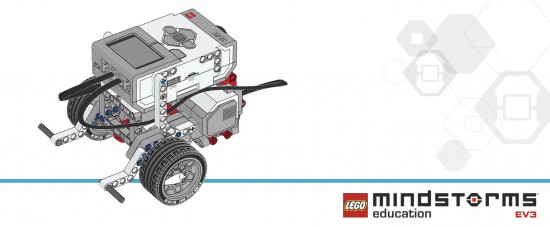
Educator Vehicle (with attachments)
![]()
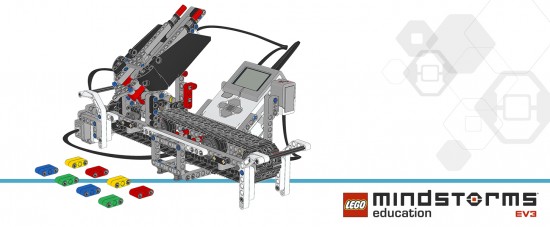
Sorter
![]()
Gyro Boy
![]()
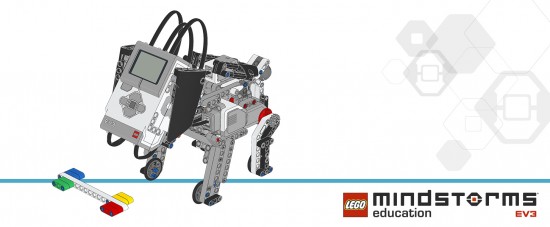
Puppy
![]()
Robot Arm H25
![]()
Where to find programs and project files:
You can find the programs for these robots within the LEGO MINDSTORMS EV3 Education software, which you can download for free via this LINK.
Thanks for creating these PDF’s. Saves me some work 😉
Are you doing the expansion models as well?
I need this one,thank you
tell me about it.
this does gio 4enogh
I have one already
Are you still here?
P.s i got new glasses and still couldnt find who asked
Advantage of the edu-set models is that they have space for the battery. Not all home-set models have that. Thanks LEGO, Laurens and Xander of course.
Thanks Lego for releasing these and Laurens for the PDFs. Is there any news on whether the we’ll be able to download the .ev3 files for these projects?
Yes, thank you. Several of the models look like great fun to build.
And I see some ideas to incorporate into some MOCs.Thanks! I’ve been bugging Lego Education to release these. These are a Huge Help!
I would love to build Gyroboy, but I only have the standard EV3 set. Would the additional gyro sensor do the trick, or is the edu-pack too different?
there is one called balanc3r on this website with a program
you can build it with the 45544 core set, thats no problem, but im a little bit unsure if you can use the 31313 set for it.
Hi
I am also wanting to know if LEGO will make the Education Core and Expansion .ev3 files available to download.
Regards GlenI too am interested in the project files for these robots. We have just introduced EV3 with our 8th graders and they are very interested in creating these robots.
Hi, it is great that these are on here, my son and I have managed to build the sorter with the EV3 kit and bits of his digger but as useful as the instructions are, doing something with it is only useful if the program is obtainable, which it isn’t.
I had camp last week and I had a challenge to build this sorter. I built it and downloaded the mindstorms programmer to my computer. It comes with all the programs to all of the listed builds. If may be a little confusin but it is manageable.
Does anyone know where to find the programming instructions for the Robots of the education pack? My team is looking for them all over the place and can’t find them. We can only build them with these instructions. Thanks in advance for any help.
Are there parts list available for these projects. The robotic arm requires a few parts that did not come in the basic set.
My name’s Joel to
That wasn’t the question,Joel Park
Nobody asked,dumb dumb
hehehe thats funey
can you please put up the directions for programming the puppy?
Thank you SO much for posting these!
Perhaps you can explain to these people that u need the lego education software to write the code for these projects? or where can we find the program code? please help us out 🙂
Well, that’s not true. The LEGO Education software has the ready-made programs. Sure, that’s easy, but you can also create your own programs for these robots using the Home Edition software, which is free.
The most complicated robot here is GyroBoy. I’ve created my own program for it, so I should be able to share it here soon. I don’t currently have time to build all of the other robots and create my own programs for them, though.
Hey Laurens! Can you upload the program for H25? If you dont have the program, can u pls give me the opportunity to create a post, cuz i have the H25 program, i programmed it with the program turtorial from the education site. Im ten years old, almost eleven 🙂
stop being a jerk to the person
hey im yum check out my youtube chanel
Hey Laurens, Where exactly in the Education software can I find the already made programs?
Thanks fjor making these builds avalilable for my lego students.
Hi,
Thanks for the PDFs. Indeed, my pupils want to build the four Robot models of the EV3 core set.
Does anybody know if there is some documentation / explanation about the Programs of these models? (Not the building instructions, but for the LabView programs, which are quite complex).
THANKS !The EV3 project files for the education models are unfortunately only available with the education version of the Mindstorms EV3 software, and so they are not available unless you buy that software for US$100. Apparently, the reason for this is to do with intellectual property, but I don’t really understand this argument: if someone has gone out and bought either the EV3 retail set (plus the additional parts to turn it into the EV3 education set), or they’ve bought the EV3 education set itself, then surely it should be no skin off Lego’s teeth to provide the EV3 project files for the education robots as they will have already gotten their money’s worth out of that customer when they bought the EV3 set.
They already provide the building instructions for free, so why not the EV3 project files to go with them? Yes, people can develop the robot programs themselves, of course, but not everyone wants to do that. Sometimes, building a robot and downloading an existing program to it is all people want to do.
Come on Lego — don’t just tease us with the PDF building instructions… give us the EV3 project files for the education robots… pretty please…?
Hi,
Can anyone direct me to the programs that come with these projects (SORTER, ROBOT ARM) ?
Anticipated thanks![BALANC3R_small]()
This tutorial provides step-by-step instructions to build BALANC3R, a self-balancing LEGO MINDSTORMS EV3 robot.
Requirements
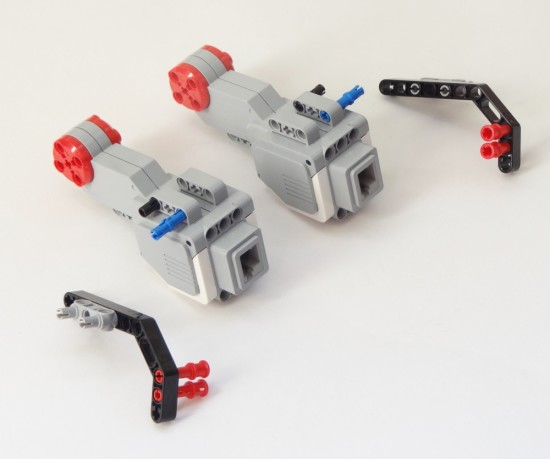
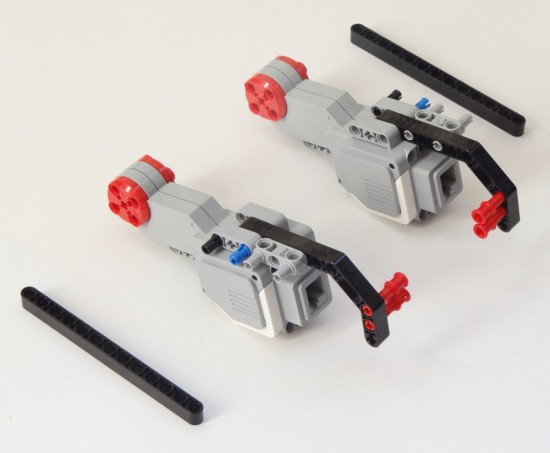
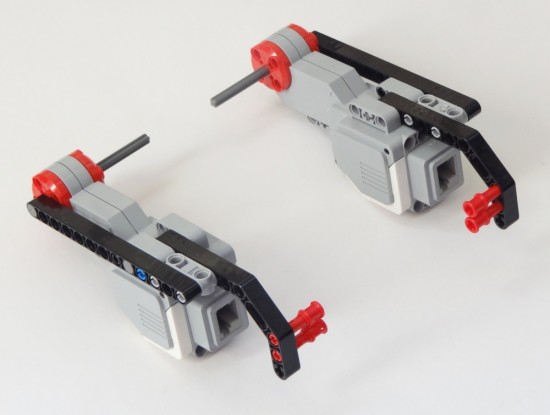
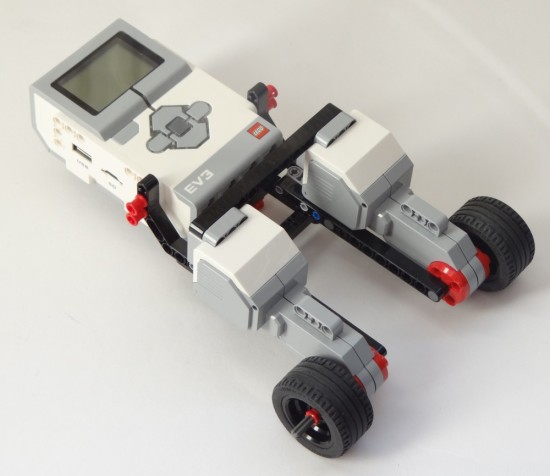
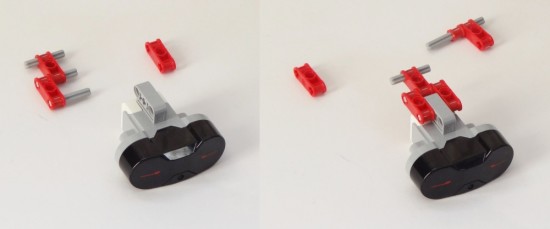
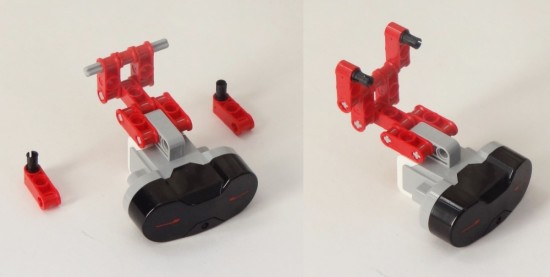
Building Steps
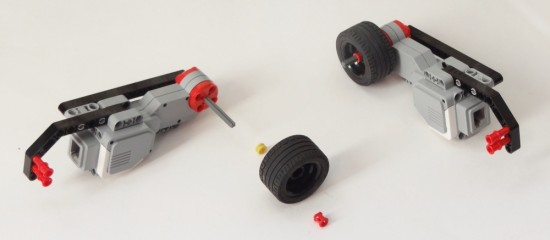
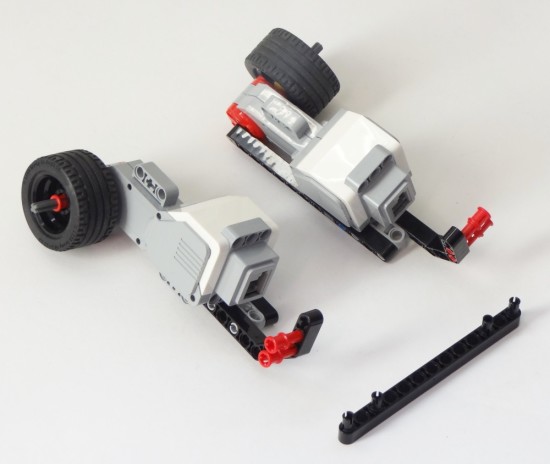
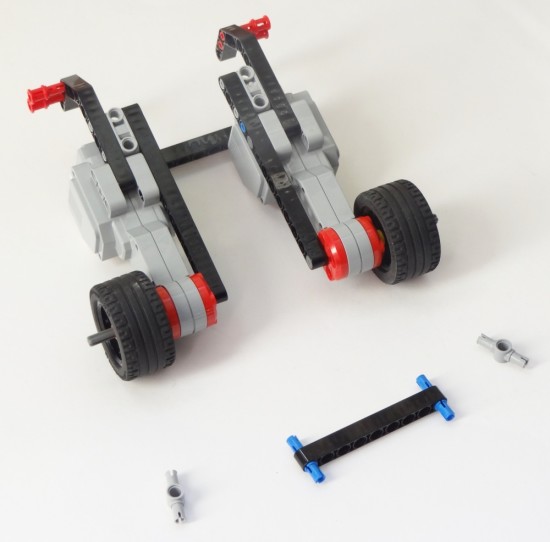
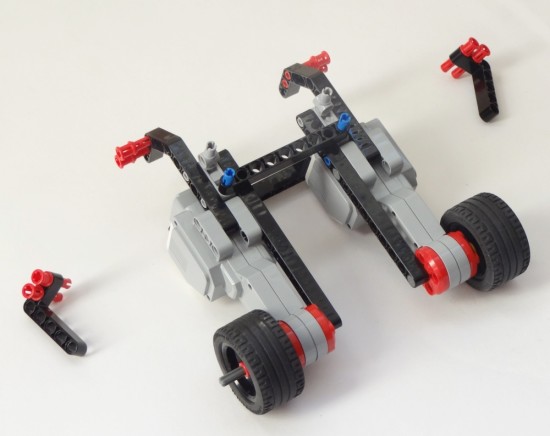
Build the robot by following the steps in order. Click on the pictures for a bigger image. Be sure to connect the motors and sensors to appropriate port on the EV3 brick as indicated by the port icons.
![BALANC3R_01]()
![BALANC3R_02]()
![BALANC3R_03]()
![BALANC3R_04]()
![BALANC3R_05]()
![BALANC3R_06]()
![BALANC3R_07]()
![BALANC3R_09]()
![BALANC3R_10]()
![BALANC3R_11]()
![BALANC3R_12]()
![BALANC3R_13]()
![BALANC3R_14]()
![BALANC3R_15]()
![BALANC3R_16]()
![BALANC3R_17]()
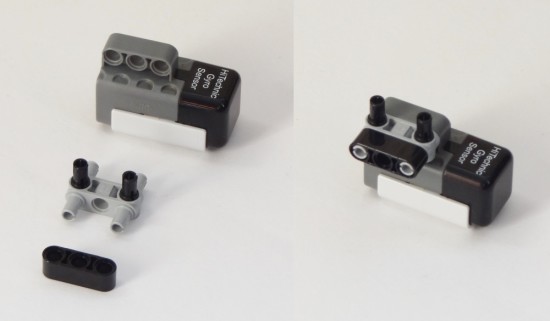
The following two steps are for the LEGO MINDSTORMS EV3 Gyroscopic sensor only. Skip these steps if you have another sensor.
Attach the LEGO MINDSTORMS EV3 Gyro sensor as follows. Be sure to connect it to the side of the EV3 brick with the USB port.
![BALANC3R_19b]()
The following two steps are for the HiTechnic Gyroscopic sensor only. Skip these steps if you have another sensor.
![BALANC3R_20]()
Attach the HiTechnic Gyro sensor as follows. Be sure to connect it to the side of the EV3 brick with the speaker.
![BALANC3R_21b]()
Programming
Now that you’ve finished building your robot, you’re ready to program it. See this article for instructions.
![drivecontrol1]()
Click to go to the programming tutorial.
Great project Laurens. Looking forward to the code next week.
Nice!Really looking forward to the program. I’ve been trying to wrap my head around the “segway”-programming for some time. Always ending up with my robot falling flat with both wheels full throttle in random directions:) Please tell me there will be an step by step tutorial for the programming as well! I’m dying to get it all explained to me! You are doning a great job! Thanx /Tomas
Just finished building your Formula EV3 Race Car. Enjoyable project. I plan on having a programming joy using RobotC. But yet, the remote control program is keeping me busy driving the car.
In the meantime, I having been looking at your BalancE3 robot. I will have to use my NXT motors instead of the EV3 motors. It will be interesting to see if your program will work with no problem.
Great to hear that robot was fun to build. Maybe after you’ve tried the BALANC3R project, you can make the Formula EV3 Race car balance on its two rear wheels, and continue controlling it with the remote 😀 (It’s one of the challenges at the end of the balancing tutorial)
The NXT motors are indeed quite comparable. Actually, I find them to be slightly more precise because they seem to have less backlash, which is good for balancing.
When rotating in place, you’ll notice that BALANC3R balances almost perfectly, while it moves back and forth while trying to stand still. That’s because when standing still, it constantly moves back and forth across the backlash. While turning, it’s always on one side of the backlash.
Can you use the dexter industries gyroscope sensor for the balanc3r?
Unfortunately, not at this time. I was going to add support fot it, but their sensor block didn’t work, or wasn’t fast enough.
Hello,guys! Valk,Can you add a sound sensor?
Hello Laurens,
I’m sorry that I posted this comment here but it wouldn’t work on the other page. I bought your book on my kindle but I saw the BRICK SORT3R so I put in the password in figure 15-9 and it didn’t do anything when I submitted it just looked liked it refreshed the page. Am I doing any thing wrong?sorry for posting on this page it was one of the pages that didn’t have passwords on it,
I think $180 is a bit too steep for a recolored NXT. It would be cool if LEGO could make falceeatps in different colors that you could swap out (A clear one to display the internals would be awesome!)
Great site and book. I will order that. I am taking and advanced Robotics course this fall and we will be using EV3. But a lot of advanced programming will be in leJOS. Do you have a book recommendation for leJOS programming?
Thank you and keep up the great work.
Best wishesI have used and enjoyed your EV3 book very much.
The Balanc3r ‘bot is fantastic!I added an Arduino UNO, Emic2 text to speech module, EasyVR voice recognition module, Bluetooth module, Pixy CMUcam5 video camera, and a FrSky RC receiver to my Balanc3r ‘bot that I call Wilber.
He is to have 5 modes of control and speech:
1) IR control using the EV3 Beacon
2) Voice recognition control
3) Bluetooth-cell phone App. 1
4) Bluetooth
5) RC control
6) Video controlAgain, thanks for creating such a great platform!
Thanks a lot for your comment. Sorry I didn’t see it before—I have to manually review any comment with a URL in it to reduce spam.
Glad to hear you liked the book. The extended Segway project with sound is impressive, nice work!
Can you post the programing using absolute-IMU?
Of course!
I can’t!Hey Laurens,
I have buildet jour balancer and i have building a line follower from that, i can give jou the instructions and the ev3 programm, THATS REALY WORK!Hey laurens peter here!
I need a challange to build an robot, why an DUCKS3GWAY or a realy fast car
Or… Can jou reply and write it?ok. HAPPY HALLOWEEN.Laurens hello do you reply??
You Fokin Wot M8 1v1 Butta crumpett Wot Amayzing Speqtackula Penus You Wot
Laurens,
Enjoying your excellent book received as Xmas gift.
Have you published any new build instructions as I’ve completed just about everything out there, but just not creative on my own at 78, ha.Thanks for your feedback!
You can also build all 12 bonus projects in the LEGO software under the “more robots” tab. I designed the RAC3 Truck.
Перевод на русский язык с изменениями и дополнениями:
Проектирование и конструирование
Программирование
Имитационное моделирование (симуляция)
Анализ
- MINDSTORMS EV3 / NXT — Ультразвуковой датчик
- MINDSTORMS EV3 / NXT — датчик касания
- MINDSTORMS EV3 — ИК-датчик
1. Введение
- Возможно, наиболее очевидным преимуществом является то , что при использовании моделируемого робота мы можем писать программы для работы с роботом, даже если он физически не доступен. Например, ваш клуб робототехники может иметь только один комплект для сборки MINDSTORMS ® робота, но вся команда может работать и программировать на цифровую версию такого же комплекта MINDSTORMS ® робота в классе или дома.
- Когда речь заходит о средах (реальных и виртуальных), моделирование предлагает гораздо большее разнообразие решений, чем это будет возможно физически. Это может быть даже слишком дорогим , чтобы протестировать наш робот в ближайшем невесомом космическом пространстве, в нашем случае мы могли бы легко имитировать его.
- С помощью виртуальных робототехники, вы никогда не потеряете детали LEGO ® MINDSTORMS ® , и их всегда легко найти, а кроме того у Вас будет своя библиотека деталей, узлов и готовых роботов и программ к ним.
- Работая в полностью цифровом пространстве, мы можем построить Вашу модель один раз, а затем сохранить её навсегда. Что дает нам возможность гораздо легче конкурировать и делиться своим роботами с другими пользователями по всему миру.
2. Установка и настройка
2.1 Минимальные системные требования к компьютеру
- Intel Core Duo или лучше
- 2 Гб оперативной памяти
- 1,3 Гб свободного пространства на жестком диске
- Windows 7 или выше
2.2 Рекомендуемые системные требования к компьютеру
- Intel ISeries, i3 или лучше
- 4 Гб оперативной памяти
- 1,3 Гб свободного пространства на жестком диске
- Dedicated видеокарта
- Windows 7 или выше
2.3 Поддерживаемые платформы Robotics
2.3.2 LEGO ® MINDSTORMS ® EV3 ™ — (3 — е поколение роботов)
На рисунке (Figure 2.2) приведен список датчиков EV3, которые поддерживаются в тренажере.
2.3.1 LEGO ® MINDSTORMS ® NXT ™ — (2 — е поколение роботов)
На рисунке (Figure 2.1) приведен список датчиков NXT, которые поддерживаются в тренажере.
2.4 Дополнительные ресурсы
2.4.1 LEGO ® среда программирования как дополнительный инструмент для работы в Virtual Robotics Toolkit ™
![lego-educator]()
Рисунок 2.3 Пример кода программы робота в среде программирования ev3.
2.4.2 Среда моделирования LEGO ® Digital Designer ™ как дополнительный инструмент для работы в Virtual Robotics Toolkit ™
LEGO ® Digital Designer ™ (или LDD, так он обычно называется) является свободно доступным CAD инструментом. Если у Вас есть серьезный интерес в разработке собственных цифровых роботов, то Вам будет полезным рассмотреть вопрос о более близком ознакомлении с этим инструментом проектирования.
![lego-digital-disigned]()
LDraw
В дополнение к LEGO Digital Designer, вы можете также рассмотреть вопрос установки LDraw «все-в-одном» библиотеки деталей LEGO ® . LDraw поддерживает многие форматы файлов, поддерживаемых LEGO Digital Designer, и, вероятно, самый популярный формат файлов для создания и совместного использования 3D моделей LEGO между программами САПР.
Virtual Robotics Toolkit содержит мастер импорта, который может быть использован, чтобы импортировать LDraw файлы в тренажер. Правда, нет необходимости устанавливать эту библиотеку, но она предоставит намного больше возможностей для различных типов LEGO ® деталей, которые могут быть приведены в тренажере.
![Ldraw]()
После установки LDraw «все-в-одном» библиотеки, вы также можете, обновить LEGO Digital Designer , так что вы можете экспортировать свои модели на SIM — карте. Для этого достаточно в меню Virtual Robotics Toolkit нажать на Help и выбрать пункт Patch LEGO Digital Designer .
![lego-digital-disigned-1]()
Рисунок 2.5: Применение заплатки для LEGO Digital Designer
2.4.3 Дополнительные Интернет ресурсы
3. Экран приветствия
В этой главе рассмотрим проекты по умолчанию, которые включены в базовую установку Virtual Robotics Toolkit, и будем рекомендовать курс обучения. Мы завершим эту главу, продемонстрировав, как интерфейс Тренажера может быть настроен, чтобы наилучшим образом удовлетворить ваши потребности.
3.1 Установка Virtual Robotics Toolkit
![Virtual-Robotics-Toolkit]()
Рисунок 3.1.1 При первом запуске Virtual Robotics Toolkit введите лицензионный ключ если Вы приобрели лицензию или выберите радиокнопку Continue with trial period. (14 days remaining) — продолжить 14 дневную пробную версию — > нажать OK
Далее, через 30-40 секунд появиться экран приветствия с открытой вкладкой Sim Basics — Базовые Симуляции:
![Virtual-Robotics-Toolkit-1]()
Рисунок 3.1.2 Вкладка Sim Basics — Базовые Симуляции.
3.1 Проекты
3.1.1 ПомощьСправка Virtual Robotics Toolkit
![Virtual-Robotics-Toolkit-2]()
Рисунок 3.2: Вкладка SimBasics (Базовые симуляторы). Прокрутите справа движок окна вниз и вы увидите 8 проектов виртуальных миров (сред обитания роботов) из них 4 мира спроектированы для LEGO ® EV3
Читайте также: