
The lego boost creative toolbox 17101
Обновлено: 25.04.2024
Новый набор Lego Boost — это набор, в который входят двигатель, программируемый блок, комбинированный датчик цвета и расстояния. Эти детали позволяют превратить детали из старых наборов LEGO в «умные» программируемые игрушки. Кроме того в состав конструктора входят 843 пластиковые детали — LEGO-кирпичей никогда не бывает много.
В набор входят инструкции по созданию пяти моделей:
Робот Vernie (Vernie the Robot).
Кошка Frankie (Frankie the Cat).
Гитара (the Guitar 4000).
Вездеход M.T.R.4 (the Multi-Tool Rover 4).
Автосборочная линия (the Autobuilder).
Move Hub features Bluetooth Low Energy (BLE) connectivity, 2 encoded motors, activation button, internal tilt sensor and a light.
Interactive Motor is an encoded motor.
Color & Distance Sensor detects distance, motion and color, and can also function as a light.
Выглядит более "детским" чем xiaomi mitu biulder (робот и танк) и дороже китайца.
Интересно:
1) Когда выйдет. Итоговая цена. Предзаказ 160$ может быть не потолком.
2) Софт. Раньше фирменный софт Lego был платный. Ценники были негуманными на 300%.
Что сможет софт для android/ios, будет ли совместимость с др. софтом в т.ч. бесплатным от сообщества.
3) Электроника.
Совместимость текущими продуктами Лего ( они же регулярно меняют фирменный разъем, я не спец., но политика на 3---).
Возможность расширения.
4) В общем спасибо китайцам, ценник хоть немного ближе к реальности стал. Но у Лего или начнется канабализм своих же продуктов, или дебильные скрытые ограничения в этой линейке.
Народ, а как вы думаете можно как-нибудь установить и запустить приложение на телефоне, а не на планшете. Просто у нашего планшета bluetooth 3.0, а покупать новый только из-за Lego Boost не хочется.
Схожий вопрос - может кто-то подскажет есть ли вожможность установить програму на android 4.4.?
kr.artem,
Я нашел apk файл Ссылка, установилось все без проблем, но работает ли с конструктором проверить не могу.
У меня Elephone P9000 с Android 7.0
kr.artem,
И еще: на устройстве с Android 4.4 врятли будет bluetooth 4.1, а как мне заверили продавцы, работать с блютусом меньшей версии он не будет.
Интересно, есть ли возможность запустить на виртуальном эмуляторе с подключенным USB bluetooth 4.1 ?
Конструктор заказал ребетенку, чувствую, теперь еще и на новый планшет придется денег копить ((
У меня та же проблема.
Я установил Remix OS на ПК и плюс ORICO BTA - 403 Mini USB Adapter, всьо завелось.
Там много росказов о Bluetooth 4.1 или специальних BLE адаптерах, но многие новые адаптеры понимают BLE.

Фантастический набор от Лего, приобщающий детей к робототехнике и программированию
Артикул: 17101
Название: LEGO BOOST
Кол-во деталей: 843
Кол-во минифиг: 0
Год выпуска: 2017
Рекомендуемый Возраст: 7 - 12
РРЦ: 9999.00 (11.86 руб./деталь)
У Лего издавна существуют серии, предназначенные не только для игры, а для обучения детей чему-нибудь. Для самых маленьких это серия Educational, в частности WeDo. Для самых взрослых это естественно MindStorms и его разновидности. Существовало ещё много промежуточных наборов, но только в 2017м году компания выпустила BOOST, позволивший приобщиться к роботостроению и роботопрограммированию тех, кто уже вырос из WeDo, но ещё не дорос до MindStorms. Знакомьтесь - Лего 17101 или просто Лего БУСТ)

На коробке написан возраст - 7 - 12лет, но мы, например, подарили его ребенку на 6 лет на ДР. Учитывая что мы давно уже с Лего, и вполне справляемся с Техникс, для нас не было особых проблем со сборкой моделей.

Как гласит задняя часть, в самом наборе представлены 5 разнообразных моделей для сборки - гитара Guitar 4000, кот Frankie The Cat, мини завод Auto Builder, уборщик M.T.R. 4 и робот Vernie The Robot. Бумажных инструкций в наборе нет, вся сборка и управление идут через приложение Lego BOOST, для которого нужен планшет или очень большой телефон. Нам, например, пришлось специально покупать планшет Samsung, потому что наши Китайские ноунеймы были неспособны работать с приложением. Так что рассчитывайте заранее) Немного о самой сборке - она осуществляется через приложение, поэтапно. Собираете первый этап, самый простой, обычно это часть модели - немножко программируете его, потом открывается следующий этап и так дальше. В среднем на каждую модель по 9-12 этапов, причем последние этапы - это перестройка модели или работа с построенными аксессуарами. В общем, есть чем занять ребенка на месяцы)

В наборе 11 пронумерованных пакетов с деталями, плюс пакеты с датчиками и колесами. В отличие от обычных наборов, где сборка идет от 1го пакета, здесь, насколько я помню, лучше распотрошить все пакеты заранее. Из электроники в наборе основной блок с мотором, датчик цвета и датчик расстояния\положения.

В набор помимо деталей входит большой плакат с роботом.


Так же тут присутствует разлинованный коврик, на котором удобно проверять программы для робота и уборщика. С оборотной стороны на нём список деталей.

Я не буду долго показывать процессы сборки, покажу в основном законченные модели. Первой мы собирали гитару. Она великолепна) Длина её примерно 40-55см, она вполне удобно ложится в руки ребенка. Датчики входящие в набор реагируют на расстояние и цвет, на котором находится подвижный элемент, за счет этого изменяется звук издаваемый гитарой. Звук, кстати, идет из планшета) В дальнейшем есть возможность заменить звуки гитары на электорогитару или барабаны, а так же навесить всякие примочки как у настоящих рокеров.


После гитары мы собирали кота. Естественно, деталей хватает лишь на сборку одной модели, но все 100% деталей используются только для сборки робота Верни. Для остальных моделей идет в среднем 60-80% от общего их числа. У кота вначале собирается тело с головой. У него подвижные уши и брови, так же у него двигаются лапы и хвост. Плюс с датчиком положения кот реагирует на укладывания на бок и на спину, а так же может мурчать, когда вы берете его на руки)

Вот так выглядит процесс программирования - внизу доступные блоки программ, в центре - тело программы. В данном примере длинная программа - двигать бровями в разные стороны, две программы поменьше - эмоции на подъем кота на руки. В целом программирование вполне доступно для детей, ко всем схемам есть примеры и подсказки. Можно написать сразу несколько программ и запускать их по очереди или одновременно.

Предпоследний этап сборки - остались только ноги. На этом этапе мы учимся махать хвостом.

Полностью собранный кот с аксессуарами. Он довольно тяжелый, на руках чувствуется. Длина все также - 40+ сантиметров. Тут есть губная гармошка на которой можно играть, есть бутылка с молоком из которой можно пить, бантик и гусеницы. Даже черные очки есть и тортик) Все можно снять\одеть, на многие вещи можно запрограммировать какую-нибудь реакцию кота.

Следующим мы собирали завод по сборке роботов.

У него в центре находится настоящий конвейер.

Это - линия по сборке робота. Сюда мы ставим отдельные детали, из которых в конце рабочего процесса получится симпатичный маленький робот.


. и с помощью мотора, роликов и ленты проходит весь конвейер, постепенно ставя детали друг на друга и собирая робота. К сожалению фото самого процесса не осталось, но поверьте, в первые разы это выглядит офигенно - робот действительно собирается. В последующем вы можете заменять детали, при условии что они поместятся на линии сборки и строить свои модели.

В процессе сборки робота все мигает, всякие механизмы крутятся.

Четвертым мы собирали робота. Хочу заметить, что в среднем на полную сборку у нас уходила неделя-две, поскольку мы особо не спешили. Плюс ещё неделя-две на игру. Так что 4ю модель мы собирали уже к декабрю, хотя набор был подарен в августе.

Я покажу только финальную модель без аксессуаров. Робот гусеничный, сзади есть упор для равновесия. Программируются подвижные руки, глаза, голова. Программируются движения, повороты, развороты - очень удобно это делать на прилагаемом коврике. В груди стоит датчик дистанции\цвета.

Вид сзади - ничего примечательного)


Ну и последняя модель - мы назвали его уборщиком, но вообще это многофункциональное устройство. Изначально у него есть вилы для подъема кубиков и роботов. В дальнейшем к нему можно пристроить молот для забивания чего-нибудь, или грейдер. Он также программируется на движение, благодаря датчикам может сам объезжать предметы или загружать роботов к себе в кузов.
Помимо всего вышесказанного, набор совместим с другими наборами Лего - в 70652 он помогает роботизировать и управлять синим драконом, в 60194 - проапгрейдить машину, а ещё он совместим с парком аттракицонов.
P.S. Я не знаю что добавить ко всему вышесказанному) Если ваши дети серьёзно увлекаются Лего, то этот набор - однозначный маст хэв. В нем куча деталей, необходимые датчики и при должном уровне фантазии есть возможность строить свои поделки и программировать их в приложении. Мы, например, с осени прошлого года только им и занимаемся - строим, перестраиваем, немножко программируем.
Приближается Новый Год и наступила пора искать подарки. Для подрастающих робототехников сейчас доступны самые разные конструкторы, наборы и уже готовые роботы.
Но выбирая подарок для ребёнка — первым делом думаешь о конструкторе LEGO.
А если рассматривать LEGO и роботов, то, разумеется, первым на ум приходит конструктор LEGO Mindstorms.
Однако, серьёзная цена (от 20 тыс. р.), возрастные ограничения 10+ и угрожающий дизайн версии EV3 — заставляют рассмотреть другие варианты.
Следующим, находится образовательный набор — LEGO WeDo 2.0.
Но опять же — цена (от 13 тыс. р.) и направленность набора на использование в рамках детских робототехнических кружков — заставляют продолжить поиски.
И вот, наконец, находится очень привлекательный вариант для новогоднего подарка — набор для конструирования и программирования — LEGO Boost 17101.
Более доступная цена (от 7 тыс. р.), возрастная категория 7+ и очень привлекательный дизайн — ставят этот конструктор в фавориты в роли новогоднего подарка подрастающему робототехнику.
Что же это за конструктор?
Набор LEGO Boost
Впервые, LEGO Boost был представлен в январе 2017 года на международной выставке электроники CES 2017 в Лас-Вегасе.
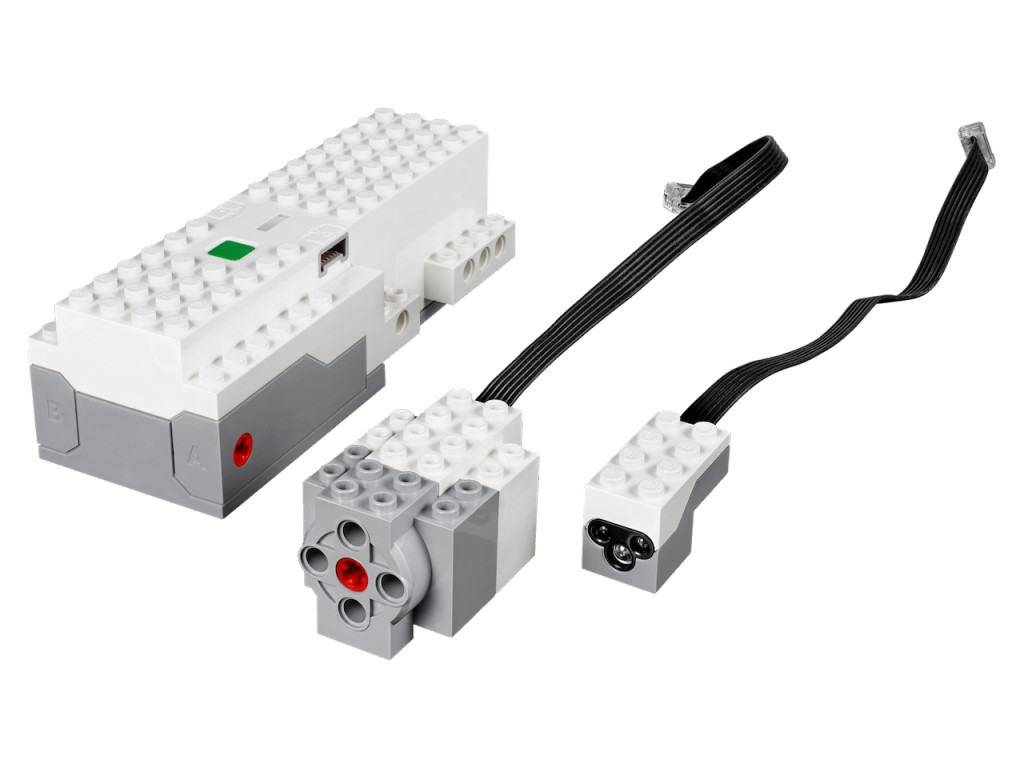
Сердцем набора является специальный электронный блок (Move Hub) у которого есть два разъёма, в которые можно подключить две дополнительные детали — двигатель и комбинированный датчик (цвета и расстояния).
Используя эти детали, можно превратить обычные пластиковые детали LEGO в интересных программируемых роботов.
Для своей работы, хаб требует 6 AAA-батареек.
Здесь следует обратить внимание, что встроенных микрофона или динамиков в Move Hub — нет, звук идёт через планшет.
Так же, следует иметь в виду, что разъемы LEGO Boost — отличаются и не совместимы с разъёмами LEGO Mindstorms EV3 (в котором испольуется 6p6c (RJ-25, RJ-12)).
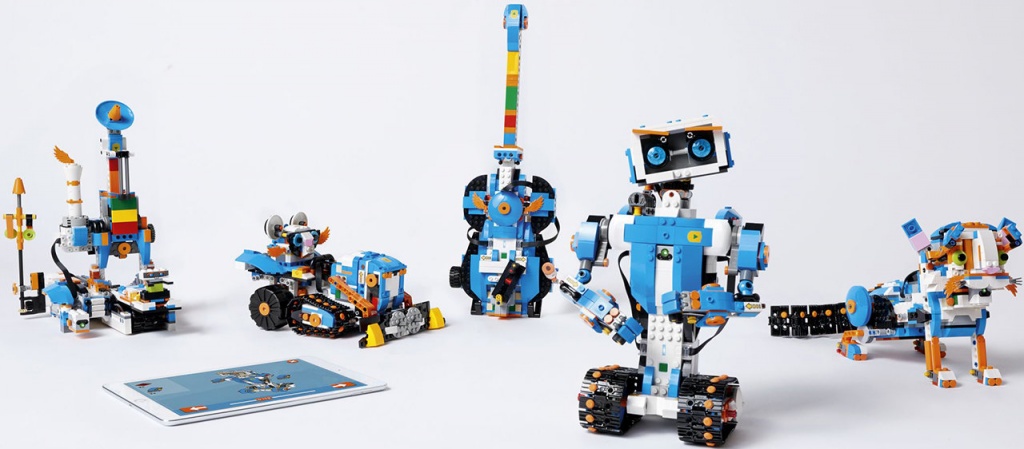
Всего в состав конструктора входят 847 пластиковых детали (упакованы в 11 пронумерованных пакетиков) из которых можно по готовым инструкциям собрать одну из пяти моделей:
1. Робот Верни (Vernie the Robot).
2. Кошка Фрэнки (Frankie the Cat).
3. Гитара (the Guitar 4000).
4. Вездеход M.T.R.4 (the Multi-Tool Rover 4).
5. Автосборочная линия (the Autobuilder).
Каждая модель может выполнять какое-нибудь действие. Например, робота Верни можно запрограммировать стрелять по мишеням или танцевать, а кошку Фрэнки — мурлыкать и вилять хвостом.
Графическое программирование действий осуществляется с планшета в приложении LEGO® BOOST (совместимо с iOS (10.3 и выше), Android (5.1 и выше), Fire OS, Windows 10) через беспроводную связь Bluetooth 4.1.
Минимальные требования к планшету
* Технология Bluetooth 4.1 или выше
* двухъядерный процессор 1.4 ГГц
* 1 Гб оперативной памяти
* дисплей 4.5” или более (лучше 8”)
* микрофон
* динамик
LEGO рекомендует проверить подходит ли ваш планшет для выполнения приложения LEGO BOOST, до покупки игрушки, так как управление собранным роботом осуществляется напрямую с планшета.
Робот Верни
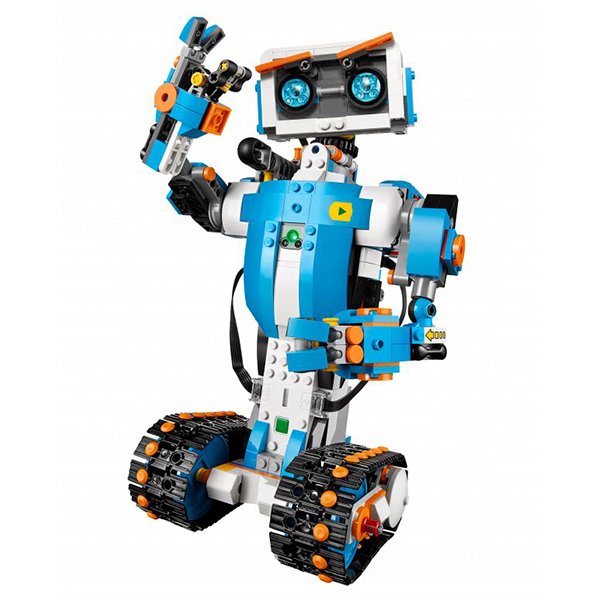
Самая харизматичная модель, которую можно собрать — это робот Верни, который очень сильно похож на робота из кинофильма «Короткое замыкание».
Он умеет выражать свои эмоции, умеет перемещаться (вперёд — назад, влево-вправо), по команде меняет скорость движения. Комбинированный датчик в груди робота позволяет определить расстояние и цвет предмета.
Кроме того, умеет стрелять стрелой из специального спускового устройства.
Видео сборки робота Верни из Lego Boost
Инструкция по сборке робота Верни (PDF)
Как устроен Move Hub
Сердце конструктора — умный блок Move Hub, внутри которого:
* 2 мотора с энкодерами,
* 2 порта для подключения дополнительных устройств (мотора и комбинированного датчика),
* датчик наклона,
* RGB-светодиод,
* зелёная кнопка включения,
* батарейный отсек на 6 батареек типа AAA.
Разумеется, не может не заинтересовать — как же устроен этот блок.
Как видим — основной объём блока — это батарейный отсек на 6 AAA-батареек и блок из двух мотор-редукторов.
Электронная плата основного контроллера
Можно видеть, что один из двух двухканальных драйверов двигателей предназначен для управления внутренними двигателями (A и B), а второй — используется для управления нагрузкой на внешних портах (C и D).
Внешнее программирование LEGO Boost
Становится понятно, что Move Hub только выполняет команды, поступающие ему через Bluetooth-соединение, а значит им можно научиться управлять не только из родного приложения.
Оказывается, это уже сделано. Роботом Верни можно управлять из программ на Scratch (S2Bot).
А что ещё круче — на Python при помощи библиотеки pylgbst
Для работы с BLE под ОС Windows, требуется Bluetooth-свисток BlueGiga BLED112 Bluetooth Smart Dongle.
Кроме этого, есть интерфейс для Node.js и приложение на Swift (для iOS).
Хаки LEGO Boost
Чтобы не разориться на батарейках — LEGO Boost можно запитать при помощи power-банка:
Либо, внешнего блока питания на 5В (сетодиод будет мигать о низком напряжении), но всё будет работать.
Заключение
Подводя некоторый итог, можно сказать, что конструктор LEGO Boost будет интересен не только маленьким, но и более взрослым робототехникам.
По функциональности, занимая положение где-то между WeDo и MindStorms — он не фокусируется на конструировании, а больше на управлении-программировании и играх с получившимся роботом.
С другой стороны, фактически «мозгом» робота является Bluetooth-устройство, которое просто выполняет трансляцию поступающих команд и не способно работать автономно, что вроде бы и выглядит логичным (учитывая текущую вездесущность гаджетов), но так и напрашивается на изменение.

LEGO did it again. A new cool and funky “Creative Toolbox” was just launched under the nom de guerre LEGO BOOST! With the LEGO Education WEDO 2.0 set (45300), LEGO introduced a new standard for 6-pole electric connectors, as well as a new motor and new sensors. The WEDO 2.0 electric components (part number 21980) have “LPF 2.0” in their name, which leads me to guess that the new Power Functions system (2.0?) will adopt these connectors as well, making the current ones obsolete. The interesting thing is that the new connectors are used in the LEGO BOOST electronic elements, leaving us wondering if the next generation of LEGO MINDSTORMS will have this compacter connectors as well. I think so. I hope so.
Also, I hope that all these new sensors and motors will be compatible with the next generation of MINDSTORMS. Or will the name MINDSTORMS disappear, and everything will get under the same LEGO POWER FUNCTIONS 2.0 umbrella? Time will tell.


The LEGO WEDO 2.0 set of electronic devices
Inception
I like to think that LEGO designers themselves take inspiration from previous creations made by other LEGO designers or by members of the Community. Here are the resemblances in terms of working concept that popped into my eye. The aesthetics are different of course, especially considering that the BOOST models are studded, and not studless.
LEGO BOOST Multi-Tooled Rover 4 resembles LEGO MINDSTORMS EV3 TRACK3R
LEGO BOOST Frankie the Cat resembles LEGO MINDSTORMS Education EV3 Puppy (by LEGO designer Lee Magpili)

LEGO BOOST Guitar4000 resembles LEGO MINDSTORMS EV3 EL3CTRIC GUITAR (by Daniele Benedettelli)

LEGO BOOST Autobuilder resembles the LEGO MINDSTORMS Duck Maker 1.5 (by Daniele Benedettelli)
LEGO BOOST Vernie resembles Johnny 5 as well as the LEGO Creator robot 31062.
LEGO says…
Some technical details
- The set Includes over 840 LEGO® pieces, plus a LEGO Move Hub, Interactive Motor and a Color & Distance Sensor.
- Move Hub features Bluetooth Low Energy (BLE) connectivity, two motors with rotation sensor, activation button, internal (3-axis) tilt sensor and a light.
- The Interactive Motor has a built-in rotation sensor that lets you measure how far/ how fast it’s turning.
- Color & Distance Sensor detects distance, motion and color, and can also function as a light.
- The app is an easy-to-use intuitive software with icon-based drag-and-drop programming interface.
The LEGO BOOST electric elements and app resemble the ones of Education WEDO 2.0 set. A new standard in LEGO robotics has been set?
LEGO BOOST building instructions
August 2017 update: the LEGO BOOST 17101 set is available, and you can find the building instructions here.
World's No. 1 source for LEGO news, reviews, and fan creations.
The 17101 BOOST Creative Toolbox represents the latest initiative from LEGO to introduce children to the worlds of engineering, robotics, and computer programming. LEGO recently expanded their range of supported devices, so we’re finally able to bring you a review without purchasing a brand new iPad. LEGO has targeted the 7- to 12-year-old age range for the BOOST product, one of the youngest demographics for a LEGO robotics kit. Unlike the MINDSTORMS series of products that features Technic, BOOST liberally incorporates LEGO SYSTEM brick (in addition to Technic) as the mechanical parts of the robots.

For this review, I engaged the services of an appropriate expert: my 6-year-old daughter, Artemis. Overall, she had few difficulties building the Vernie model, although she occasionally lacked the hand strength to push the Technic pins in holes (particularly when seating multiple pins at once).

Who has two thumbs, builds robots, and won’t eat broccoli? This girl!
The box and instructions
The box art certainly seems child friendly, featuring bright colors, cartoon / artistic renditions of the BOOST models, and Vernie, the anthropomorphic robot.
The reverse side displays some of the alternative models for this kit, including Guitar 4000, M.T.R. 4, Auto Builder, and Frankie the Cat.

The box contains 11 numbered polybags, one sealed bag, one box containing the BOOST LPF2 Hub Motor (more on that later), a poster, and a card stock “playmat.” No stickers included in this kit; all graphic parts are printed.

The playmat reminds me strongly of the card stock “terrain map” included with the MINDSTORMS EV3 kit in concept. It provides a stable, solid, card-stock terrain for the robots to roll around on, including points of interest for the color sensor to pick up.

The BOOST box does not include instructions for building a model. Instead, PDF instructions are available for download from LEGO’s Customer Service site. As an alternative, we used the BOOST App to build Vernie, as it includes complete instructions presented in a step-by-step format.
This, of course, raises an obvious question: what are the device requirements for BOOST? The BOOST launch initially suffered due to a relatively small number of supported devices. Since its launch, however, LEGO has expanded the list of compatible devices. For this review, we used an iPad Air 2 tablet running iOS 11.2.1. We also tried to run the BOOST app on an old iPad 2 that we have kicking around; the device simply didn’t meet the minimum operating system requirements.
The build
Of course, the first components to assemble in this kit are two, cute, simple, brick-built mini-robots. Hey, what is Vernie going to do if he doesn’t have his backup dancers?

Before building the Vernie model, the instructions guide you through a simple creation combining the LPF2 Hub Motor brick, BOOST Color and Distance Sensor, and BOOST Interactive Motor. We couldn’t find a name for the little robot, so we just named her “scout bot.”

I really appreciated that the instructions for Vernie include a quick mini-build so that we could connect to the LPF2 Hub Motor brick and test the BOOST App. Of course, this being the first time we connected to the brick, we needed to download firmware for it. A couple minutes later, we began coding (more on that later).
After disassembling the initial “scout” bot, we got down to the business of building the actual Vernie model. The Vernie model includes a nice mix of Technic and SYSTEM parts, blending building techniques from both.
The first part of the instructions had us building the shoulders and collar bone, which house the BOOST Interactive Motor. The BOOST interactive motor attaches to Vernie’s neck joint to the rest of the body. The neck itself exposes a cool turntable small top gear, serving a design rather than a functional role for the robot.

The LPF2 Hub Motor connects to the torso of Vernie, forming the lower thorax and base. Note that the BOOST Color and Distance Sensor plugs into the “C” port on the LPF2 Hub Motor, while the BOOST Interactive Motor plugs into the “D” port. (On the “scout” model, the motor plugs into the “C” port and the sensor into the “D” port; it’s good to know that the ports can connect to either motor or sensor.)

The BOOST Interactive Motor connects Vernie’s head to the body, stabilized by a Technic link arm. The link arm permits the head a decent range of motion, allowing Vernie to turn his head just a little shy of 60° to the right or left. This means, of course, that the head and eyebrows are the main interactive component for Vernie’s upper body, rather than an arm or something else. It also means that as Vernie turns to his right, his eyebrows look more angry and sinister; movement to the left makes his eyebrows look more sad and sympathetic. (Funny, given the etymology of the word “sinister”.)

Rear view of Vernie’s head

Front view with expressive eyebrows
By the time we finished with bag 7, Vernie sported some wheels, treads to cover the wheels, not-quite-finished arms, and a rear stabilizer bar. I noted the little orange plugs that we popped into the treads, as they should give Vernie a bit more traction on carpeted floors.

Look ma, no arms!

Is it a tail or a rear stabilizer bar?
After working our way through bag 8, we completed the model, leaving bags 9, 10, and 11 unopened. As of writing this review focused on the main model, I can only assume that we might use the additional bags for the other BOOST models.
The finished model
Completed, the Vernie model stands roughly 11 inches tall and weighs somewhere on the order of 5 lbs. The model feels more sturdy than I had imagined it would.

Although I’m sad that the hands aren’t motorized, their design does provide them with some strength. Rubber bands provide tension on the thumb, allowing the hands to grip other bricks.

“I told you: DON’T STEP IN MY LIGHT!”
Overall, the head remains my favorite part of this model. The design emphasizes a clean, expressive look with few visible studs.

The parts
This model contains three all-new functional parts: the LPF2 Hub Motor, the BOOST Interactive motor, and the BOOST Color and Distance Sensor.

BOOST LPF2 Hub Motor unit open.

BOOST LPF2 Hub Motor unit assembled.
The BOOST Interactive Motor behaves similarly to other LEGO motors, reminding me of the Power Functions M-Motor. Besides mounting it into Vernie’s chest, we didn’t get a chance to play much with the BOOST Color and Distance Sensor. I certainly hope that other activities and models allow us to use it more meaningfully. It’s worth noting that the cords for these BOOST components do not detach from their respective parts.

I like the bright color palette for this robot. The kit contains a healthy dose of azure, offset with a complementary shade of orange. In addition to the tracks on Vernie, the kit also includes two sets of wheels.
I have one gripe; well, maybe a concern: the cords used for this robot kit are incompatible with the cords used for MINDSTORMS or those used with Power Functions. In the image below, the plug on the left is the cord attached to the BOOST Interactive Motor; the cord in the center comes from the EV3 Mindstorms kit; the cord on the right comes from the Power Functions. I would love to connect my MINDSTORMS sensors or motors to the BOOST LPF2 Hub Motor unit, but that’s just not going to happen.

(Granted, I don’t claim any great understanding of electrical engineering, so I can’t determine whether there are solid technical reasons for using different cords and ports.)
The coding
As I mentioned earlier, the time required to begin interacting with a robot (of sorts) was fantastically short. From unboxing the kit to writing our first program, we spent roughly 10 minutes, including the time to download the firmware. The initial program takes less than a minute to complete. As parents of 7-year-old children can attest, keeping this time short is crucial for the young and easily distracted.
The BOOST App provides a really simple, drag-and-drop interface for creating a program along with a step-by-step tutorial. My daughter had little trouble putting together a simple computer program for the robot to follow. For the scout bot, the BOOST App has three easy programming tutorials. The first tutorial teaches you how to command the robot to move, the second demonstrates how to interact with sensors and events, and the third shows how to execute multiple actions at once (for example, moving and spinning the propeller at the same time). The terrain map comes in really handy for these steps, providing a flat surface for the robot to move along.

When running the program, the BOOST App plays sounds clips of the robot (I guess?) whooping and vocalizing. I thought it was a bit over the top, but my daughter enjoyed it. Also, when moving, the robot has an automatic easing feature whereby each distinct movement block in the program includes an acceleration, movement, and a gradual deceleration. This makes contiguous blocks of movement seem jerky, as each movement block comes to a complete stop before the robot executes the next movement block.
Another note: the LPF2 Hub Motor brick doesn’t seem to turn off when you hit the power button. We had to wait for its automatic shut-off timer for the brick to turn off. That doesn’t bode well for battery life…
Although very pretty, the BOOST App itself does not provide meaningful help or tips about the programming blocks. For example, after assembling Vernie’s head to the torso, the IDE (Integrated Development Environment) led us through one of several wordless tutorials. The tutorial had us place into the program a purple block with an icon shaped like a hand. I have no idea what it does, except that Vernie shakes his head a little bit when executing the block.
(Sadly, LEGO’s online documentation didn’t help much either.)

Once we had installed the rear stabilizer bar on Vernie (bag 7), we programmed him to maneuver through a small obstacle course on the playmat. The program runs smoothly, with the exception that Vernie ran off the left side of the playmat 75% of the time. We adjusted some of the settings in the program until we consistently hugged the left corner. The robot stayed very stable throughout multiple runs of the program; clearly the stabilizer bar does the trick.

After finishing the model, we then completed another coding tutorial, where we learned how to trigger an event in the program by shaking Vernie’s hand. We also learned the purpose of the mysterious purple block with hand icon: that block plays a pre-recorded audio clip of the robot, determined by the number specified by the programmer.

Although we didn’t get a chance to use these blocks in the coding tutorials that we worked on, the online documentation shows that the BOOST App does include blocks for more advanced programming concepts like flow of control and variables.
Conclusions & recommendation
As mentioned earlier, LEGO has indicated in their marketing materials and product packaging that they intend BOOST for a younger audience than their other robotics offering, the EV3 MINDSTORMS. Overall, I found the BOOST set and app to be very appropriate for a younger audience. My daughter enjoyed the coding tutorials, having no trouble with them at all. She built the Vernie model with little trouble, needing my help only a couple of times.
Even though designed for different age groups, the BOOST Creative Kit invites comparison with the EV3 Mindstorms kit. Of course, there are some surface differences. The EV3 MINDSTORMS kit came with a physical instructions set for the starter robot, TRACK3R; the BOOST Creative Toolbox doesn’t come with instructions. The MINDSTORMS EV3 kit has stickers; BOOST only has printed bricks. We had a functional robot within 10 minutes of opening the BOOST box; building and coding a functional robot takes much longer with MINDSTORMS EV3.
There are more differences between the two kits at a functional level. Of course, since MINDSTORMS EV3 targets an older age group, the LEGO MINDSTORMS EV3 Home Edition software has more sophisticated features than the BOOST App, including more configuration options for individual command blocks. Unlike the LEGO MINDSTORMS EV3 Home Edition, LEGO does not offer a desktop version of their BOOST App. You must use a relatively up-to-date mobile device to program BOOST. From our experience with BOOST, it’s not clear whether we can create our own model for which we then write our own code (unlike the MINDSTORMS EV3, which has an unlimited potential for both building and coding). The BOOST LPF2 Hub Motor provides easy locomotion and control for a model in one part, whereas the MINDSTORMS EV3 models typically use two bulky EV3 Large motors to get around in addition to the EV3 Complete Brick for the brains.
I believe that the incompatibility between the BOOST and EV3 MINDSTORMS motors and sensors is a major shortcoming for this set. I can foresee children learning how to code using BOOST and graduating up to MINDSTORMS EV3 (or future versions) as they got older and more experienced. Ideally, as children make that transition they could use their BOOST components with the MINDSTORMS EV3 Complete Brick. As the BOOST components stand now, though, that’s simply not likely.
All that aside, the BOOST Creative Toolbox offers an excellent opportunity to introduce children to engineering and computer programming. LEGO’s multiple distinct models for this kit provides many hours of learning and entertainment for children. (My daughter has made it clear that she wants to build Guitar 4000 next.)
Beyond that, I think that adults might enjoy BOOST as well. The Vernie model has several interesting building techniques, specifically with the head and torso. For adults curious about learning how to code, the BOOST App provides an engaging introduction to some of the core concepts of computer programming. As the BOOST kit reaches greater adoption, I imagine that more third-party libraries will become available for more hardcore developers to connect to the LPF2 Hub Motor.
The BOOST App is available on both the App Store and the Google Play Store.
Читайте также: